The Manager, step by step.
Each article explains the flow in steps and shows the Manager screens on the computer. Personal data is blurred.
Login and Dashboard
Sign in to the Manager in your browser and follow the open cashier's sales on the Dashboard.
How to
- Open the Manager and fill in E-mail and Senha (password). The eye icon shows the password; tick Lembrar e-mail to keep the email.
- Click LOGIN. Forgot your password? Use Recuperar a Senha. No account yet? INSCREVA-SE. Need help? SUPORTE opens WhatsApp.
- The Dashboard shows the cashier movement, payments by method and the open and closed commands.
- To end the day, click Fechar caixa (close cashier) and confirm.
Screens
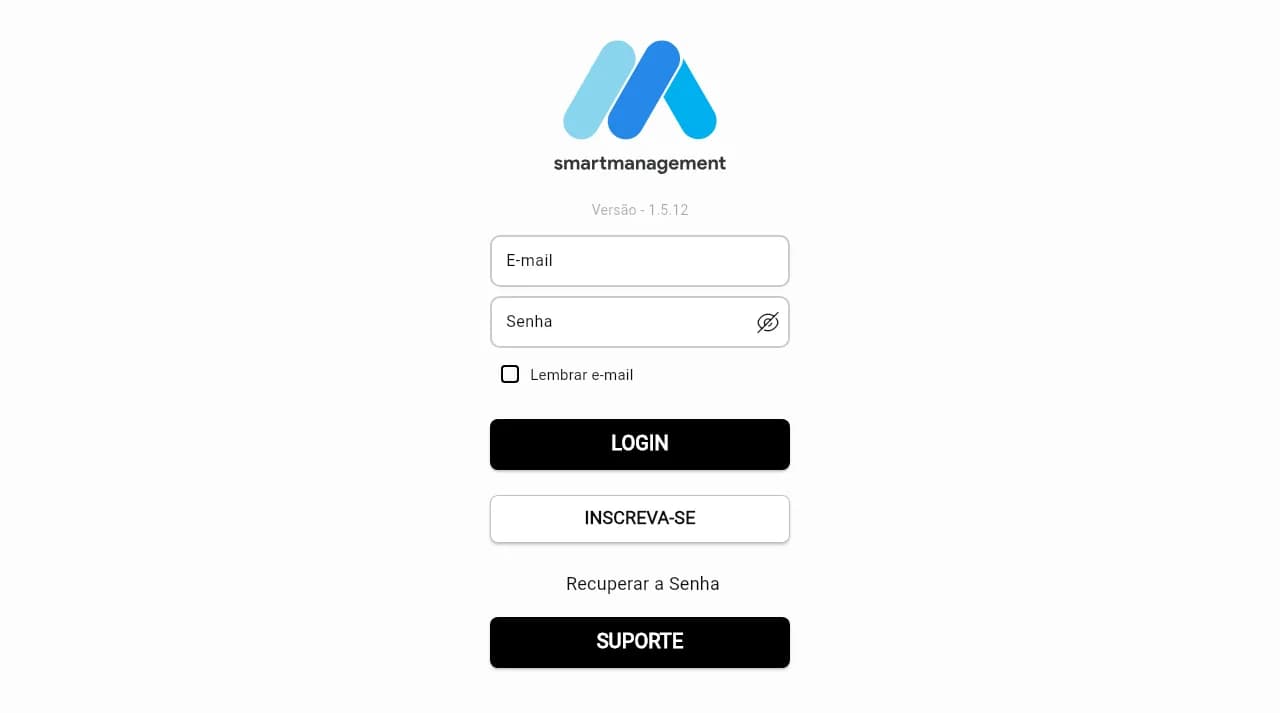
Step 1Manager login: E-mail, Senha, Lembrar e-mail, LOGIN, INSCREVA-SE, Recuperar a Senha and SUPORTE. 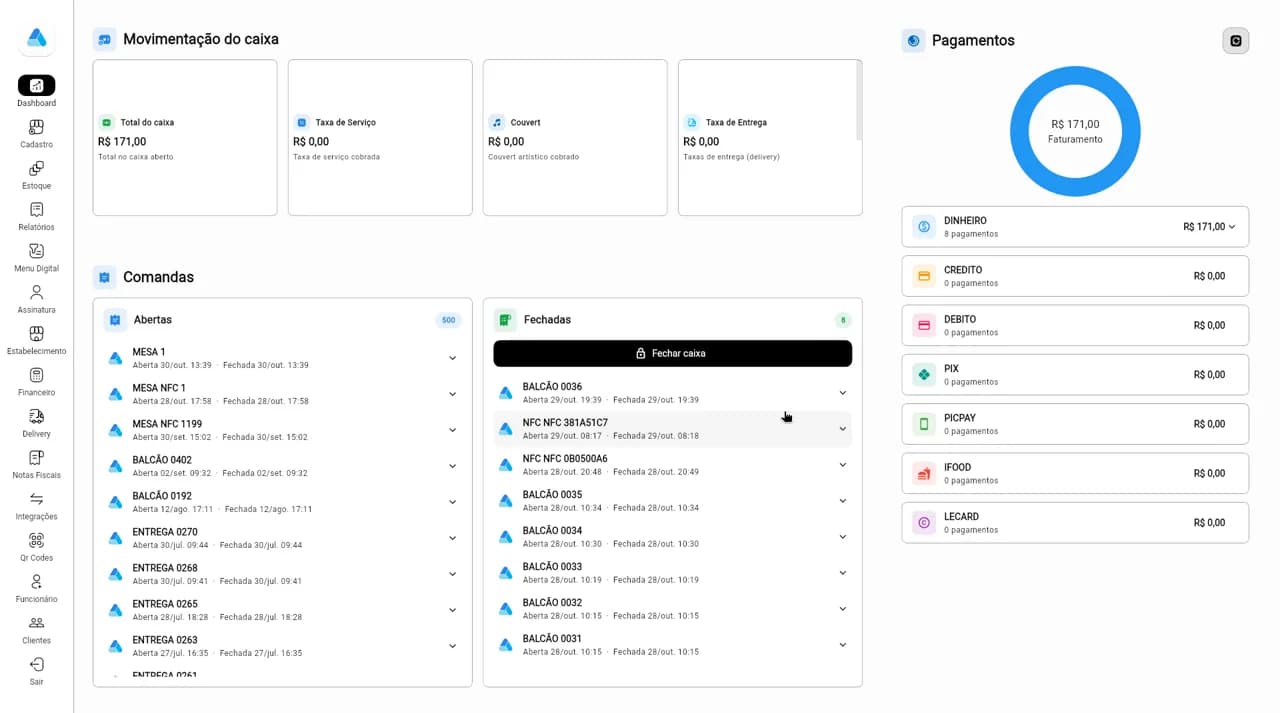
Step 2Dashboard: cashier movement, open and closed commands, Fechar caixa and payments by method.

Products
In Cadastro > Produto you create and edit the menu that goes to the card machine and to the Digital Menu.
How to
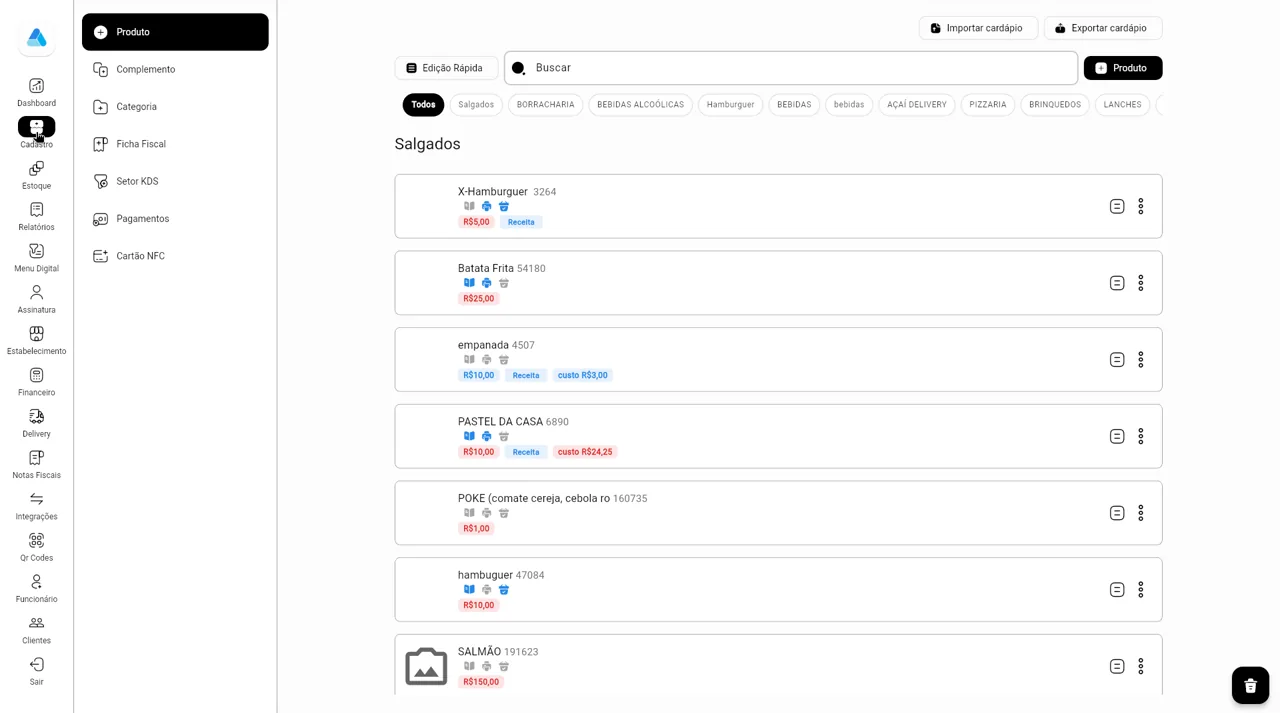
- In the side menu, open Cadastro. The Produto tab lists products by category; use Buscar (search) or the category chips.
- Click Produto to create a new one, or click a product card to edit it.
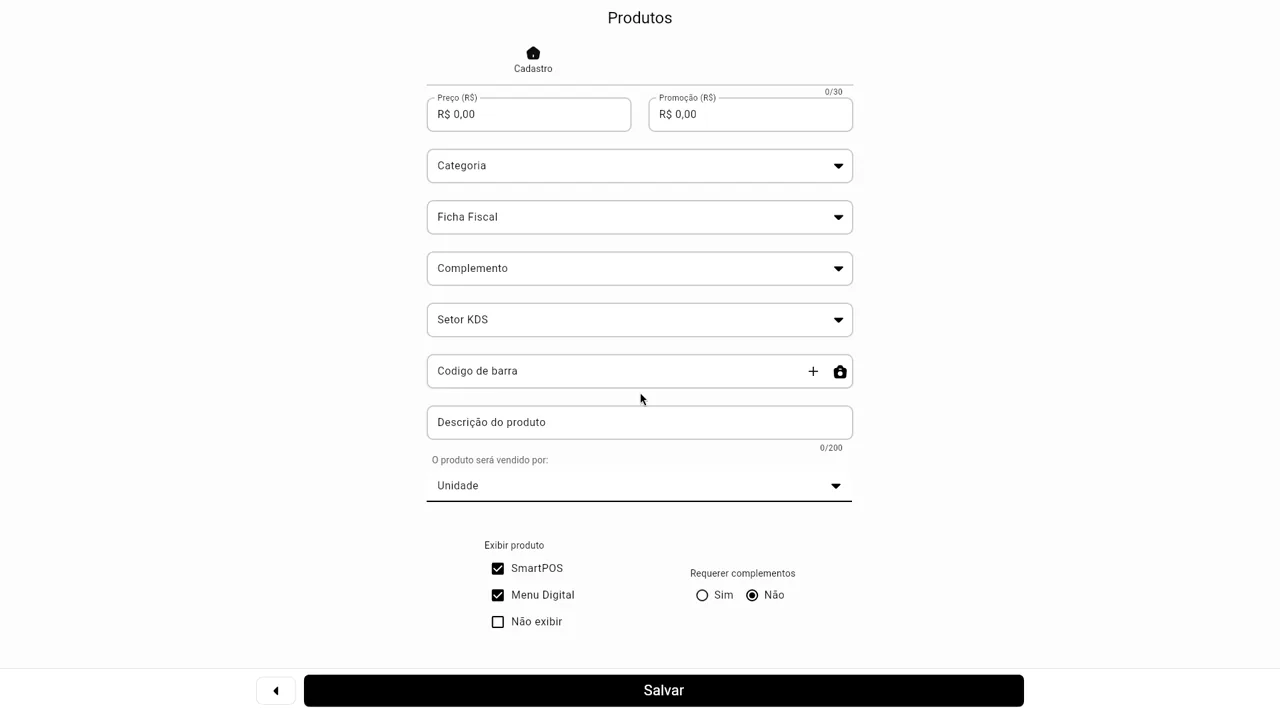
- Fill in name, price (and promotional price, if any), category, tax profile, add-ons, KDS sector, barcode and description.
- Choose how the product is sold and where it shows: SmartPOS, Menu Digital or Não exibir (hidden). Requerer complementos = Sim makes the add-on choice required.
- Click Salvar (save). Edição Rápida opens a table to change many products at once; Importar/Exportar cardápio use a spreadsheet.
Screens
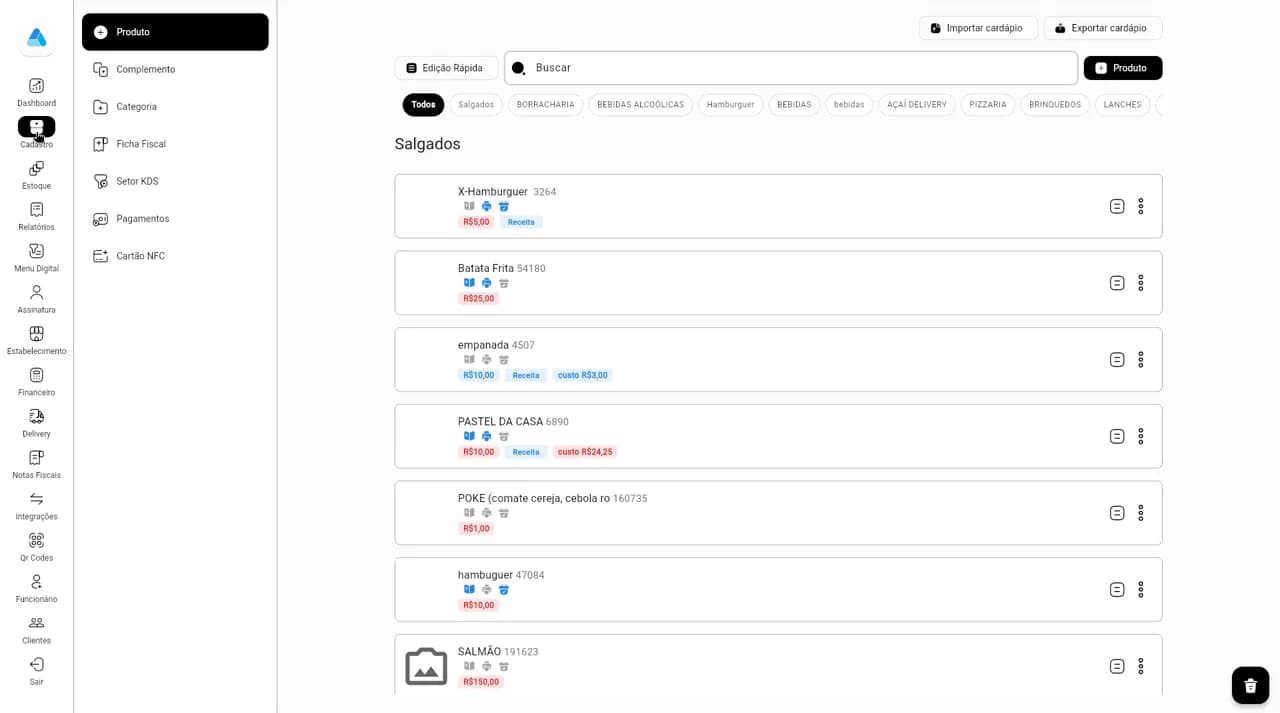
Step 1Cadastro > Produto: search, categories, Edição Rápida, Importar/Exportar cardápio and the Produto button. 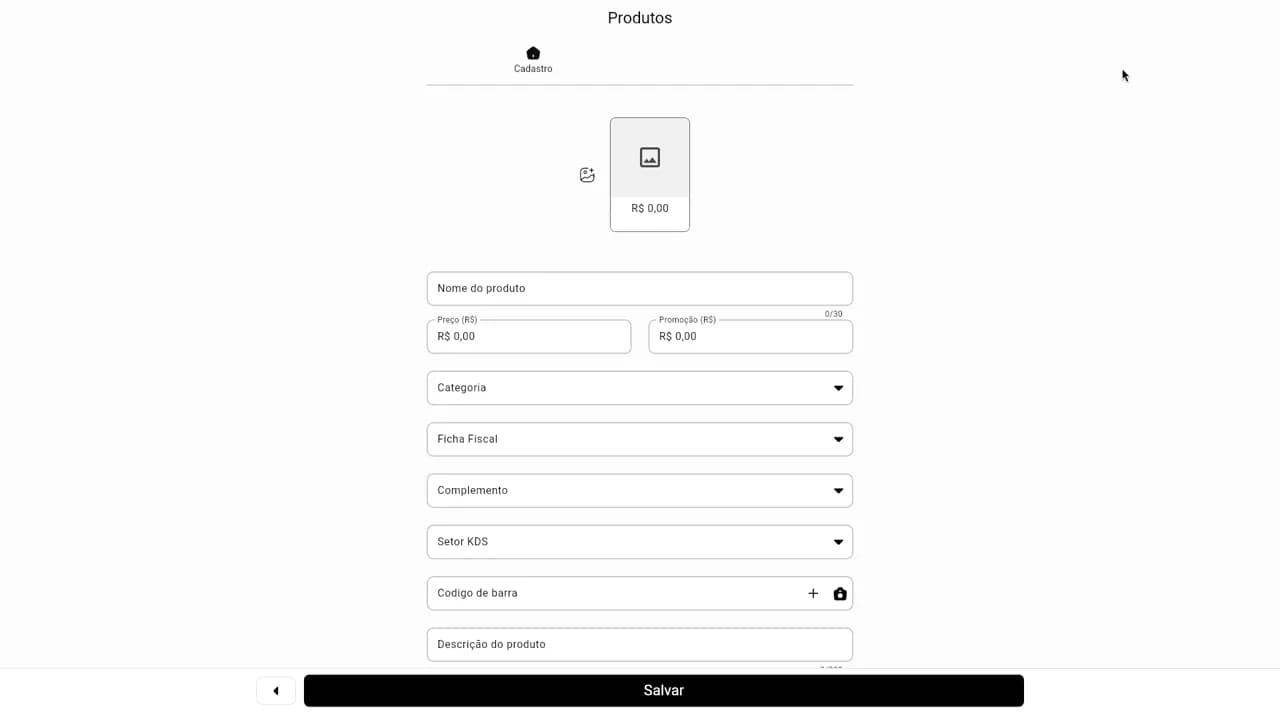
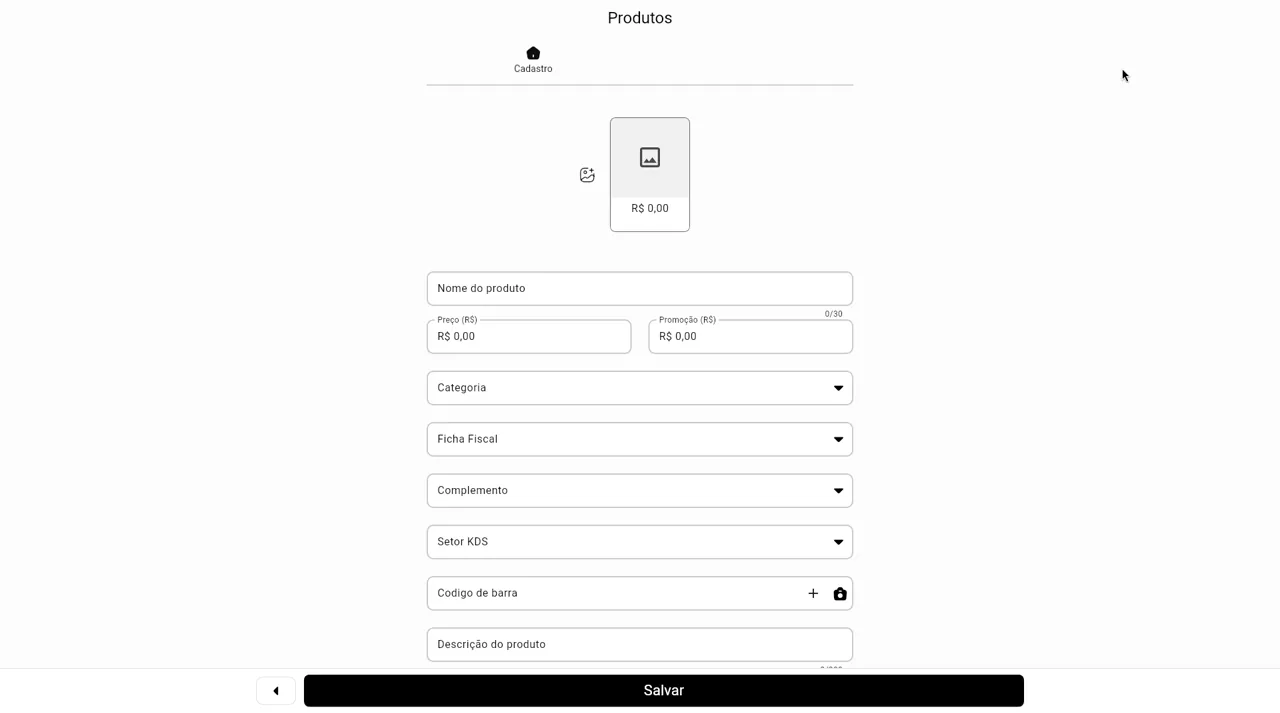
Step 2New product: image, name, price, promo price, category, tax profile, add-on, KDS sector and barcode. 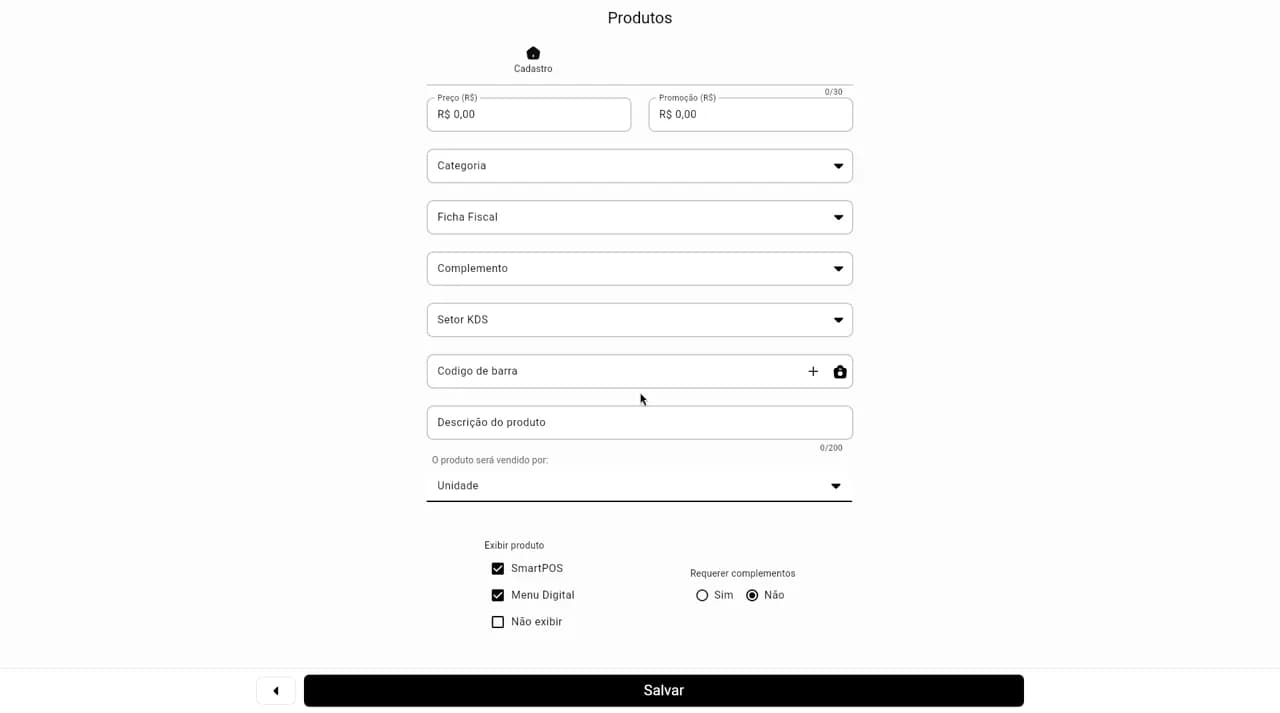
Step 3End of the form: sold by unit, Exibir produto (SmartPOS, Menu Digital, Não exibir), Requerer complementos and Salvar.
Add-ons
Add-on groups are the product choices, such as doneness, size or extras.
How to
- In Cadastro, open the Complemento tab and click Complemento to create a group.
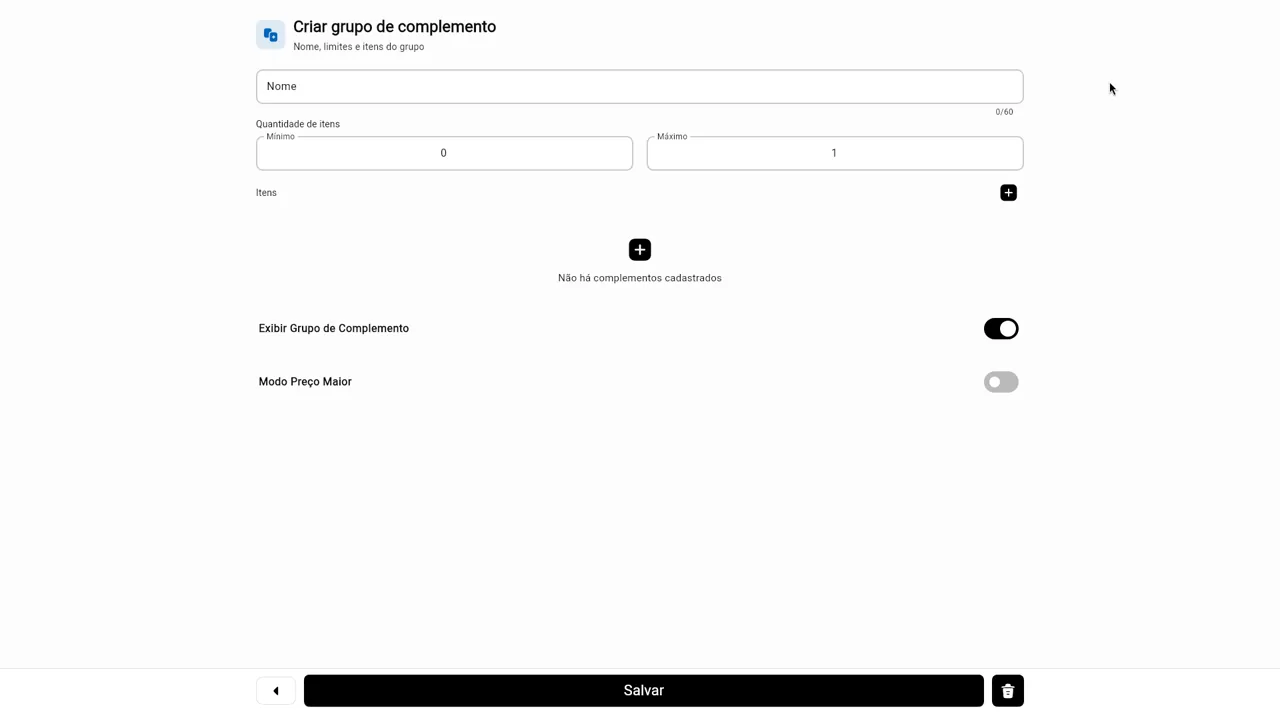
- Name the group and set the minimum and maximum number of items the customer can pick.
- Click + to add the group's items, each with its price.
- Exibir Grupo de Complemento keeps the group visible. With Modo Preço Maior on, the card machine charges the most expensive add-on chosen. Click Salvar.
- Then link the group to the product in the product form's Complemento field.
Screens
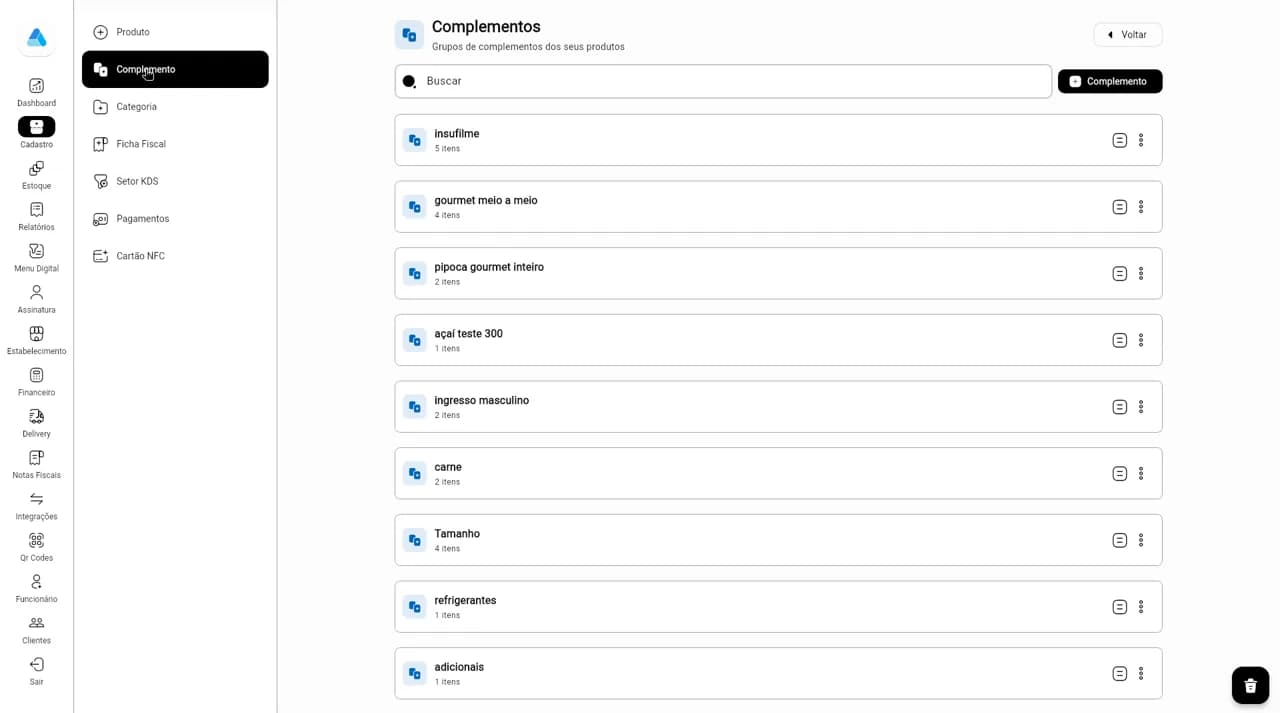
Step 1List of add-on groups, with the number of items in each. 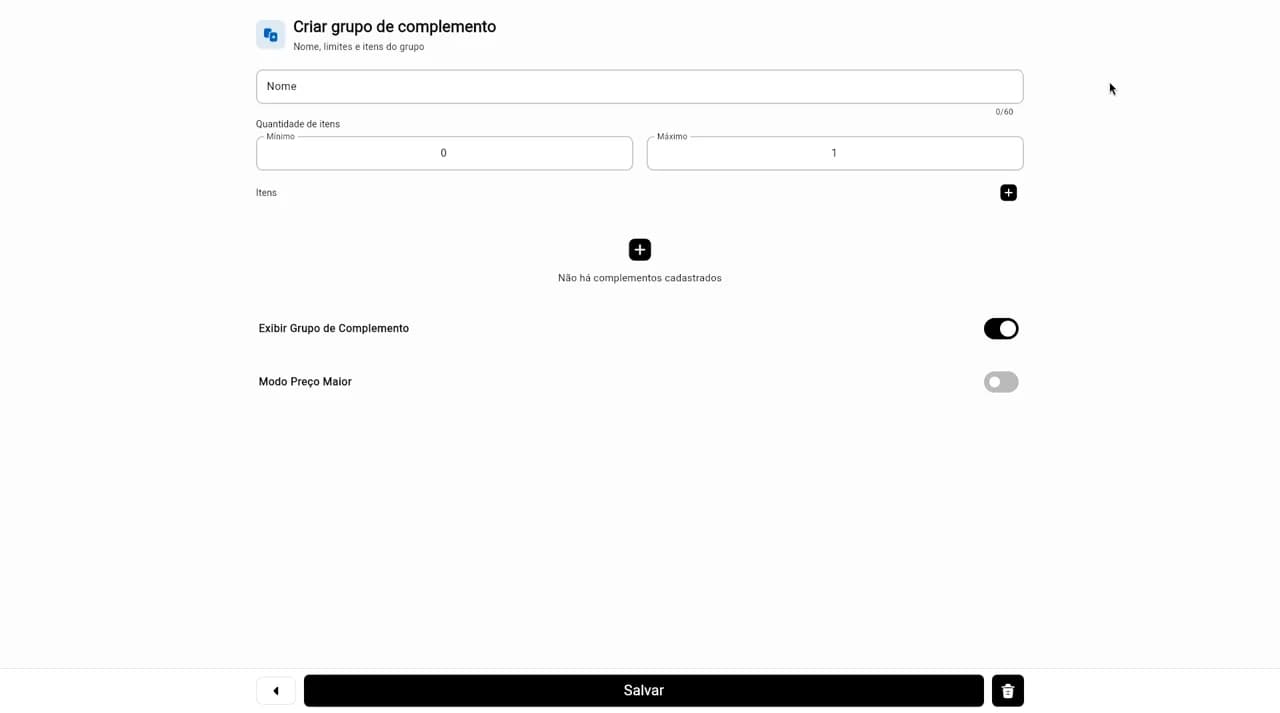
Step 2Create add-on group: name, minimum and maximum, items, Exibir Grupo de Complemento and Modo Preço Maior.
Categories
Categories organize the menu into sections on the card machine and the Digital Menu.
How to
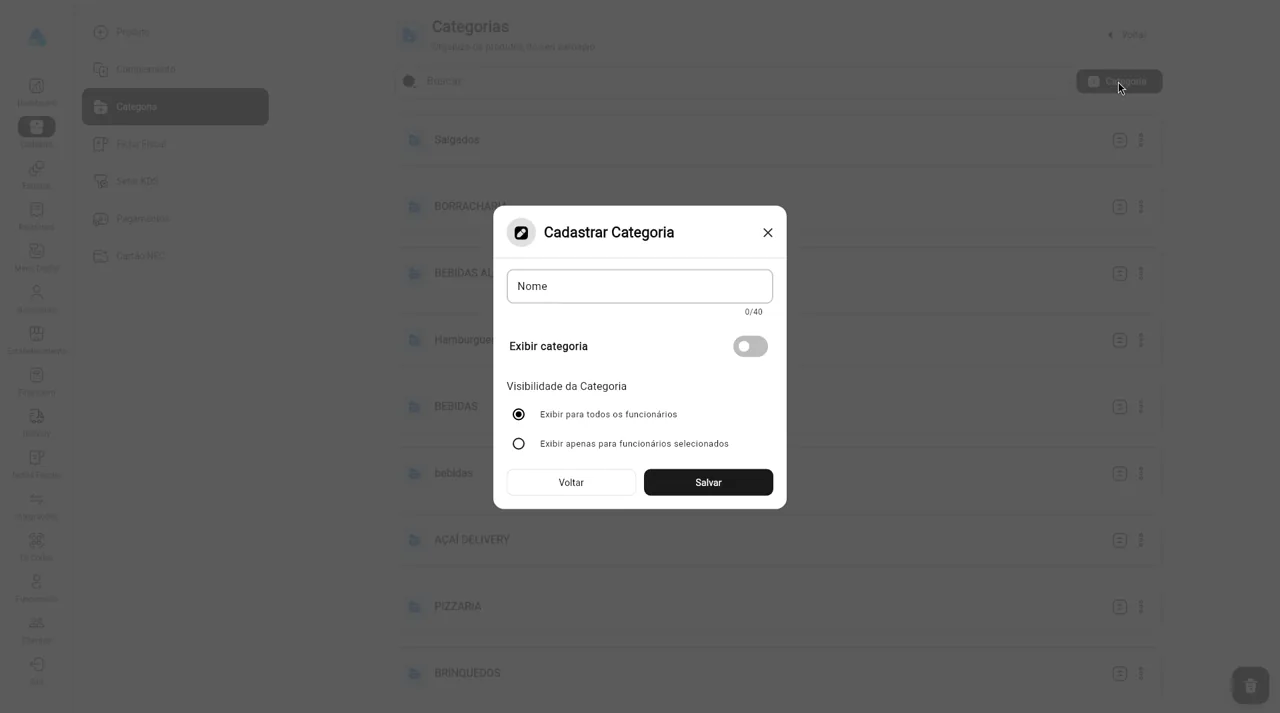
- In Cadastro, open the Categoria tab and click Categoria.
- In the Cadastrar Categoria dialog, type the name and turn on Exibir categoria so it shows on sales.
- Choose visibility: all employees or only selected employees. Click Salvar.
Screens
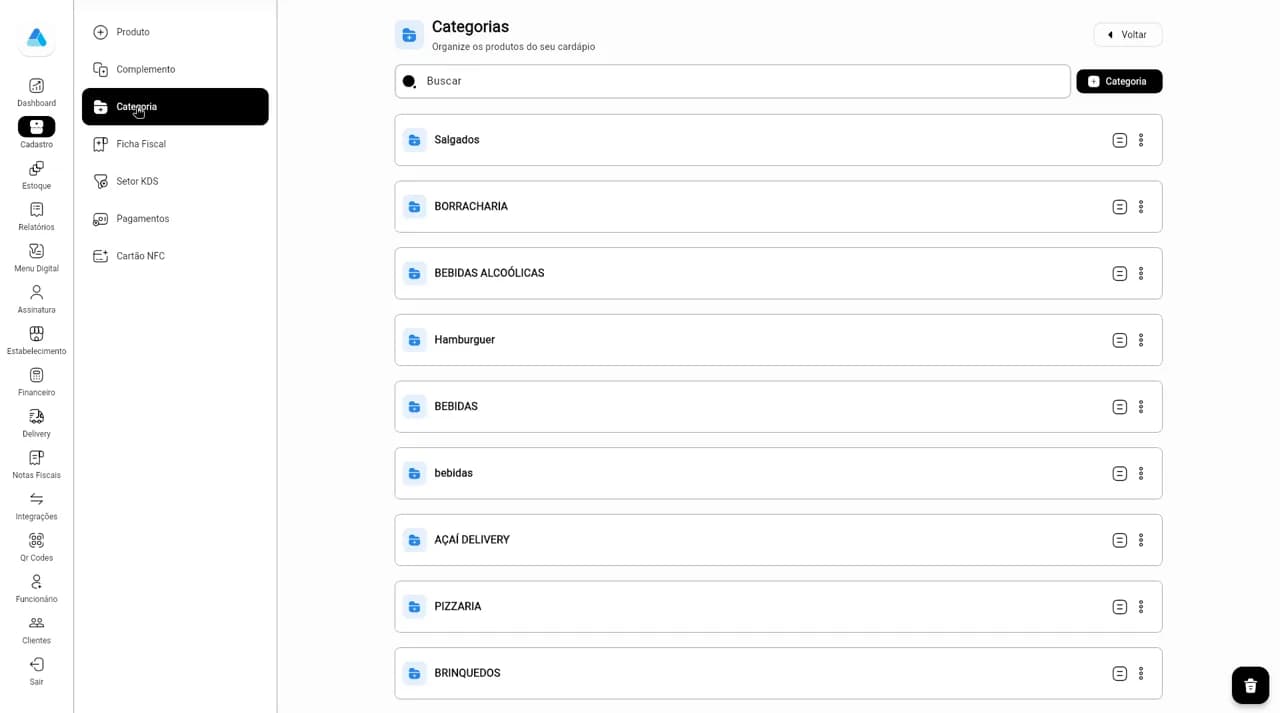
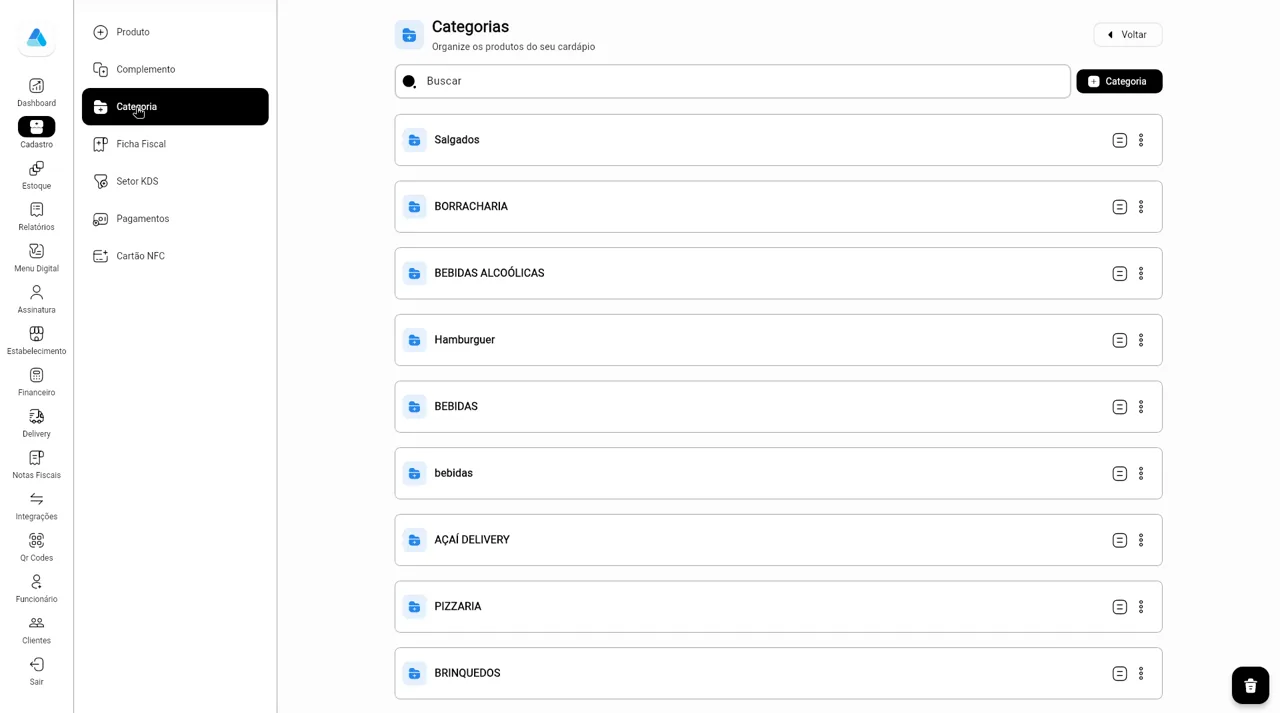
Step 1List of menu categories. 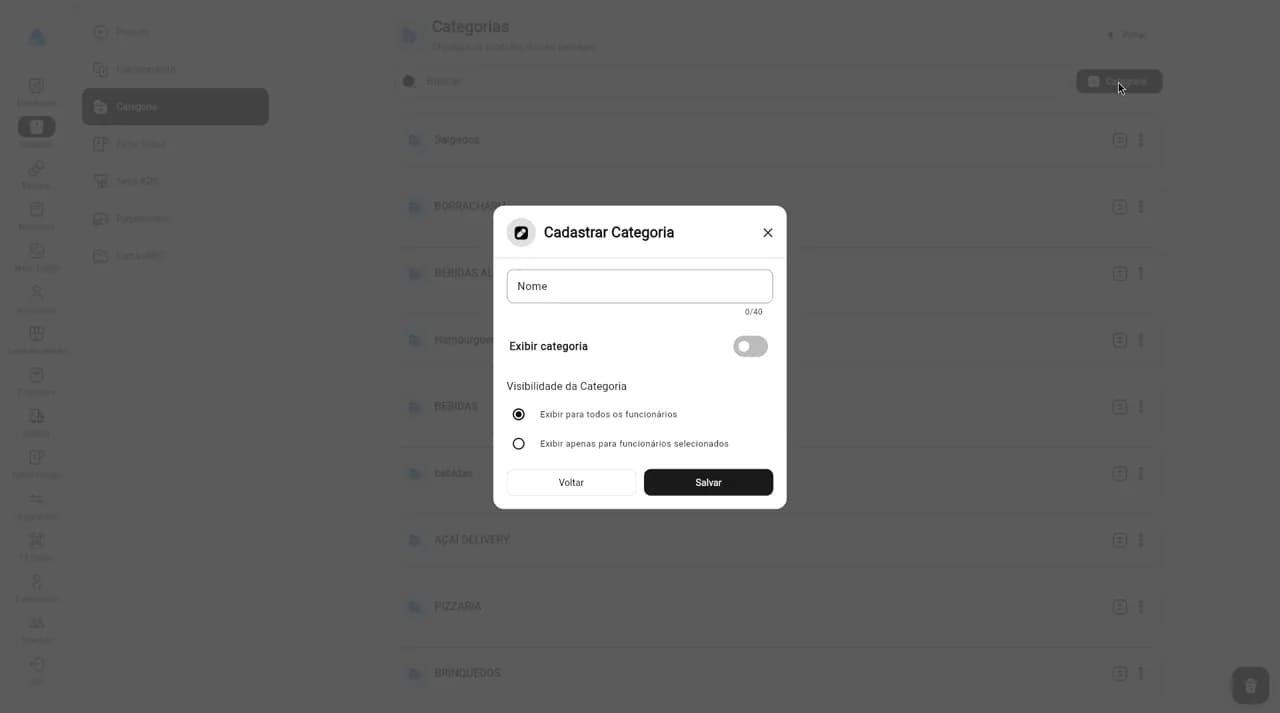
Step 2Cadastrar Categoria: name, Exibir categoria and category visibility.
Tax profiles
A tax profile holds the tax data used on each product's invoice.
How to
- In Cadastro, open the Ficha Fiscal tab and click Adicionar (add).
- Fill in the NFe and NFse tabs (and IBS/CBS) with your accountant's guidance and save.
- In the product form, pick the profile in the Ficha Fiscal field.
Screens
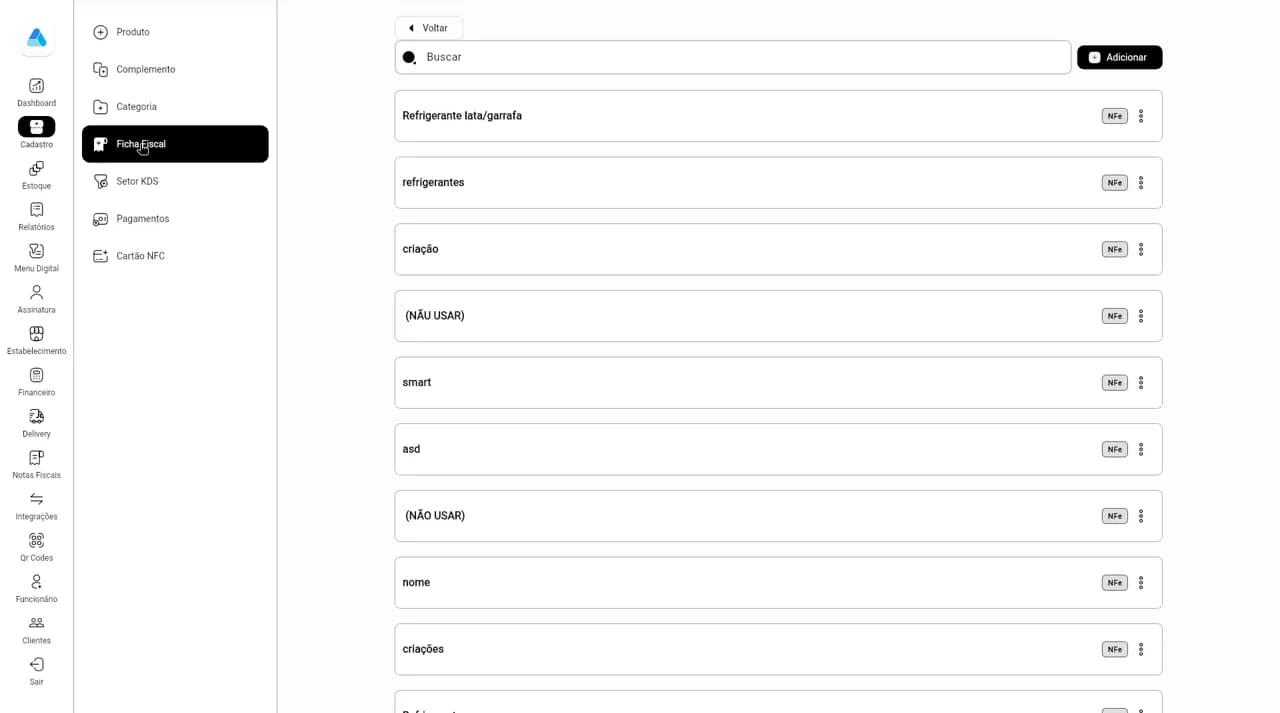
Step 1Saved tax profiles, with each one's invoice type.
KDS sectors
KDS sectors are the prep areas (kitchen, bar...) orders are sent to.
How to
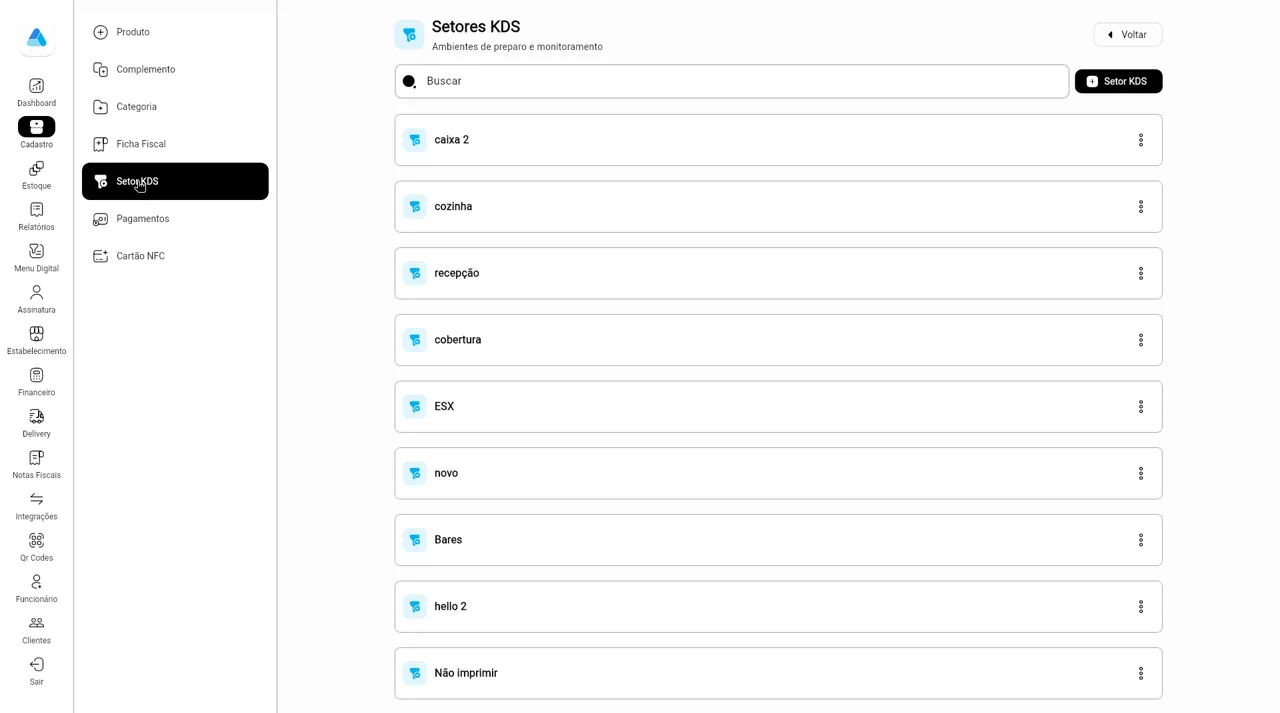
- In Cadastro, open the Setor KDS tab and click Setor KDS.
- Name the sector in the Adicionar setor KDS dialog and save. To change it, use Editar Setor KDS.
- On the product, choose the sector in the Setor KDS field.
Screens
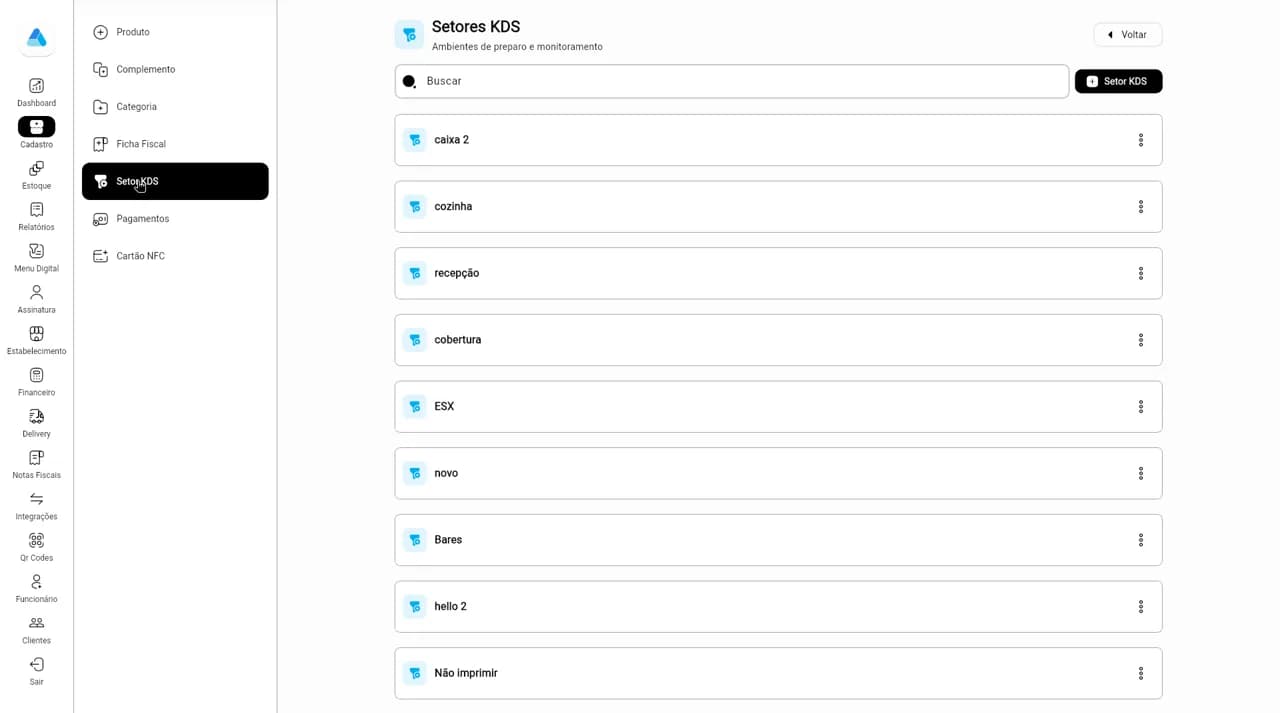
Step 1KDS sectors: prep and monitoring areas.
Extra payment methods
Add payment methods accepted outside the SmartPag system, such as a voucher or a delivery app.
How to
- In Cadastro, open the Pagamentos tab and click Pagamento (Criar Método de Pagamento).
- Pick the options: Exibir pagamento (show), Pedir senha (ask password) and Exibir relatórios (show in reports). Save.
Screens
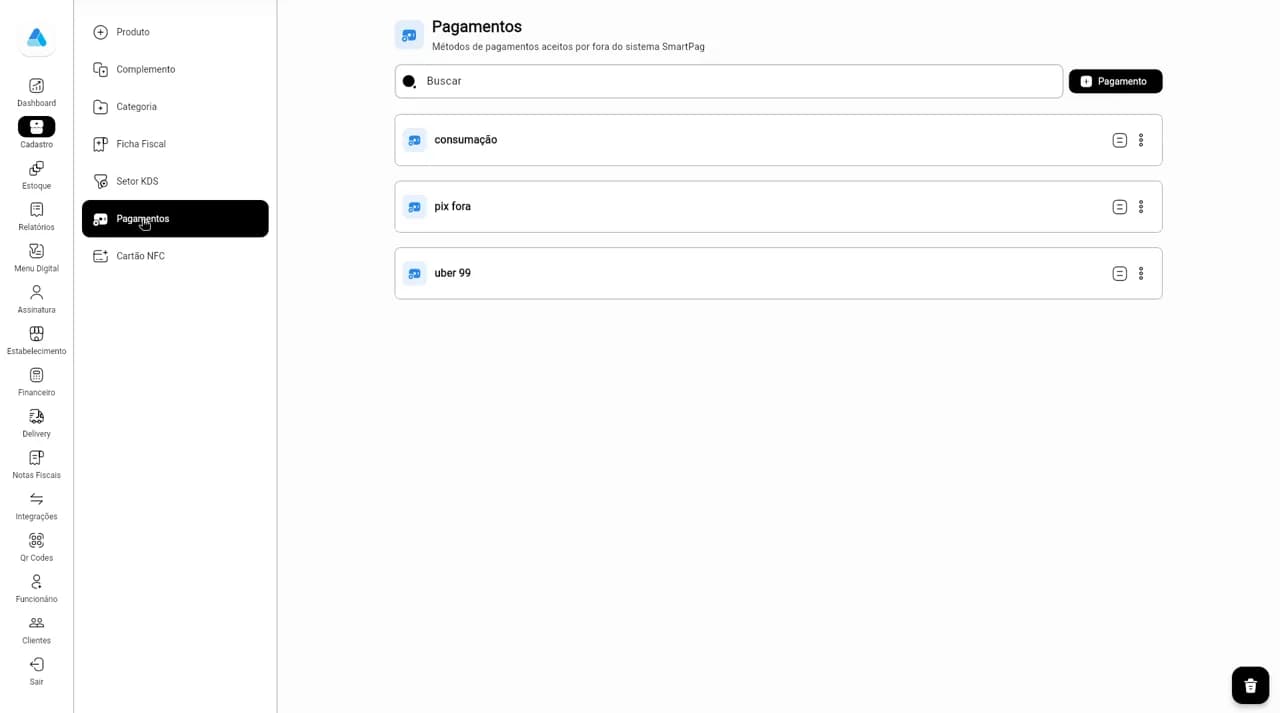
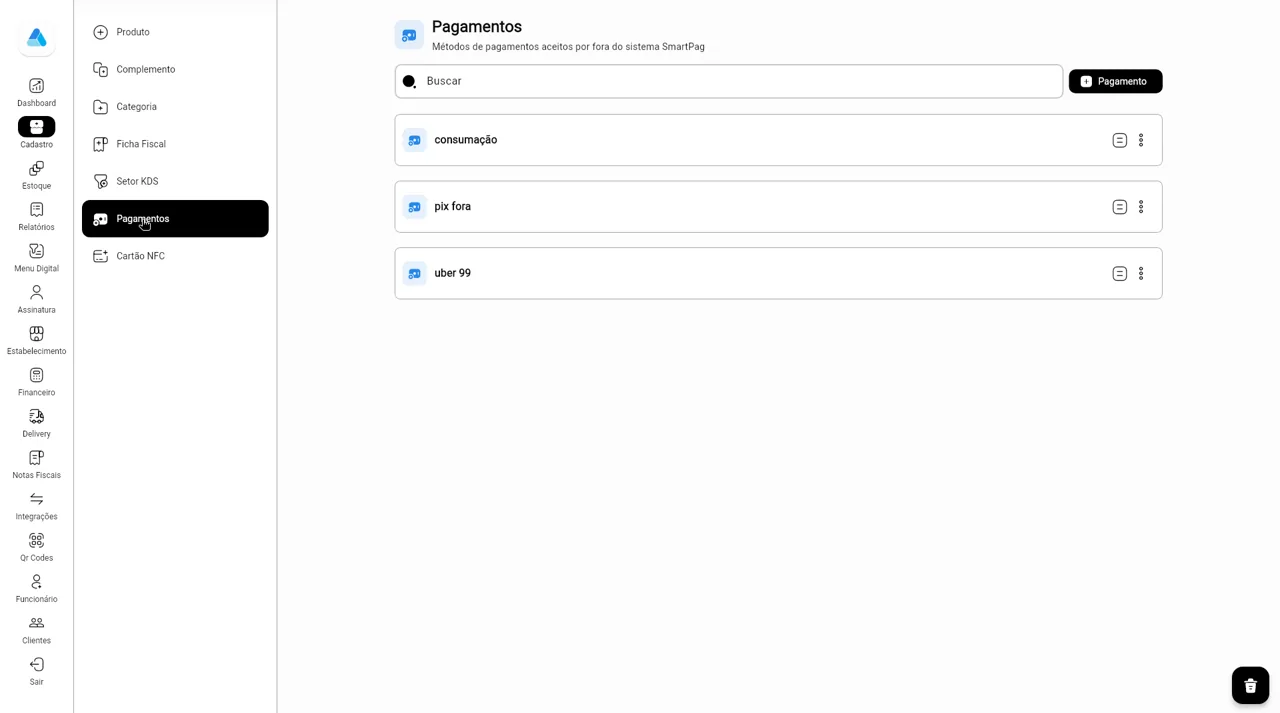
Step 1Pagamentos: methods accepted outside the SmartPag system.
NFC card (cashless)
NFC cards are the post-paid cashless cards used on the card machine.
How to
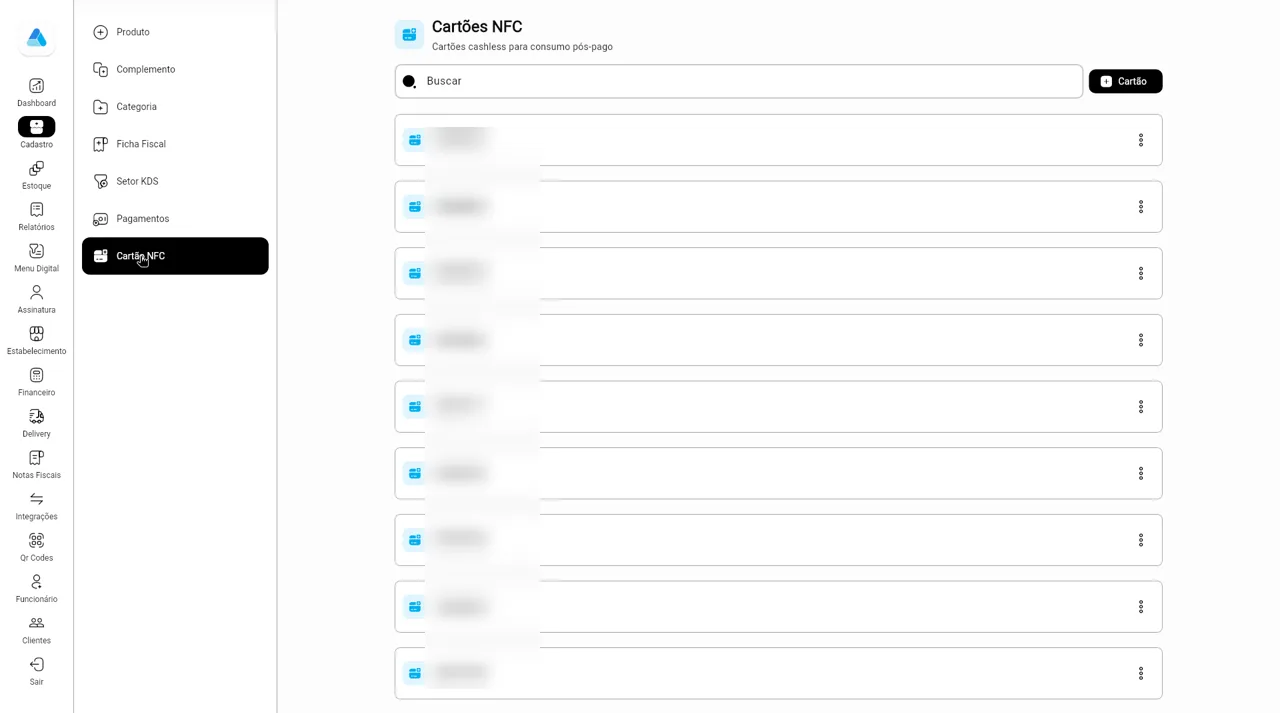
- In Cadastro, open the Cartão NFC tab and click Cartão.
- Type the card code or read it with the camera, then save.
- To retire a card, deactivate it from the three-dot menu and confirm in Confirmar Desativação.
Screens
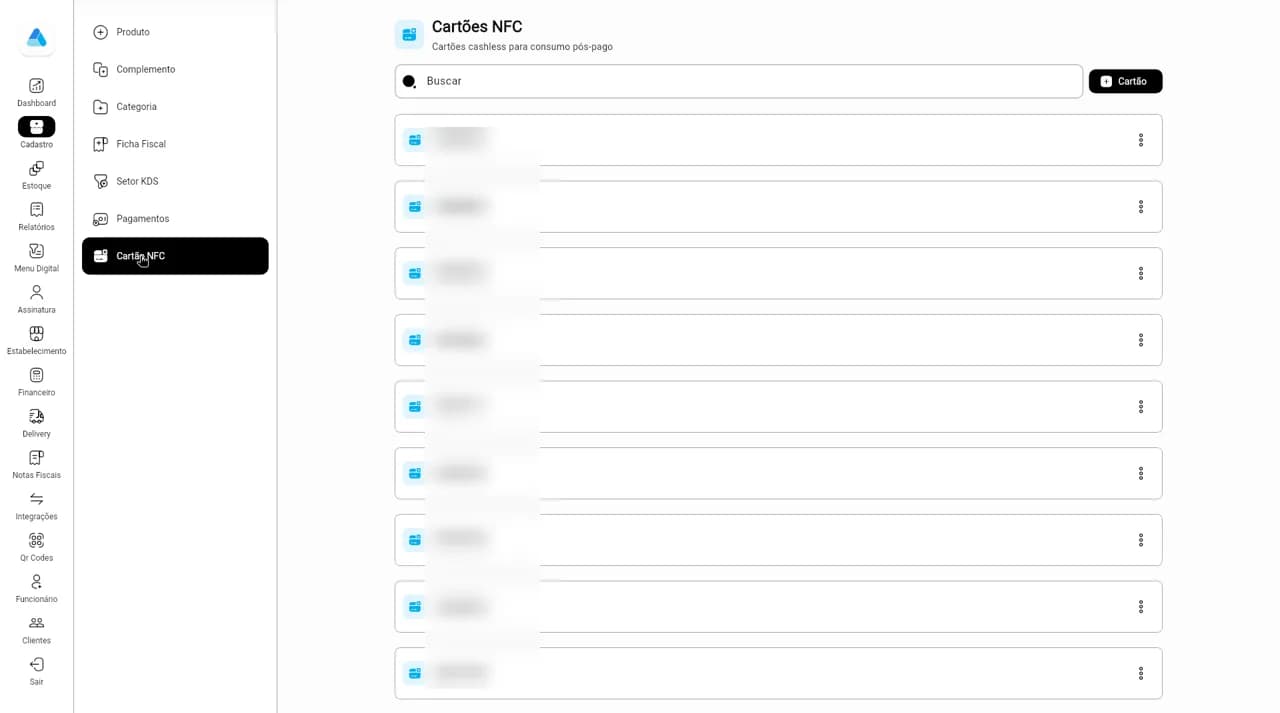
Step 1Saved NFC cards (codes blurred).
Inventory
Manage supplies, incoming invoices, production and the minimum-stock shopping list.
How to
- In the side menu, open Estoque. The Estoque tab lists items and recipes; filter by Insumo, Estoque, Receita/Auto or Sem estoque.
- Click Insumo or Estoque to add an item. Salvar saves and goes back to the list.
- In Notas, click Nota to record incoming goods, with bills marked A pagar (to pay) or Pago (paid).
- In Produção, click Produção to record a batch: stock used and supplies produced.
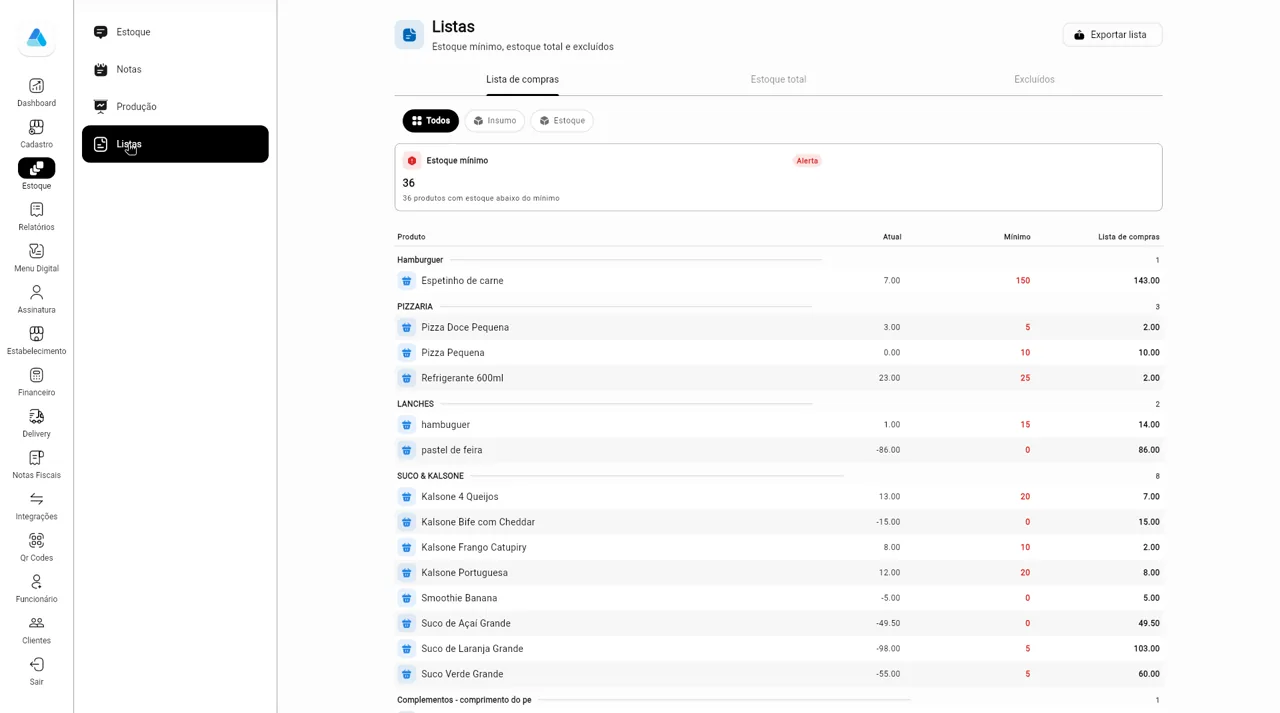
- In Listas, see the shopping list (minimum stock), total stock and deleted items, and use Exportar lista.
Screens
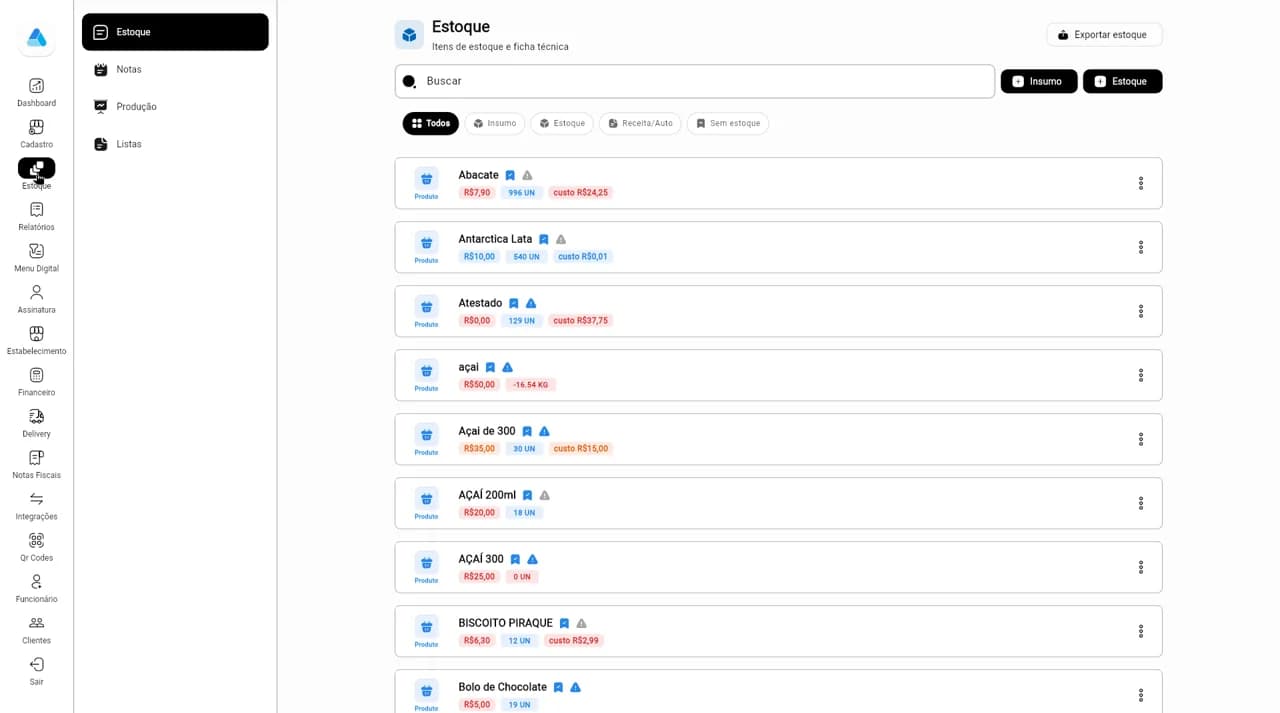
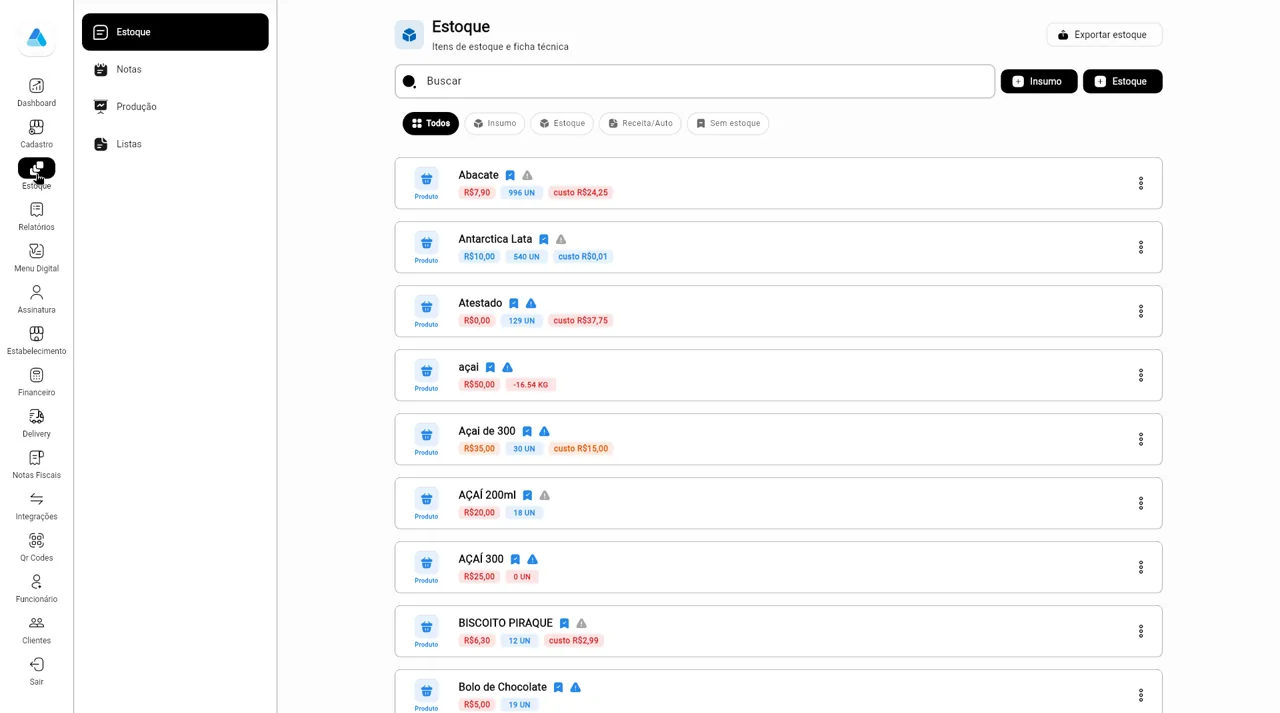
Step 1Estoque: items with price, quantity and cost, filters, Insumo, Estoque and Exportar estoque. 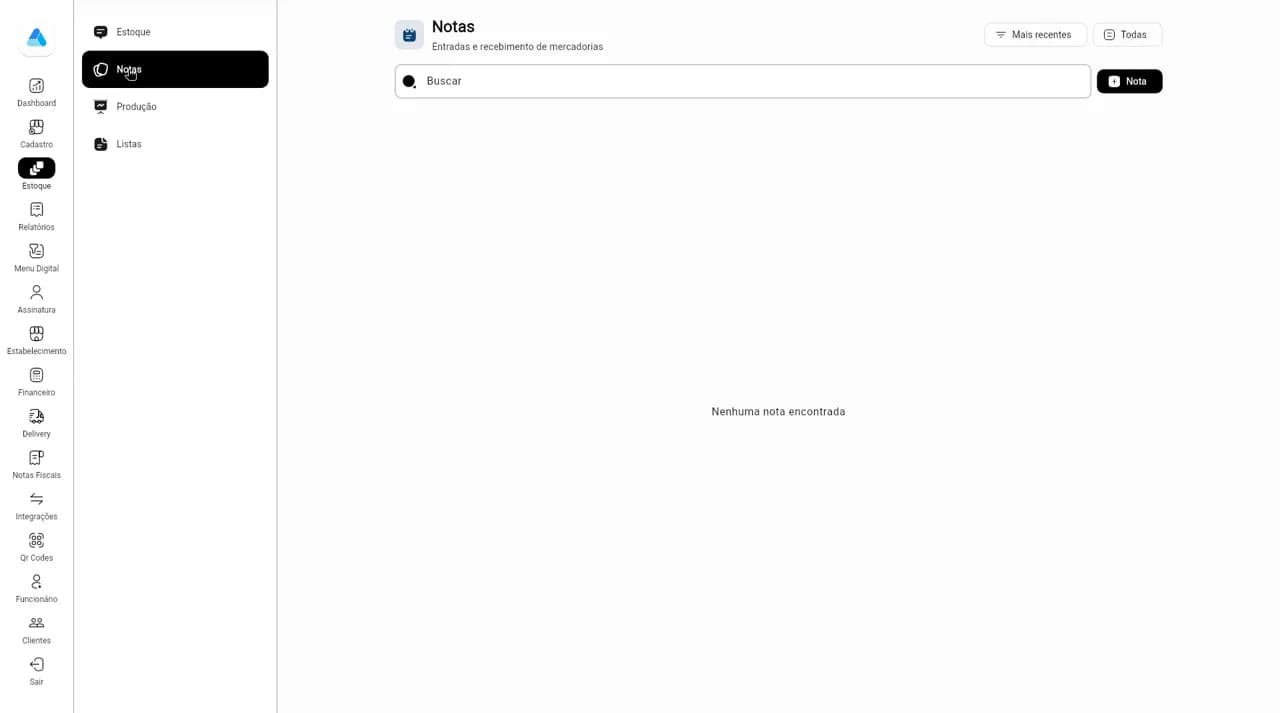
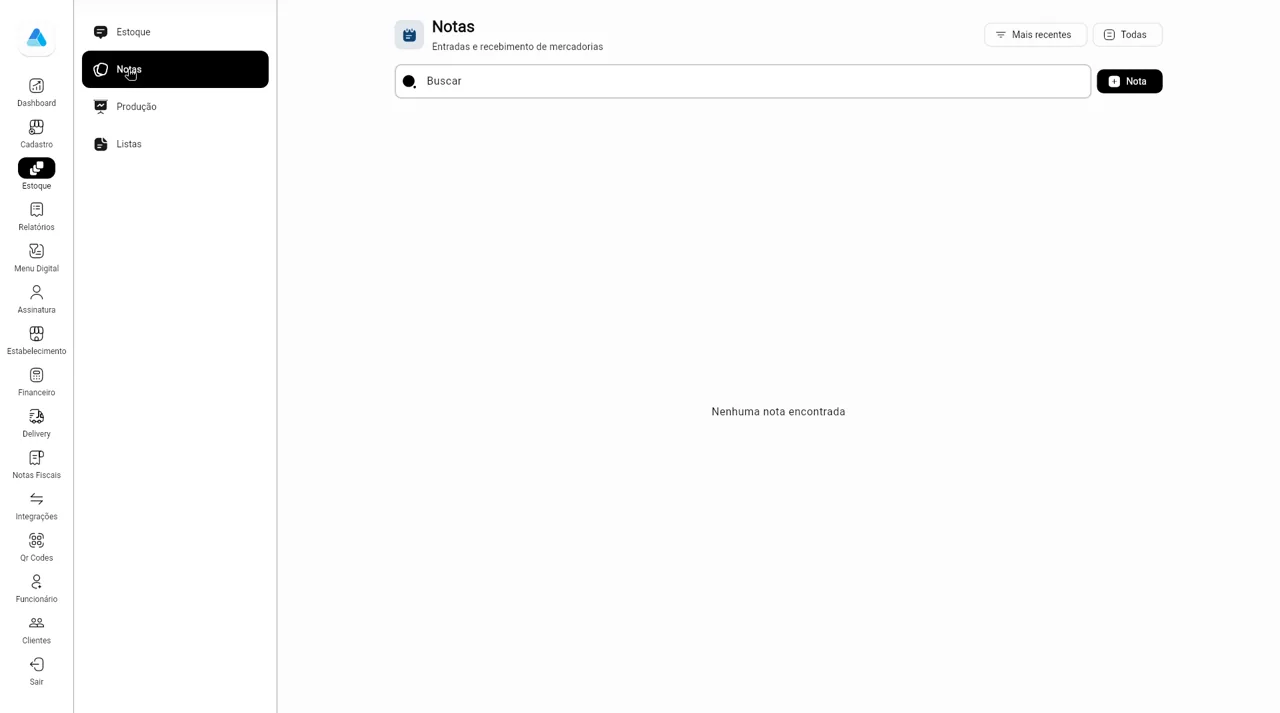
Step 2Notas: incoming goods and receipts, with the Nota button. 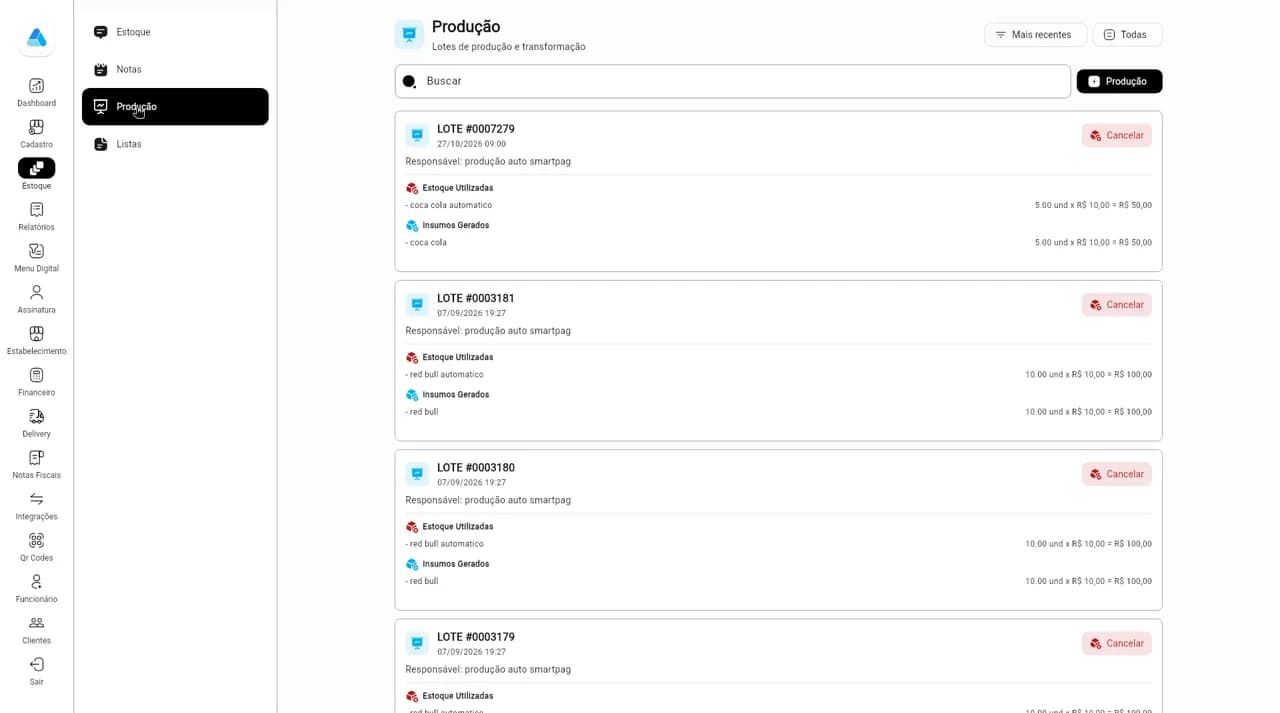
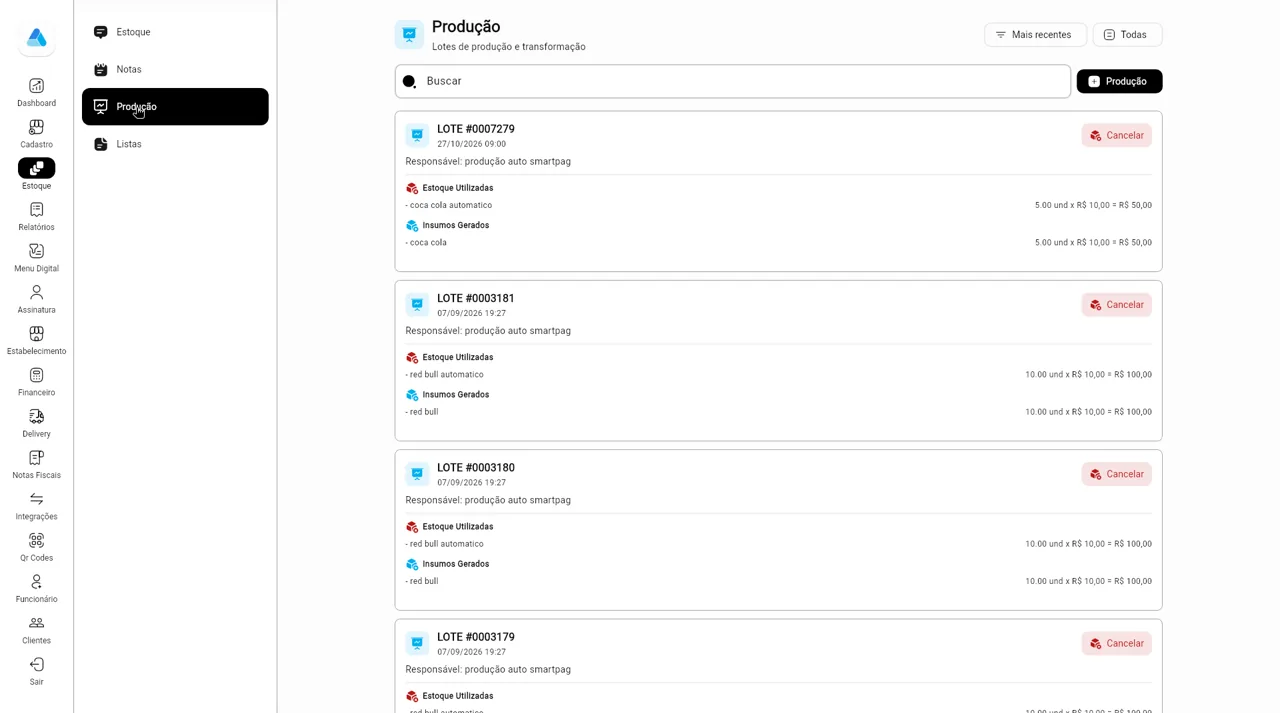
Step 3Produção: batches with stock used, supplies produced and Cancelar. 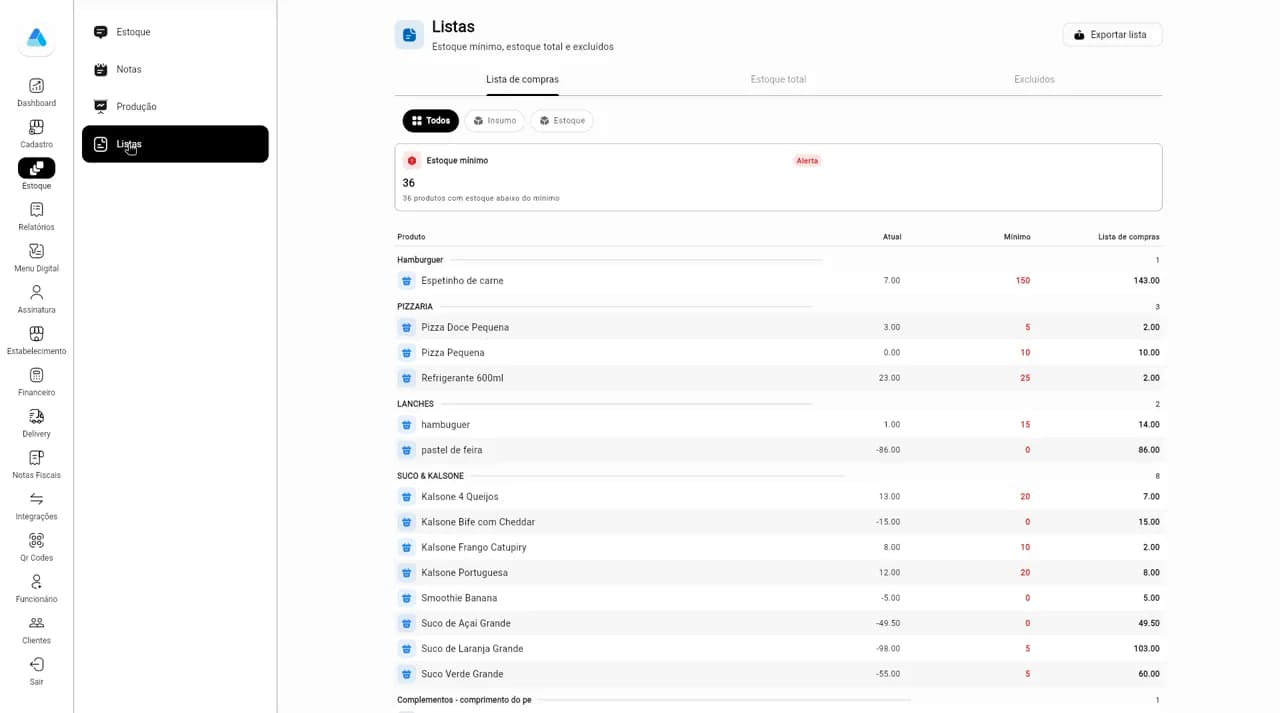
Step 4Listas: shopping list with current stock, minimum and how much to buy.
Reports
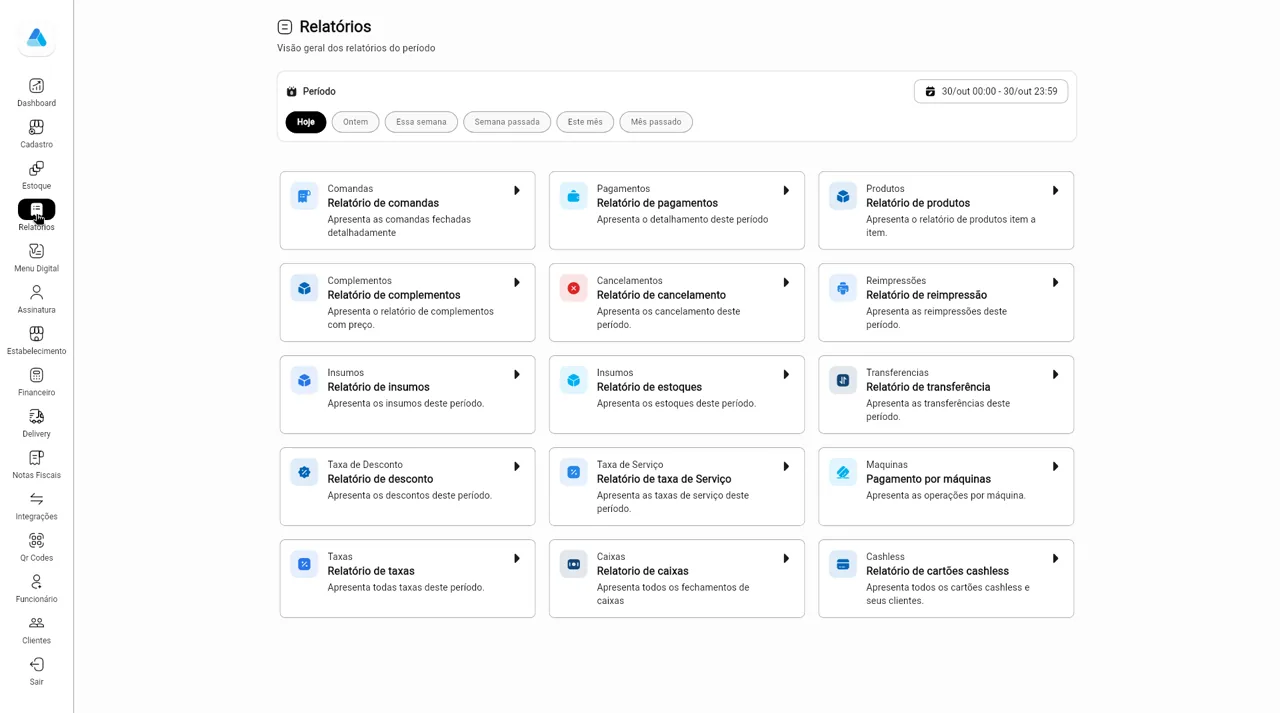
Pick the period and open the report you need: commands, payments, products, cashiers and more.
How to
- In the side menu, open Relatórios.
- Pick the period: Hoje, Ontem, Essa semana, Semana passada, Este mês, Mês passado, or click the date to change it and Salvar.
- Click the report card. In Comandas, DETALHAR shows the command's payments; in Caixas, Ver mais shows more closings.
- Most reports export to Excel on your computer. Voltar returns to the overview.
Screens
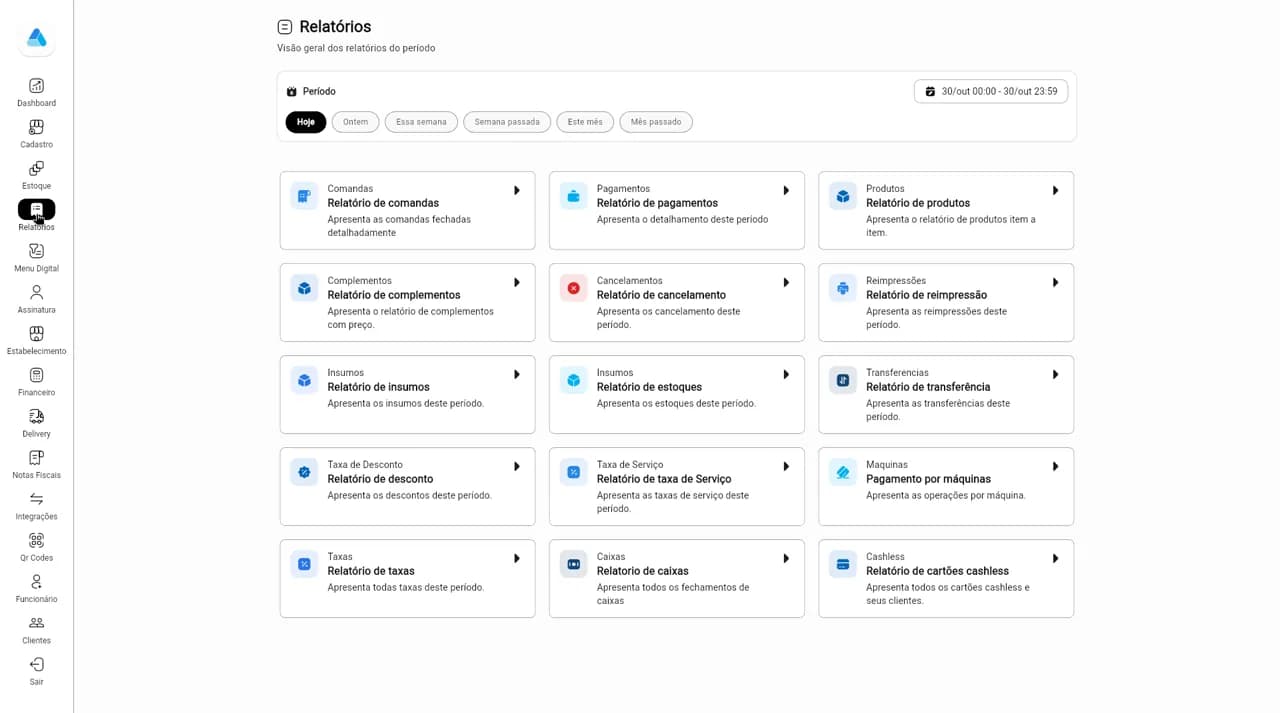
Step 1Reports: period and the Comandas, Pagamentos, Produtos, Complementos, Cancelamentos, Caixas, Cashless and other cards.
Digital Menu (settings)
Set up the store's digital menu: link, order types, payment methods, opening hours and prep time.
How to
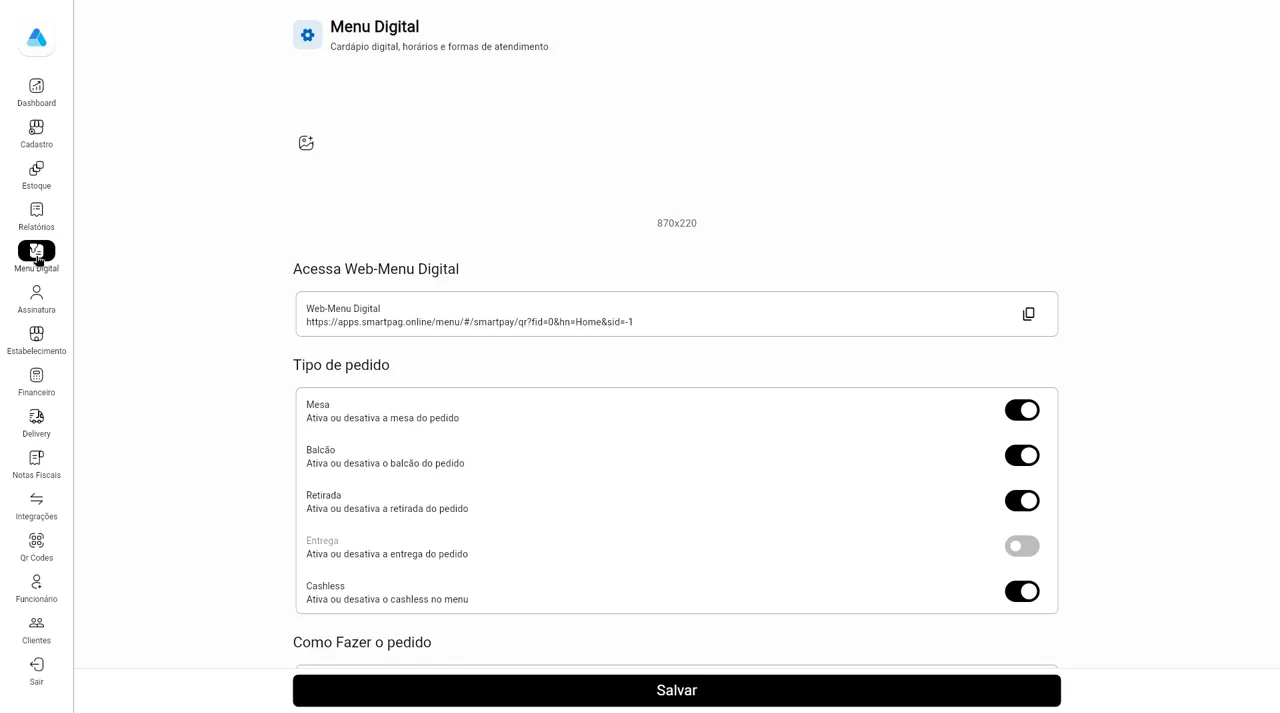
- In the side menu, open Menu Digital. Upload the banner (870x220) and copy the link under Acessa Web-Menu Digital.
- Under Tipo de pedido, turn on Mesa (table), Balcão (counter), Retirada (pickup), Entrega (needs Delivery) and Cashless.
- Under Como Fazer o pedido, choose WhatsApp, KDS order and required online payment. Then the online and in-store payment methods.
- Under Horário, use Adicionar turno for each day. Set Tempo preparo and, with delivery, the Pedido mínimo. Click Salvar.
Screens
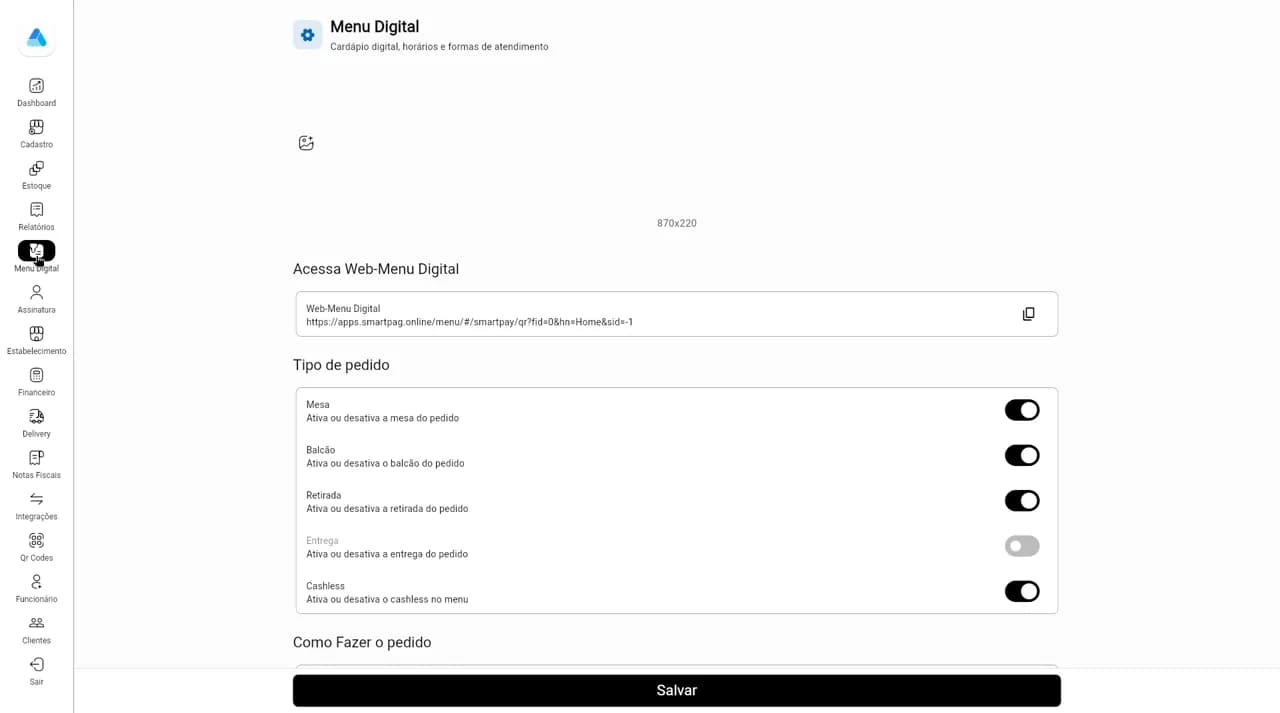
Step 1Menu Digital: banner, Web-Menu link and order types (table, counter, pickup, delivery, cashless).
Subscription
See your plan, invoices and the connected points of sale (card machines and devices).
How to
- In the side menu, open Assinatura. The card shows the plan and how many POS devices are contracted.
- Click Faturas to see and pay the subscription invoices.
- Under Pontos de venda conectados, use the three-dot menu to Remover (remove) a device. Atualizar reloads the list.
Screens
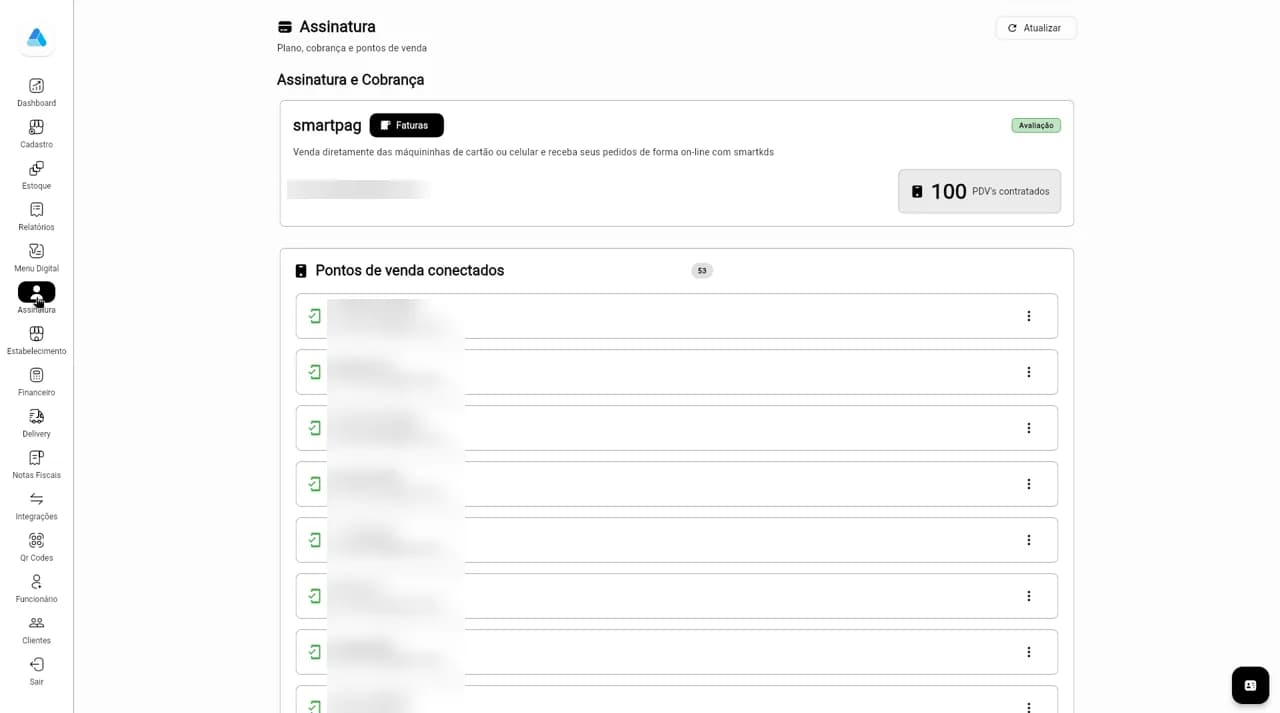
Step 1Subscription and billing, Faturas, contracted POS and connected devices (devices and emails blurred).
Store details
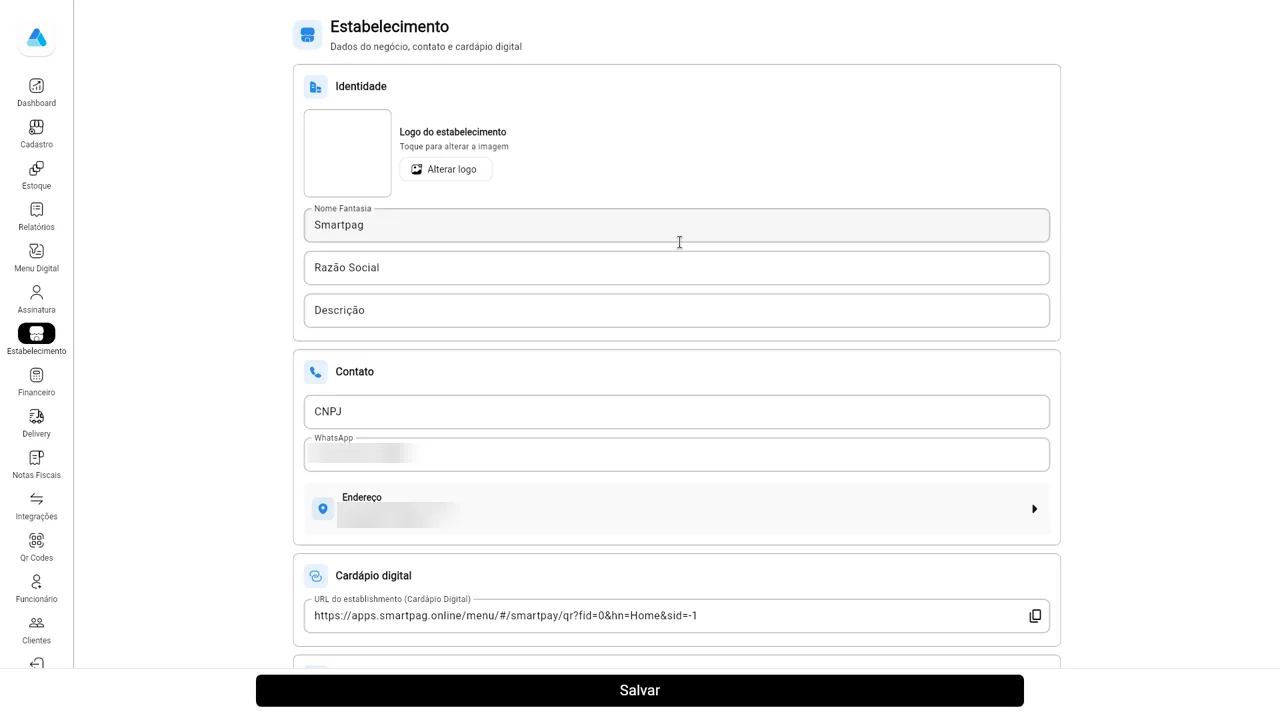
Update your business data: logo, names, CNPJ, WhatsApp, address, menu link and social media.
How to
- In the side menu, open Estabelecimento.
- Under Identidade, use Alterar logo and fill in trade name, legal name and description.
- Under Contato, enter CNPJ and WhatsApp and click Endereço to fill in the store address.
- Under Cardápio digital, copy the store URL. Fill in social media and click Salvar.
Screens
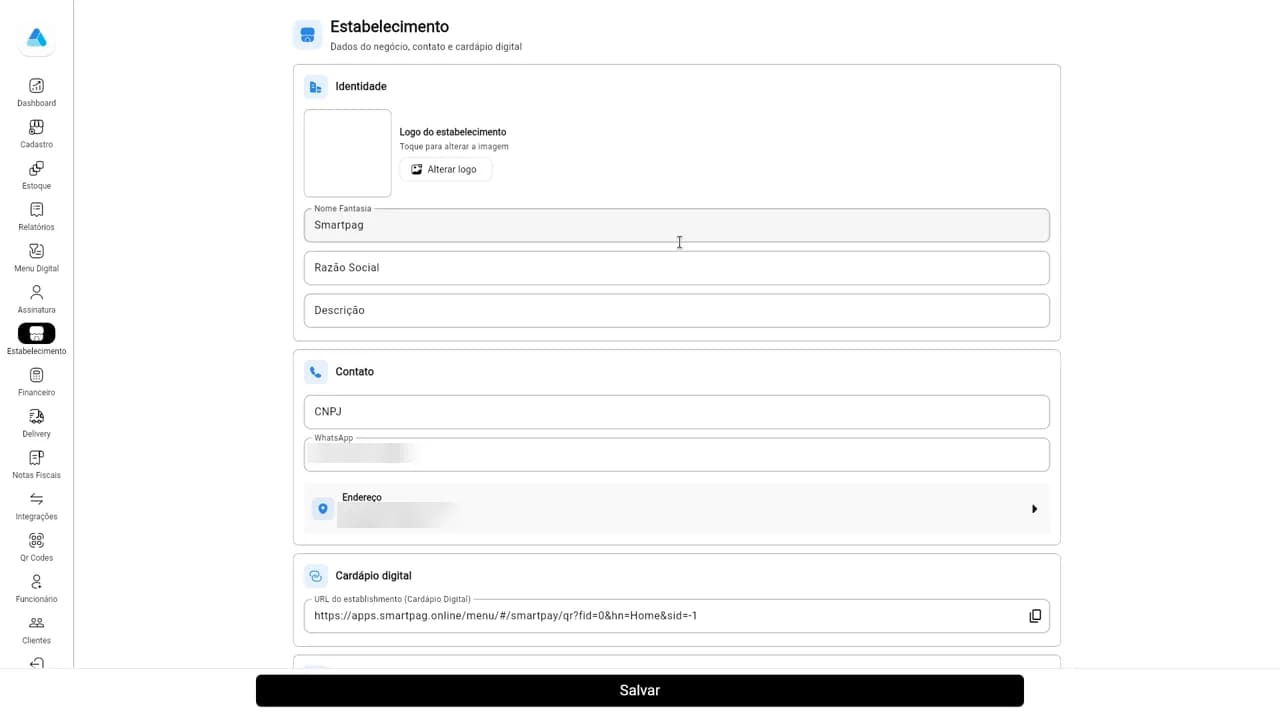
Step 1Store details: identity, contact (WhatsApp and address blurred) and digital menu.
Finance
Track income, expenses, overdue bills, the monthly P&L (DRE) and cash flow.
How to
- In the side menu, open Financeiro. Pick the month with the date button at the bottom right.
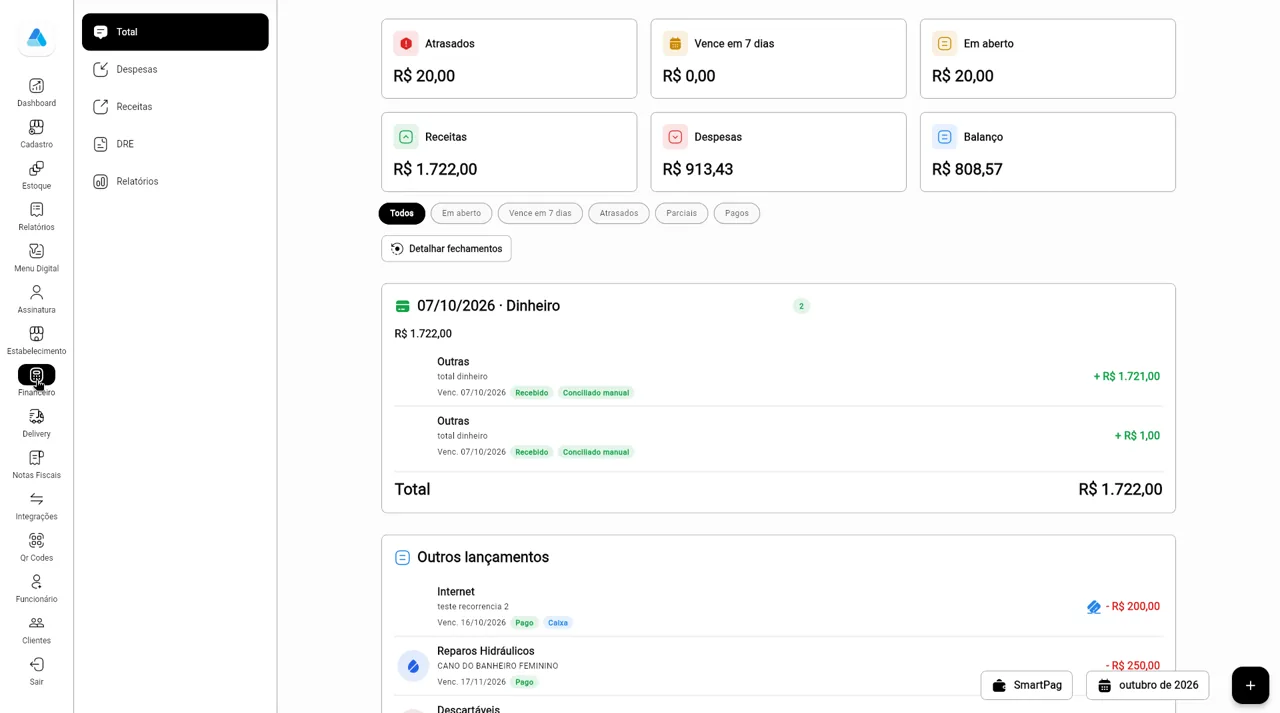
- Total shows overdue, due soon, open, income, expenses and balance. Filter by open, due in 7 days, overdue, partial or paid.
- Click + to add an expense (Despesa) or income (Receita), or open Carteiras, Conciliação, Categorias and Recorrentes.
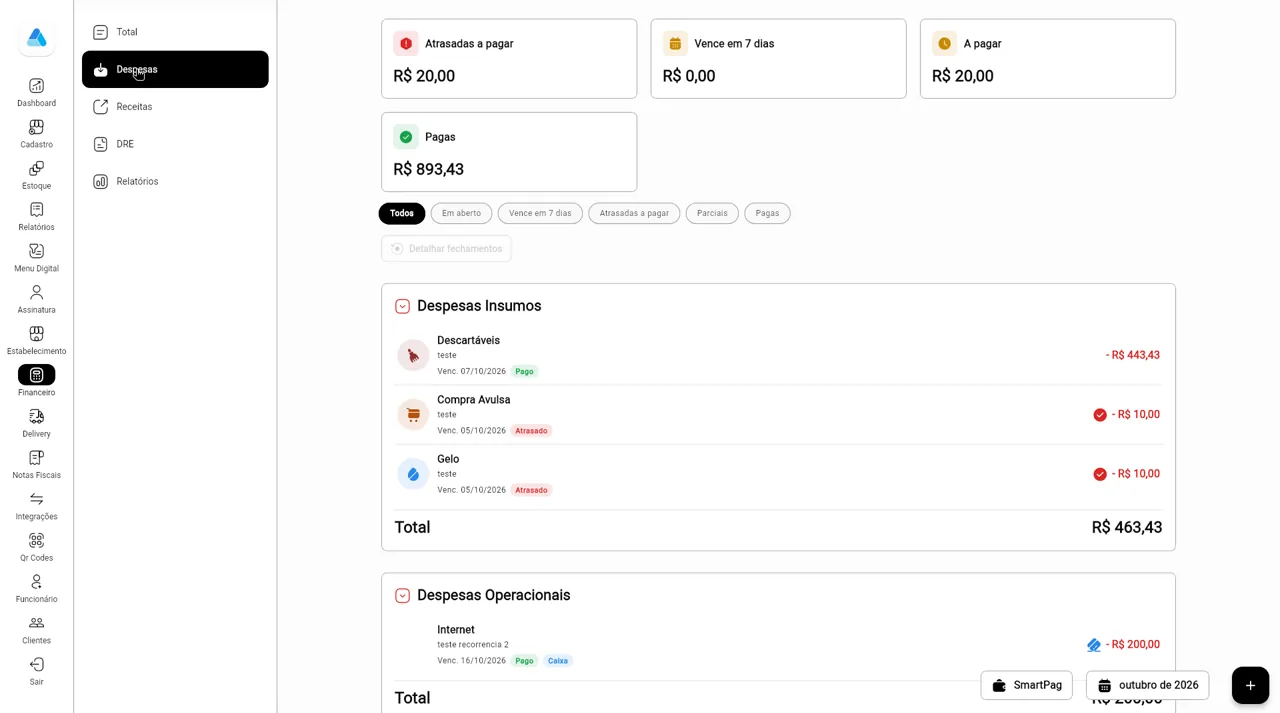
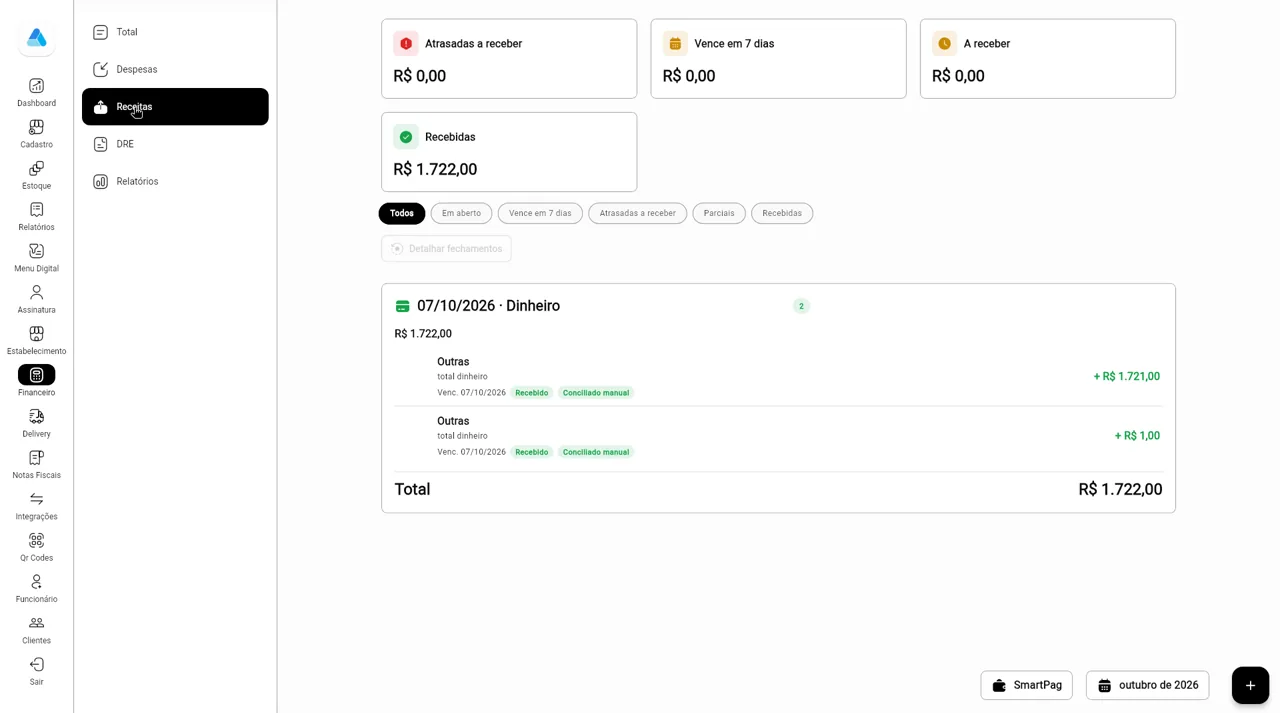
- Despesas and Receitas split outgoing and incoming entries. Detalhar fechamentos breaks the cashier total into entries.
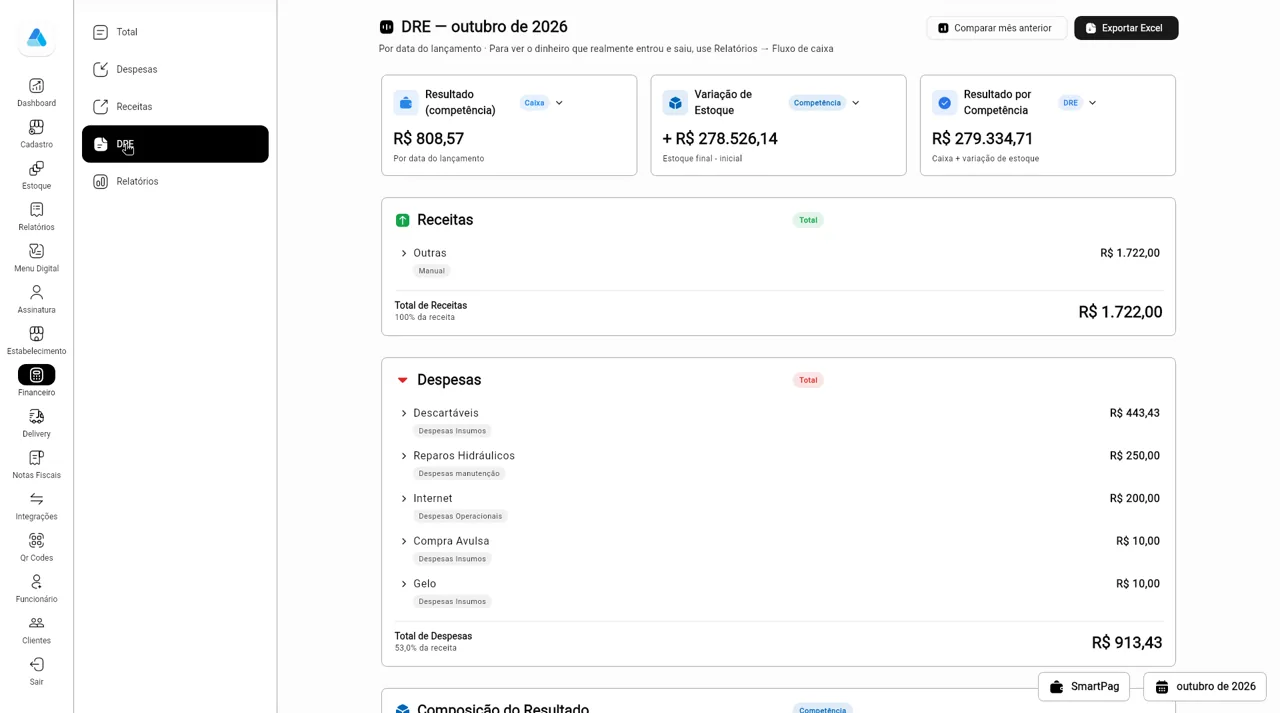
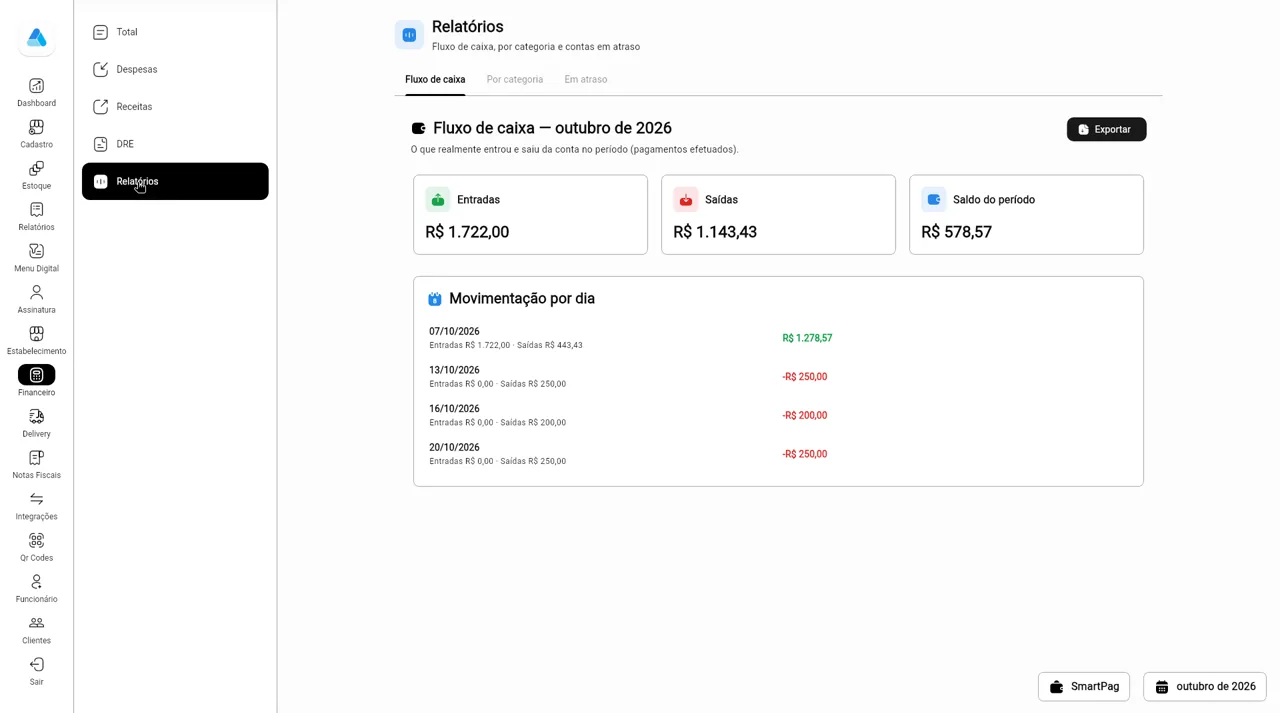
- DRE shows the month's result and Exportar Excel. Relatórios has cash flow, by category and overdue.
Screens
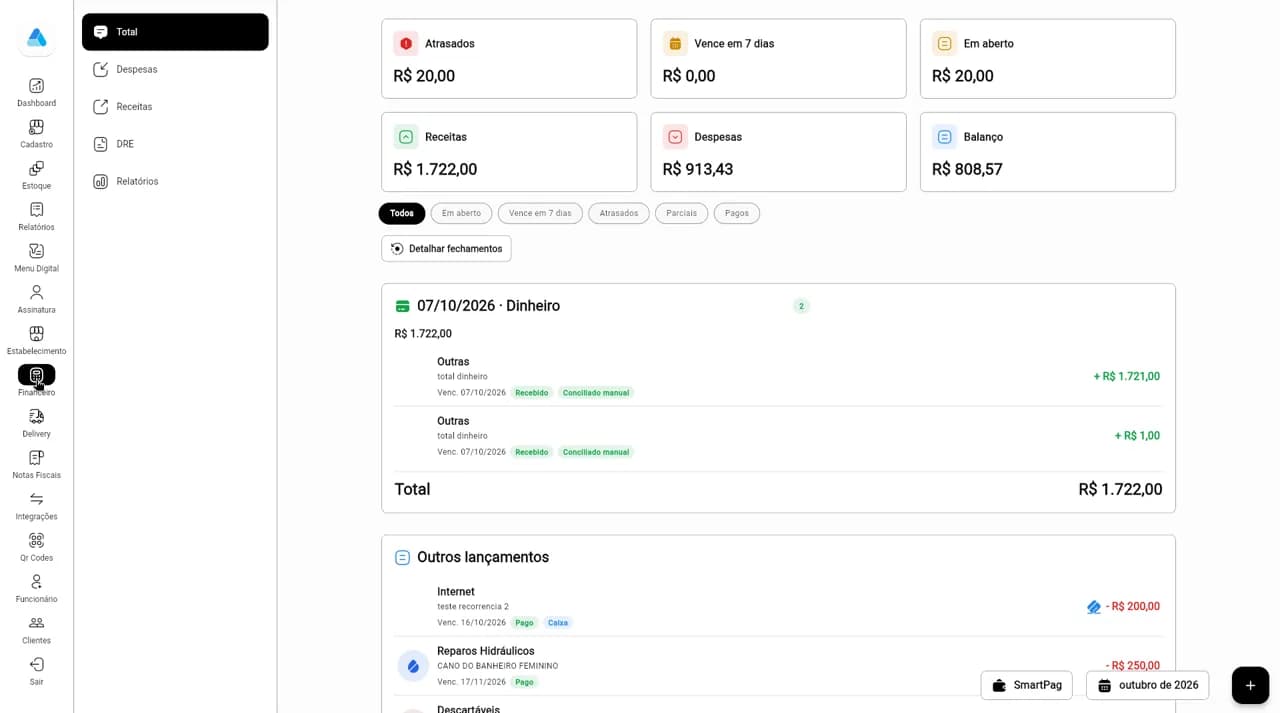
Step 1Total: month summary, filters, Detalhar fechamentos and the entries. 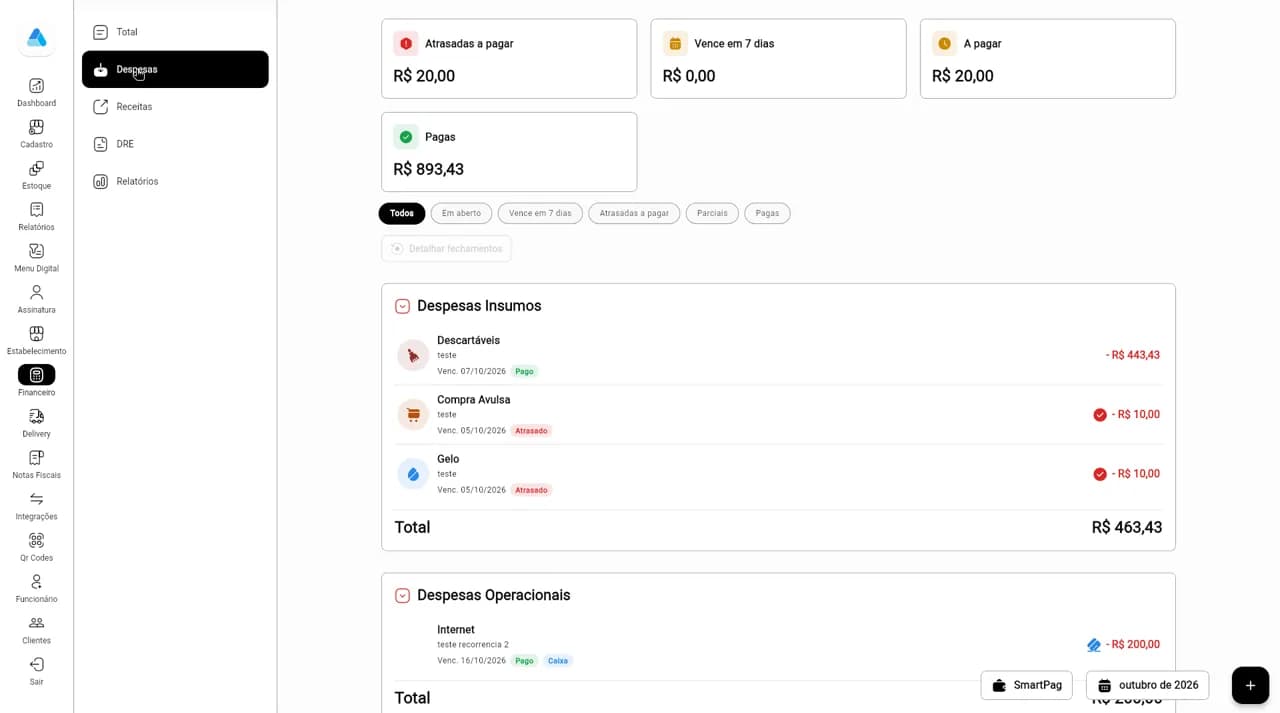
Step 2Despesas: to pay, overdue and paid, by expense group. 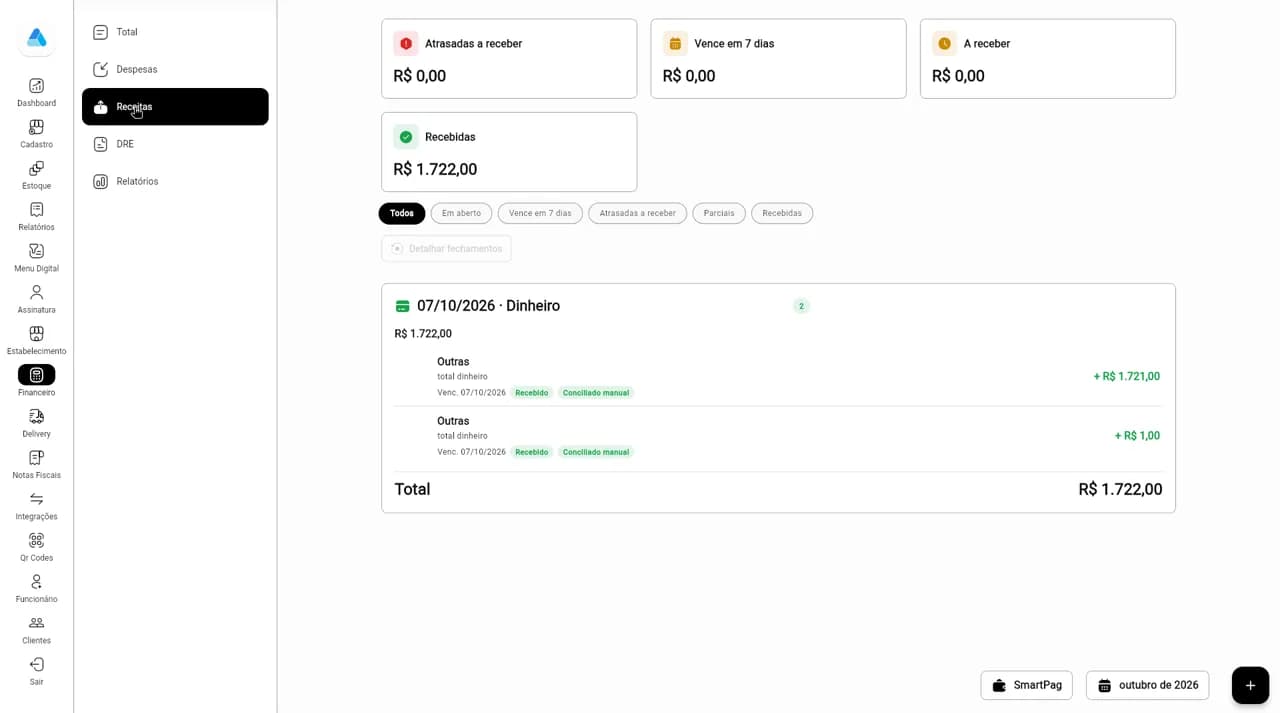
Step 3Receitas: to receive, overdue and received. 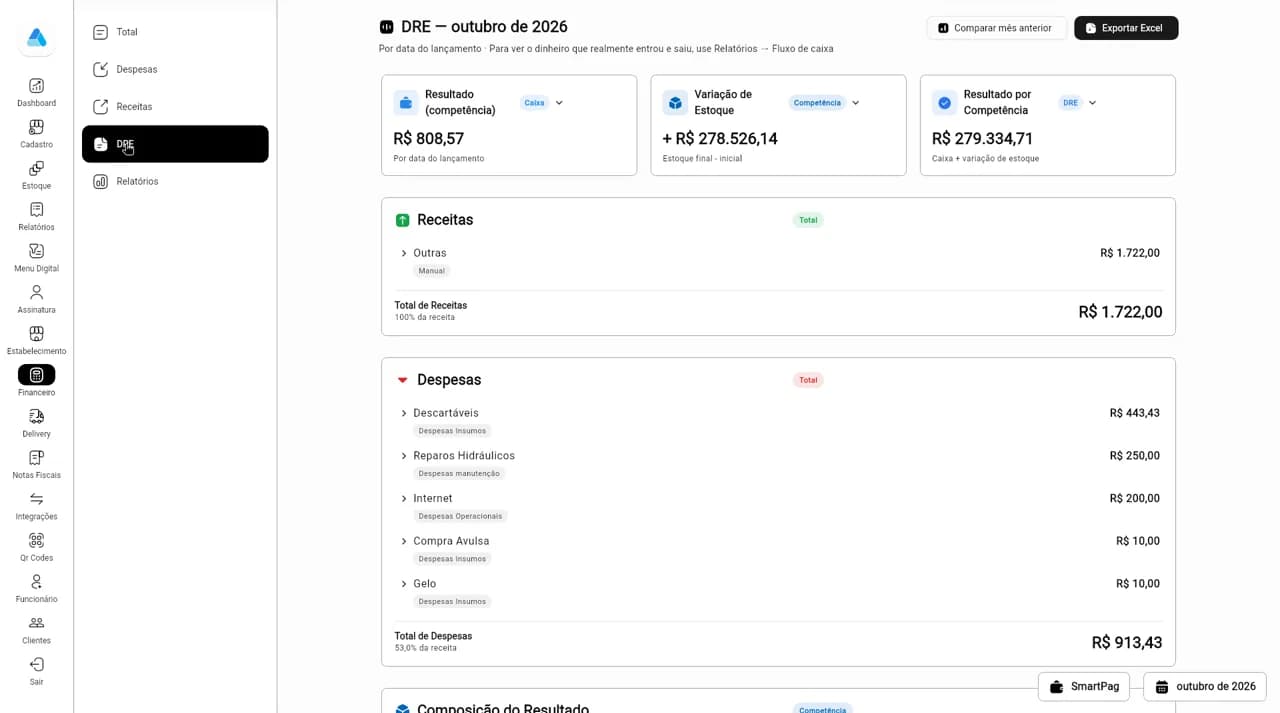
Step 4Monthly DRE: result, income and expenses, compare with last month and export to Excel. 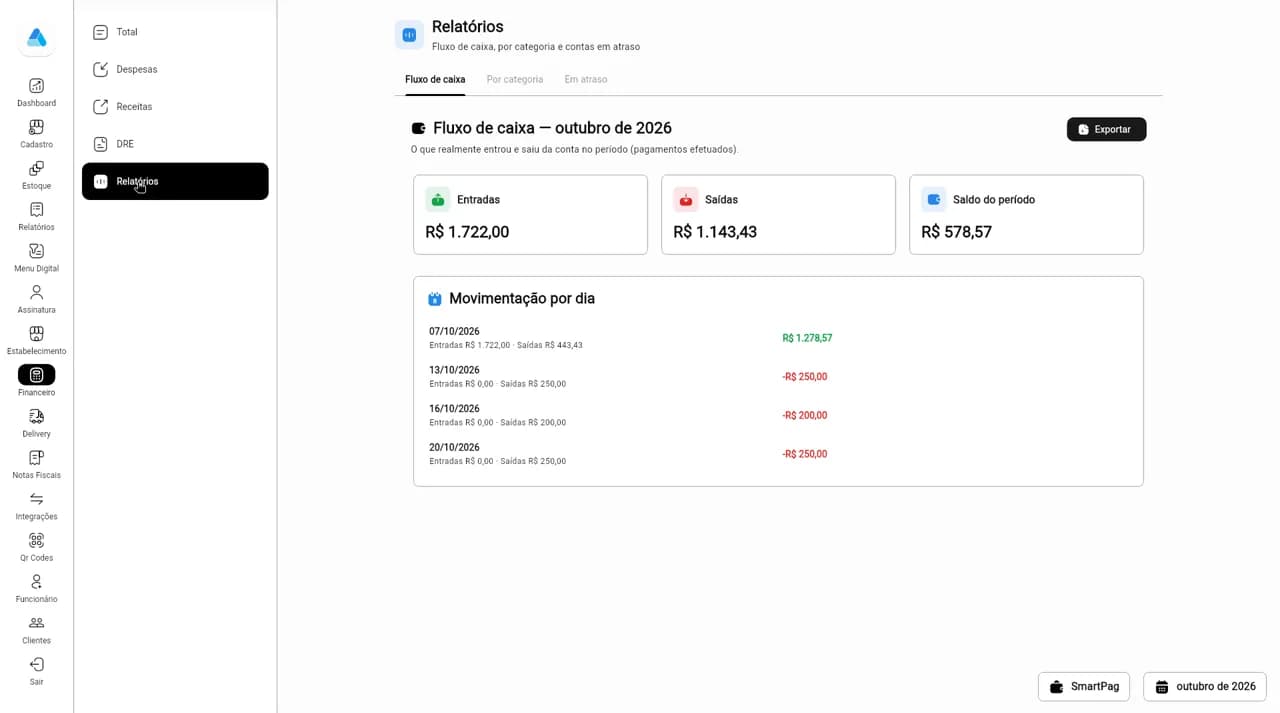
Step 5Reports: cash flow with money in, money out and movement per day.
Delivery
Set delivery areas and fees by radius, by neighborhood or by polygon on the map.
How to
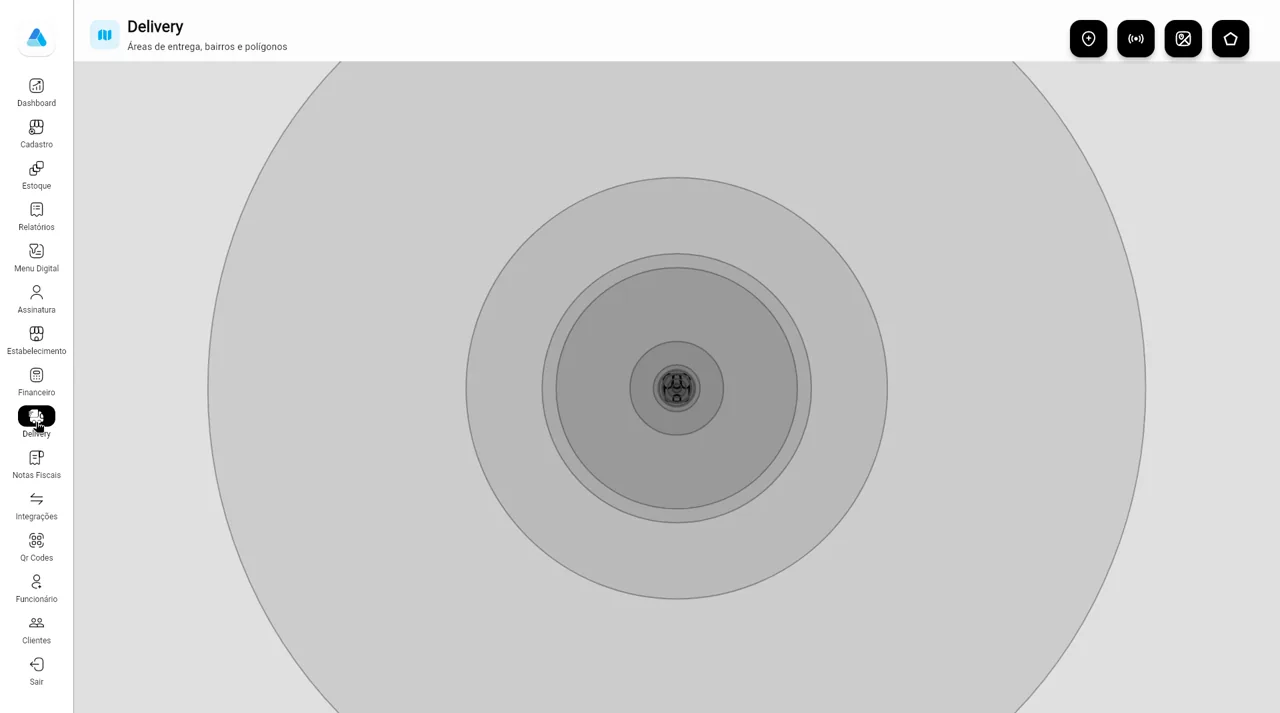
- In the side menu, open Delivery. The map shows the store's delivery areas.
- Use the origin button to set the starting point (Defina o ponto de origem) and save.
- Pick the method: radius (name, meters and fee), neighborhood (state, city, neighborhood and fee) or a polygon drawn on the map. Turn on Ativo for the one you use.
- Click Adicionar for each area and then Salvar.
Screens
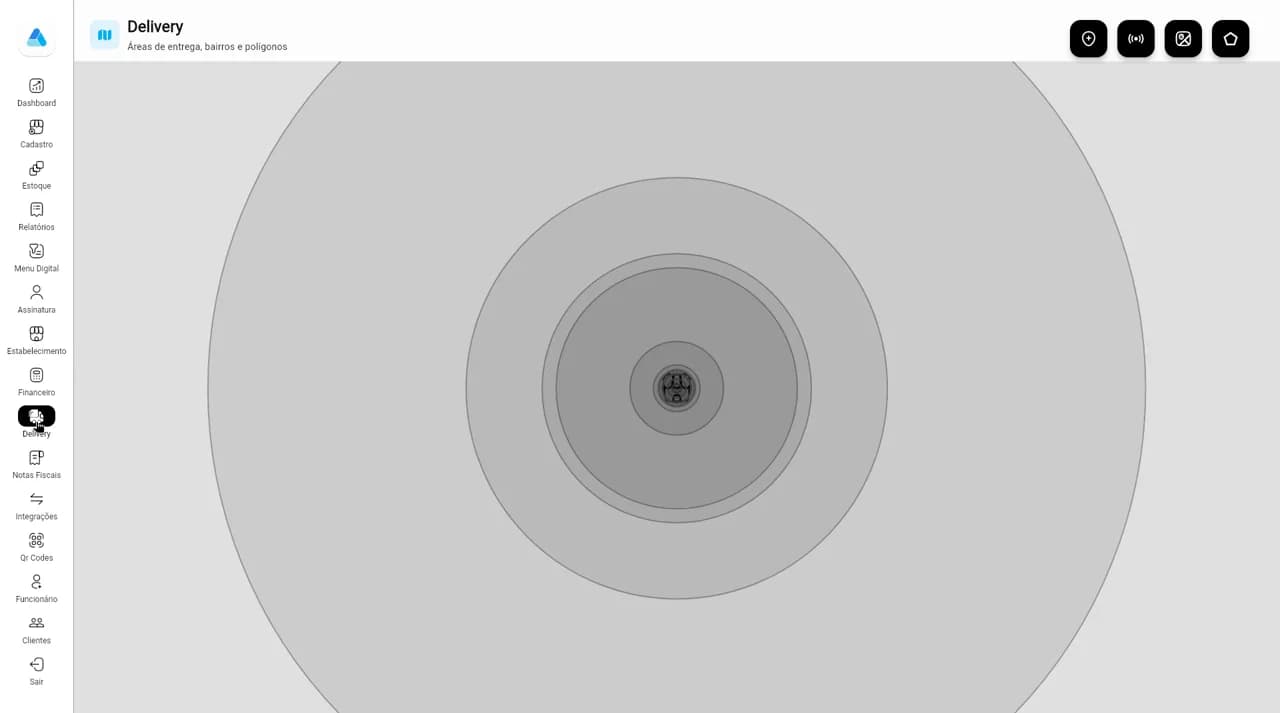
Step 1Delivery: map with radius areas and the origin, radius, neighborhood and polygon buttons.
Invoices
Acknowledge received invoices, download outgoing XML and issue NF-e and NFS-e.
How to
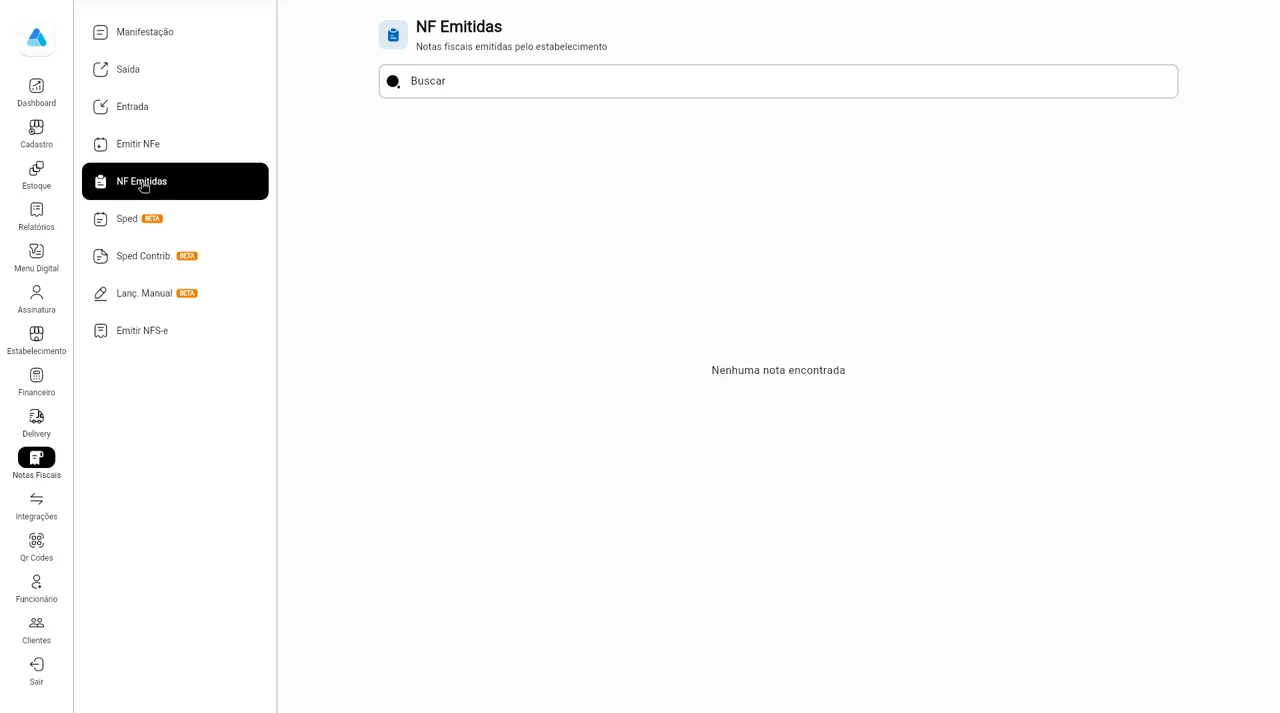
- In the side menu, open Notas Fiscais. The store needs a fiscal setup (Integrações > Focus NFe).
- In Manifestação, see invoices issued to your CNPJ and use each invoice's actions, such as Desconhecer (reject).
- In Saída, download each month's XML and the summary report for your accountant. Entrada has the XML of received invoices.
- In Emitir NFe, fill in the general data, related invoices, recipient and items, then click Emitir NFe.
- In NF Emitidas, search commands and generate or check the NFS-e. Sped and Sped Contrib. generate the SPED files.
Screens
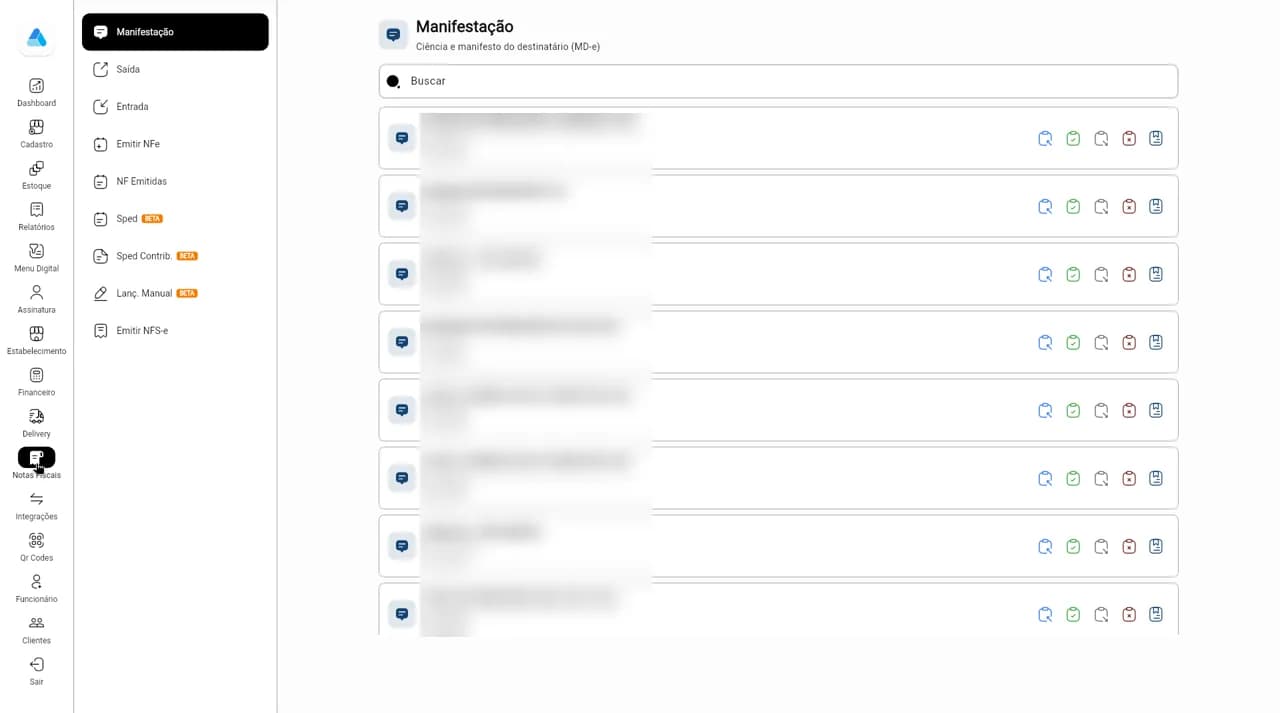
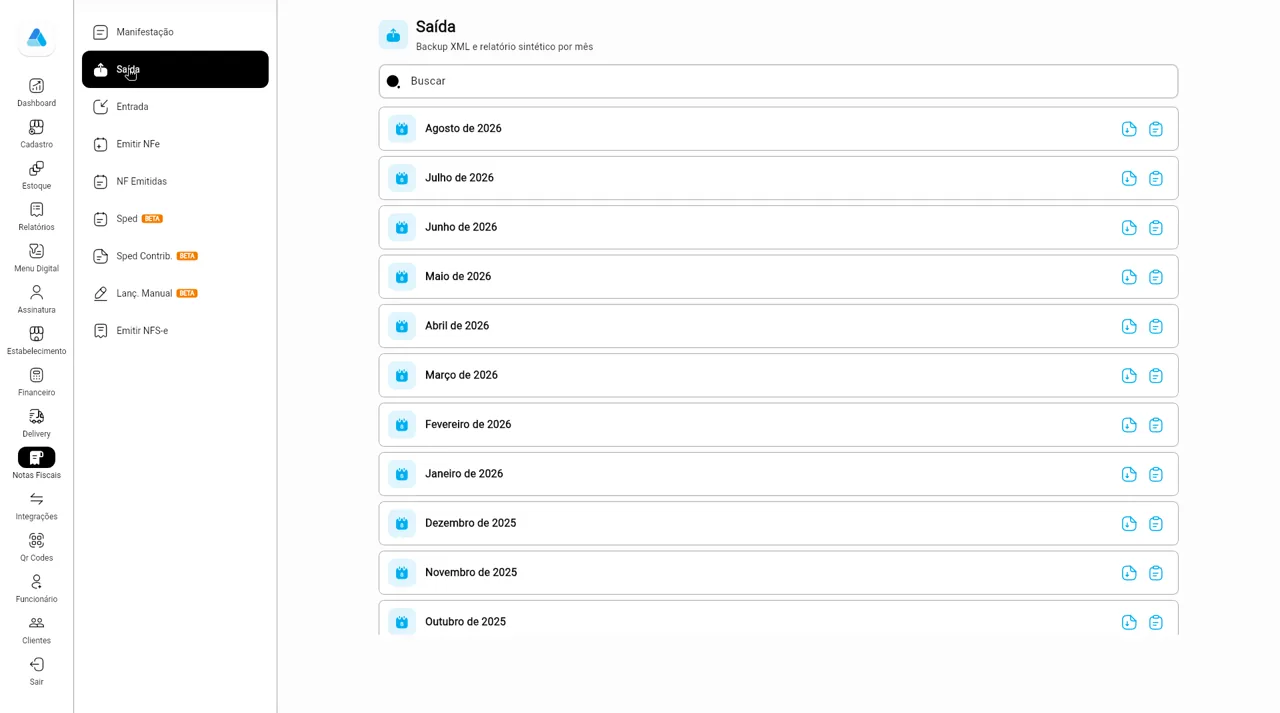
Step 1Manifestação: received invoices with their actions (issuers blurred). 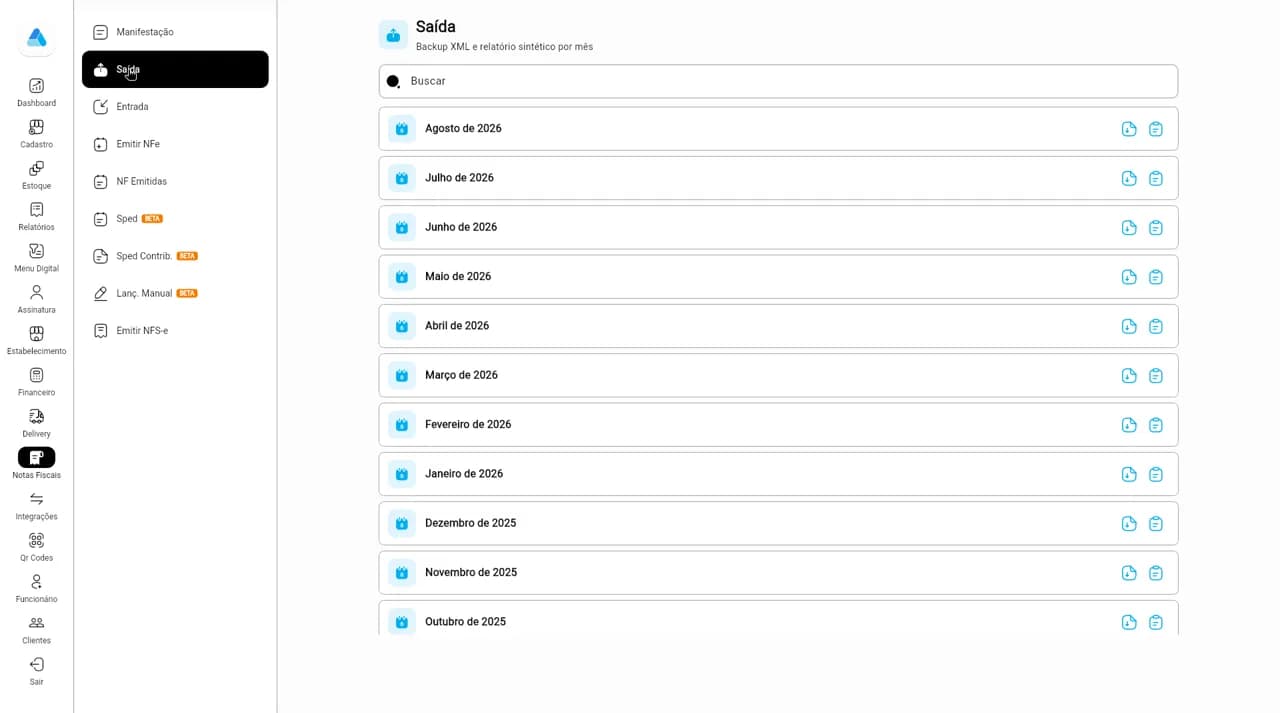
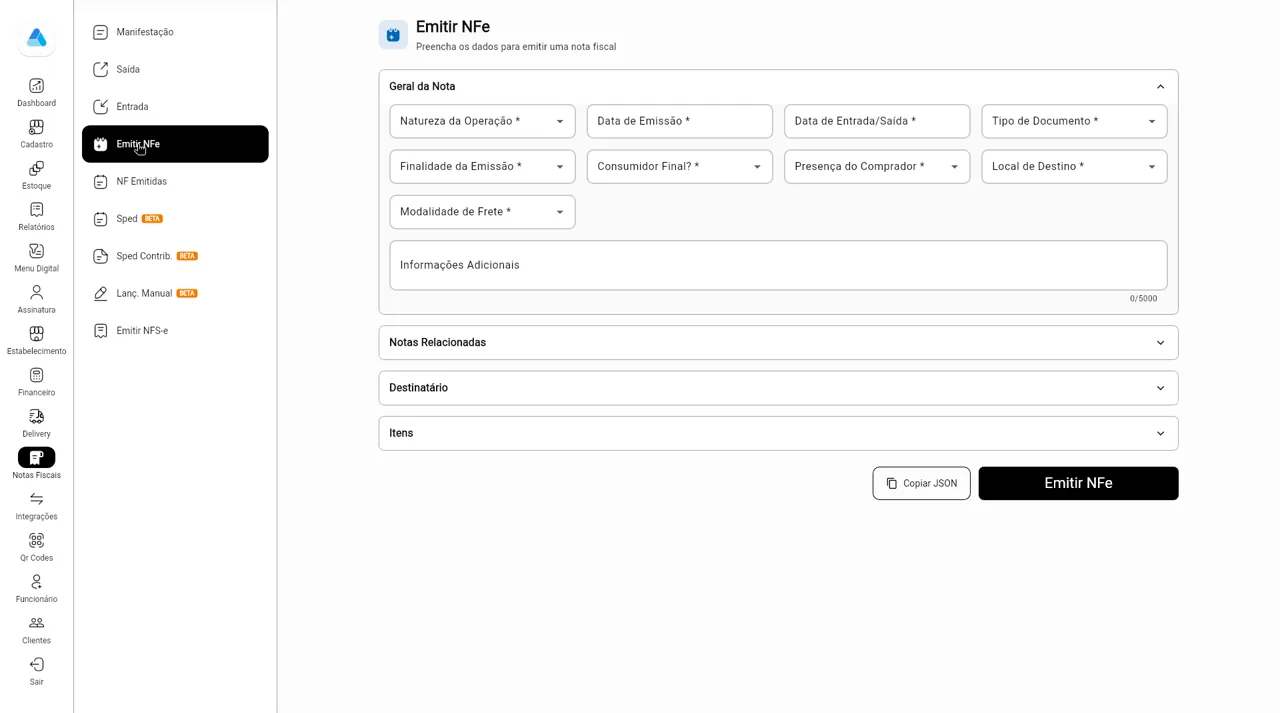
Step 2Saída: XML backup and summary report per month. 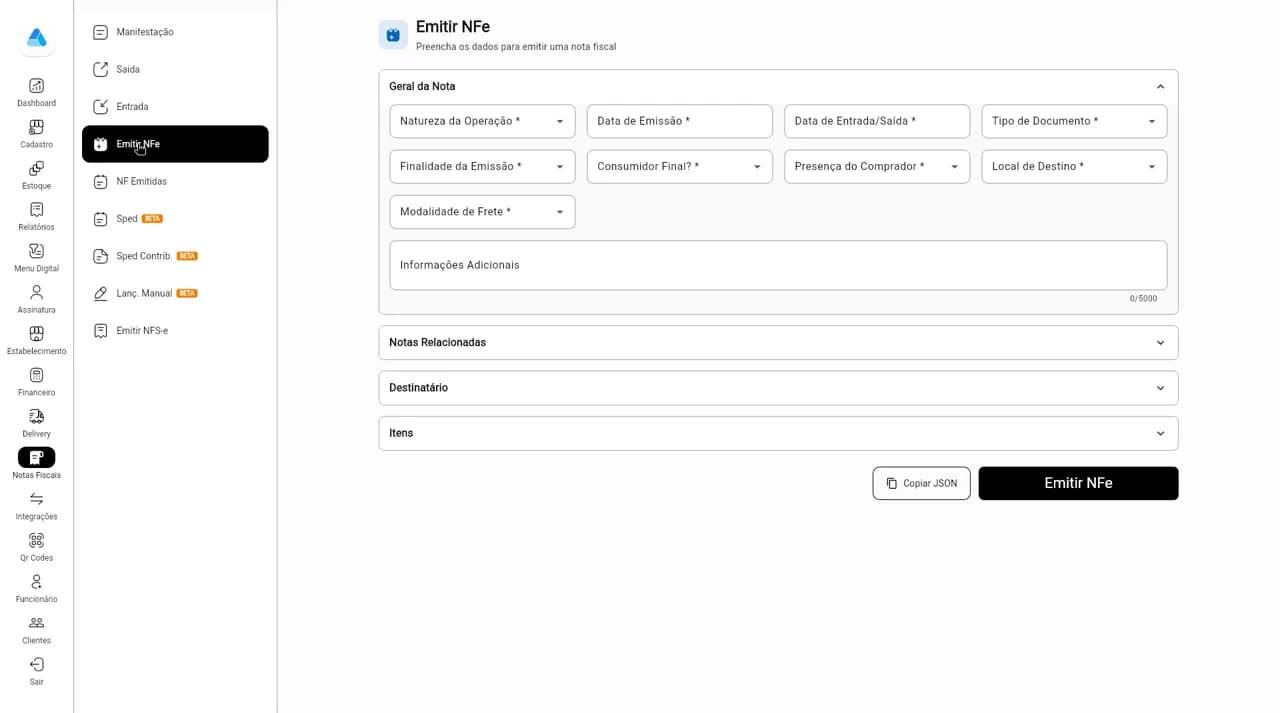
Step 3Emitir NFe: general data, related invoices, recipient, items, Copiar JSON and Emitir NFe. 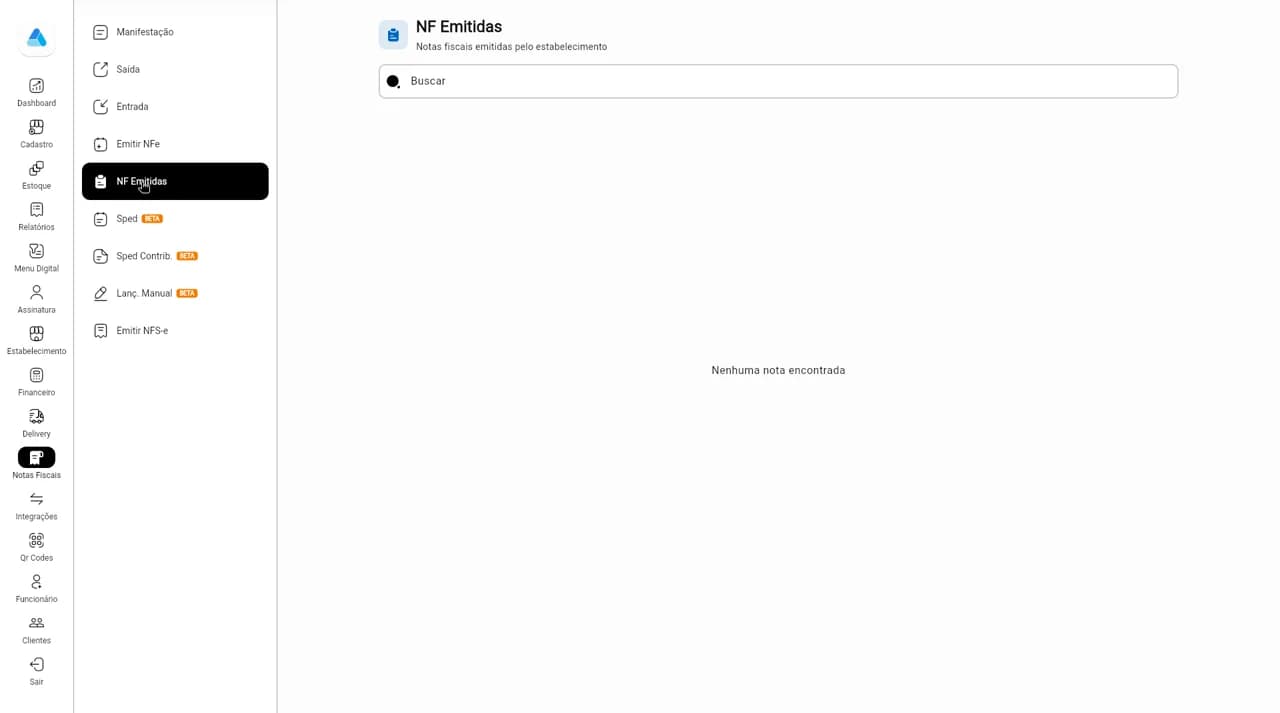
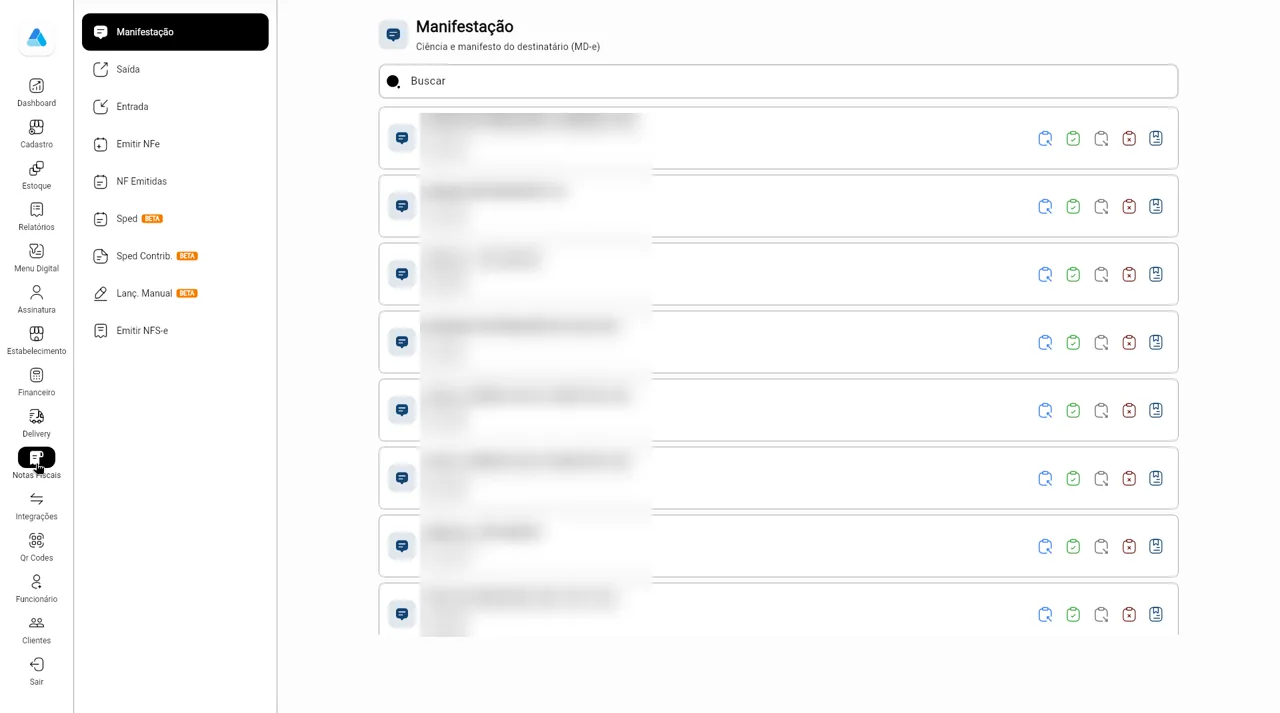
Step 4NF Emitidas: invoices issued by the store.
Integrations
Connect iFood, WhatsApp, Focus NFe, PicPay, Le-Card and Online Payment.
How to
- In the side menu, open Integrações. Each card shows whether it is Ativo (on) or Inativo (off).
- Click Configuração to fill in the data: iFood Merchant ID, PicPay tokens, Le-Card store code, digital certificate on Focus NFe.
- On WhatsApp, connect the phone with the QR code, adjust the automatic messages and the phones that get the closing report.
- Turn on the card's switch to activate. Online Payment uses the Ativar button, which opens PagBank.
Screens
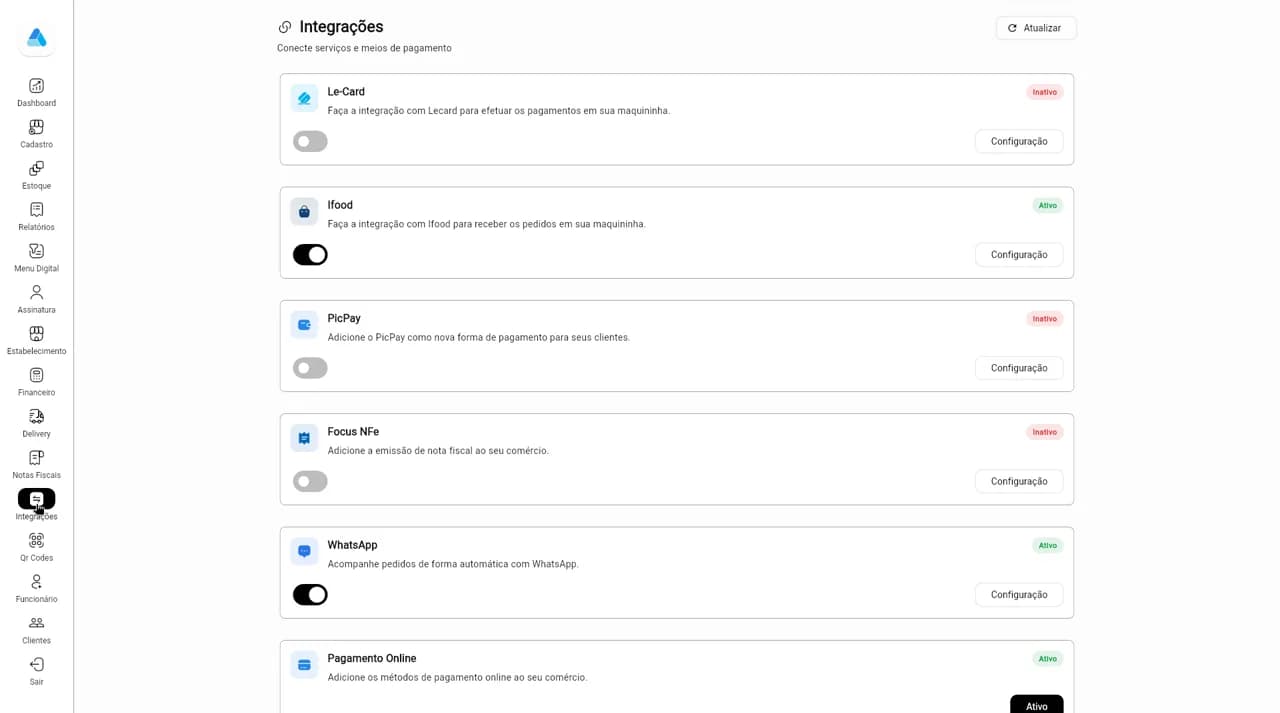
Step 1Integrations: Le-Card, iFood, PicPay, Focus NFe, WhatsApp and Online Payment, each with Configuração.
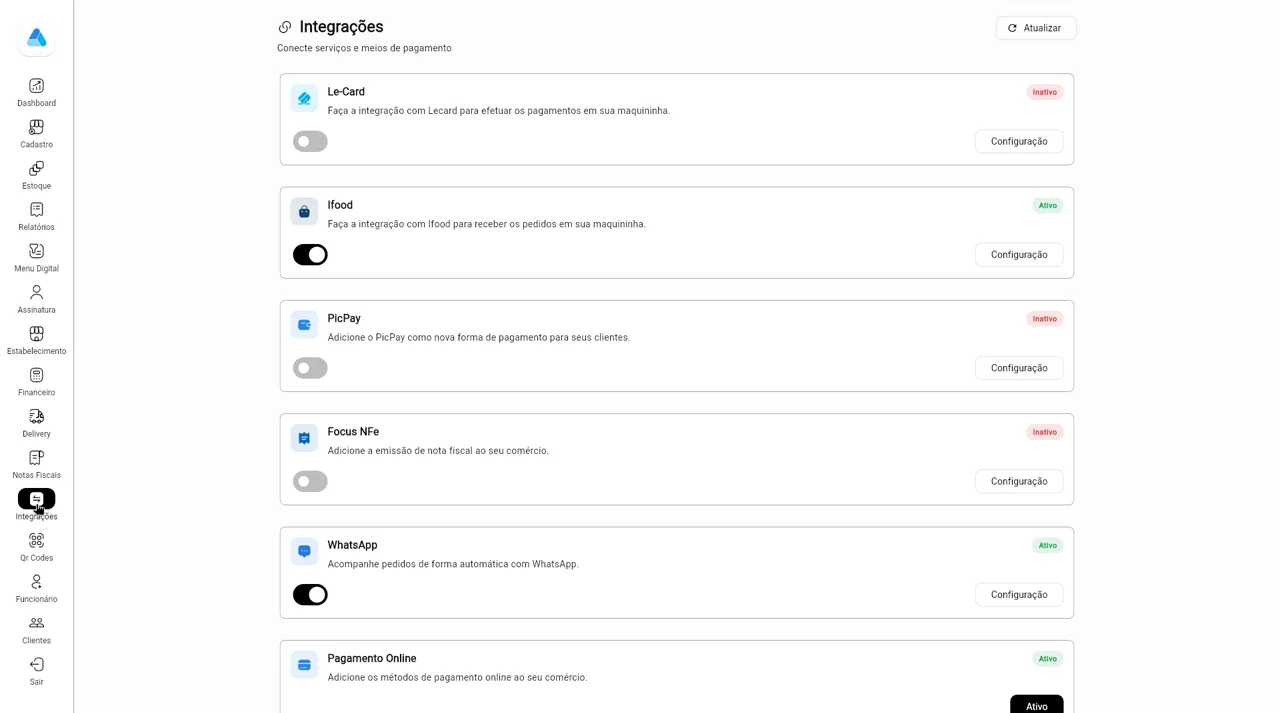
Table QR codes
Create the QR codes that take customers to the digital menu for a table or the counter.
How to
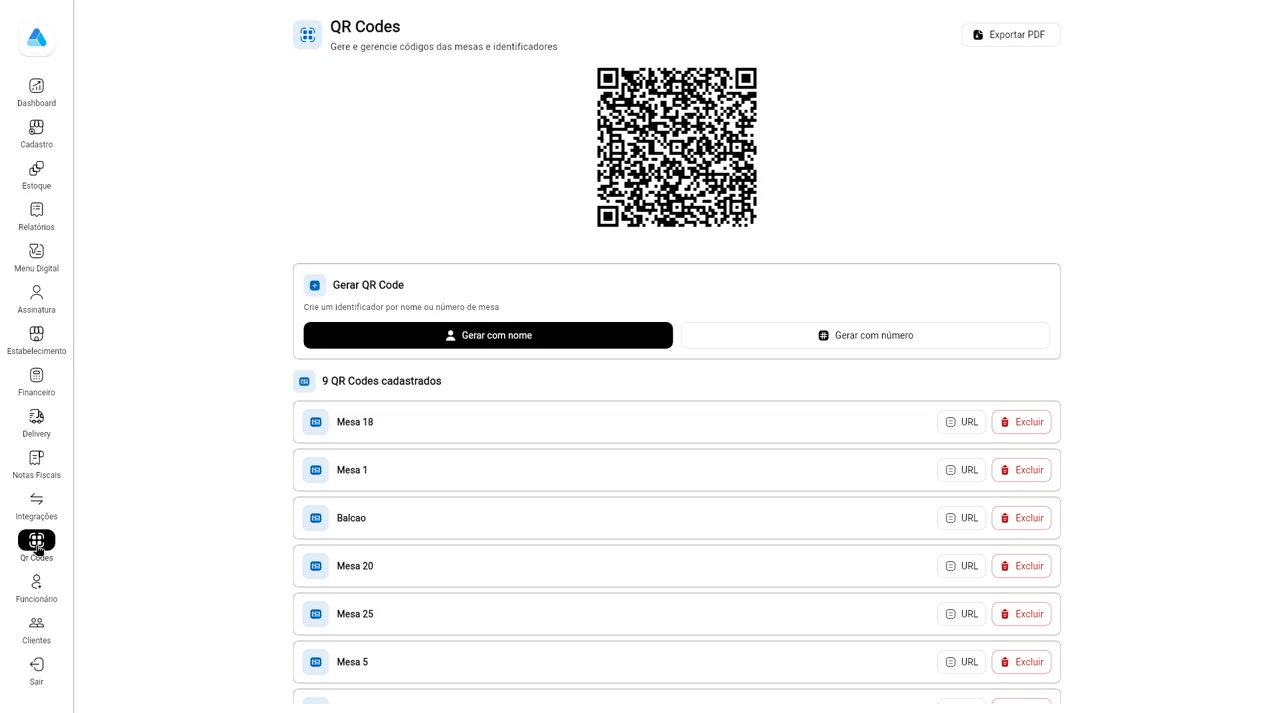
- In the side menu, open Qr Codes.
- Click Gerar com nome (e.g. Balcão) or Gerar com número (e.g. table 5).
- Use URL to copy a QR's link, Excluir to delete and Exportar PDF to print them all.
Screens
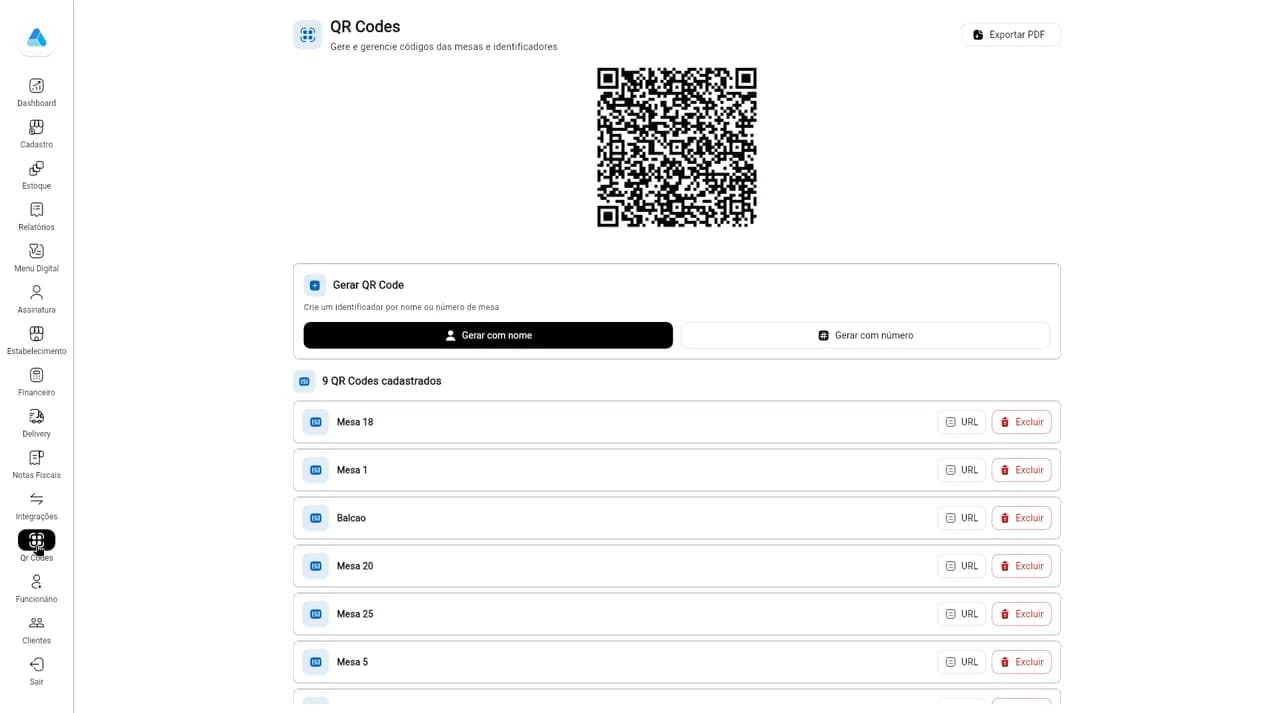
Step 1QR Codes: Gerar com nome, Gerar com número, the QR list and Exportar PDF.
Employees and cashiers
Create each employee's card machine access, with permissions, and set up the cashiers.
How to
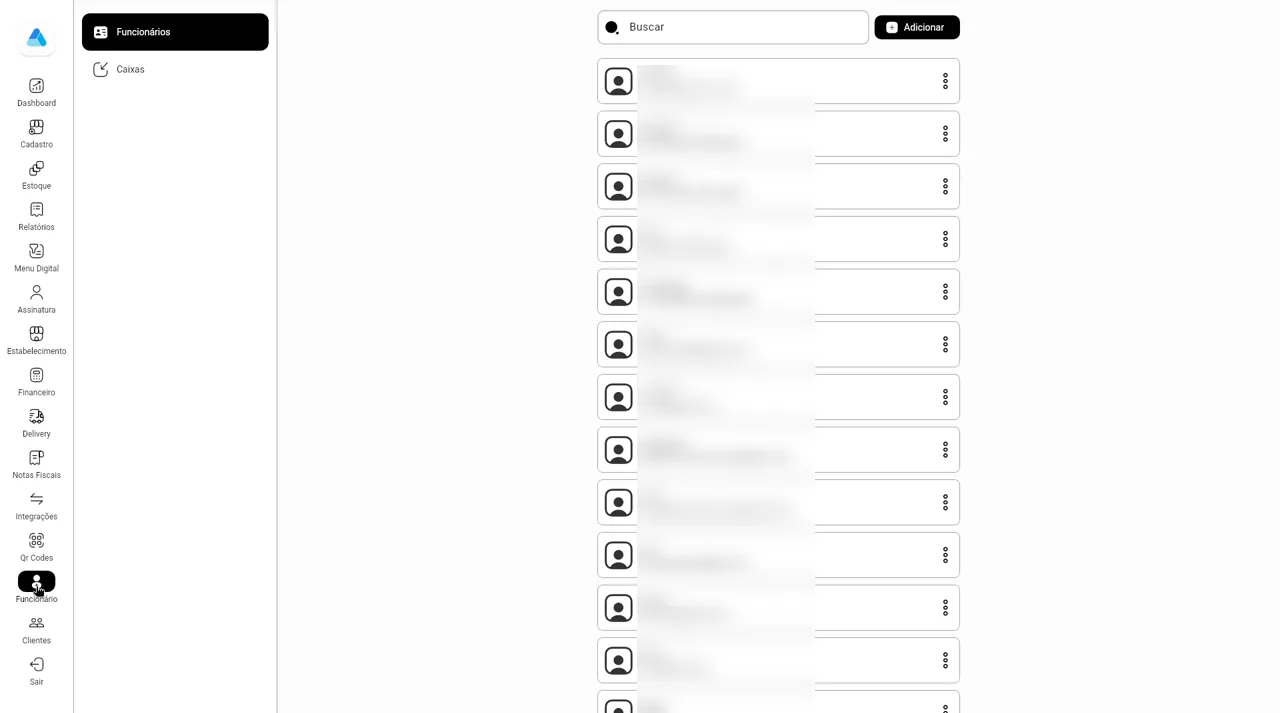
- In the side menu, open Funcionários and click Adicionar.
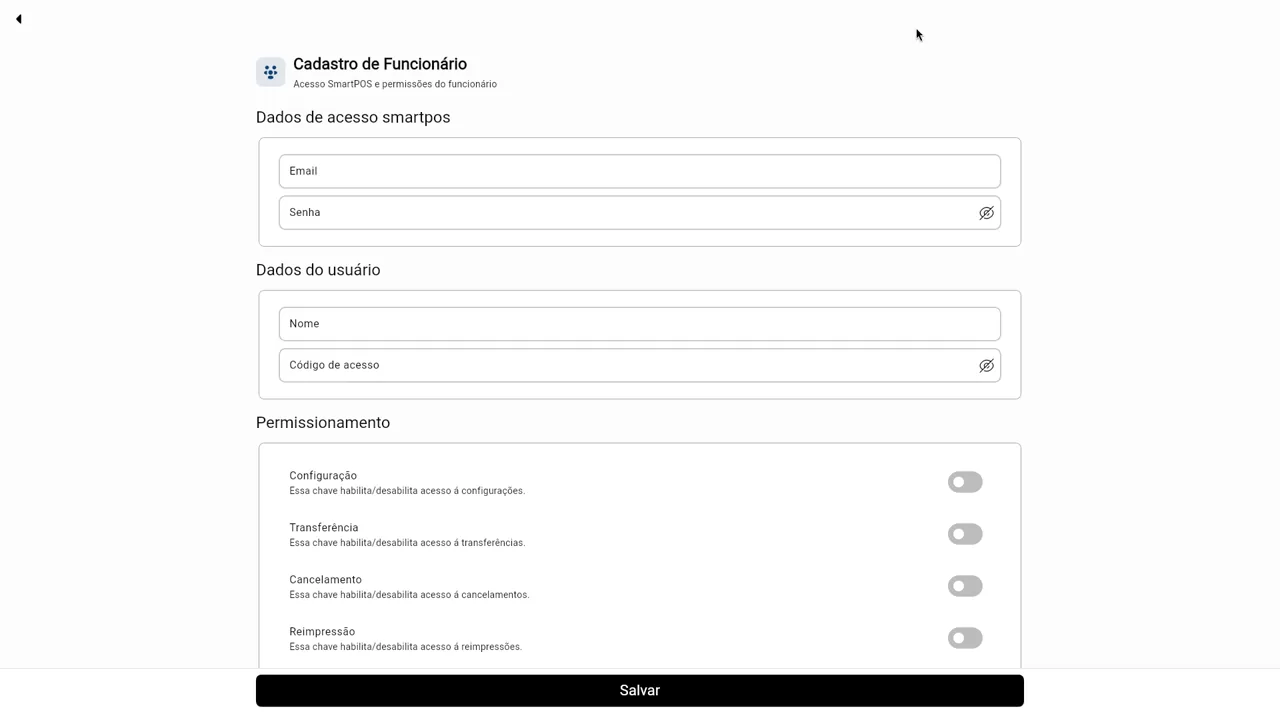
- Under Dados de acesso smartpos, enter email and password. Under Dados do usuário, name and access code.
- Under Permissionamento, turn on what the employee may do: settings, transfers, cancellations and reprints. Click Salvar.
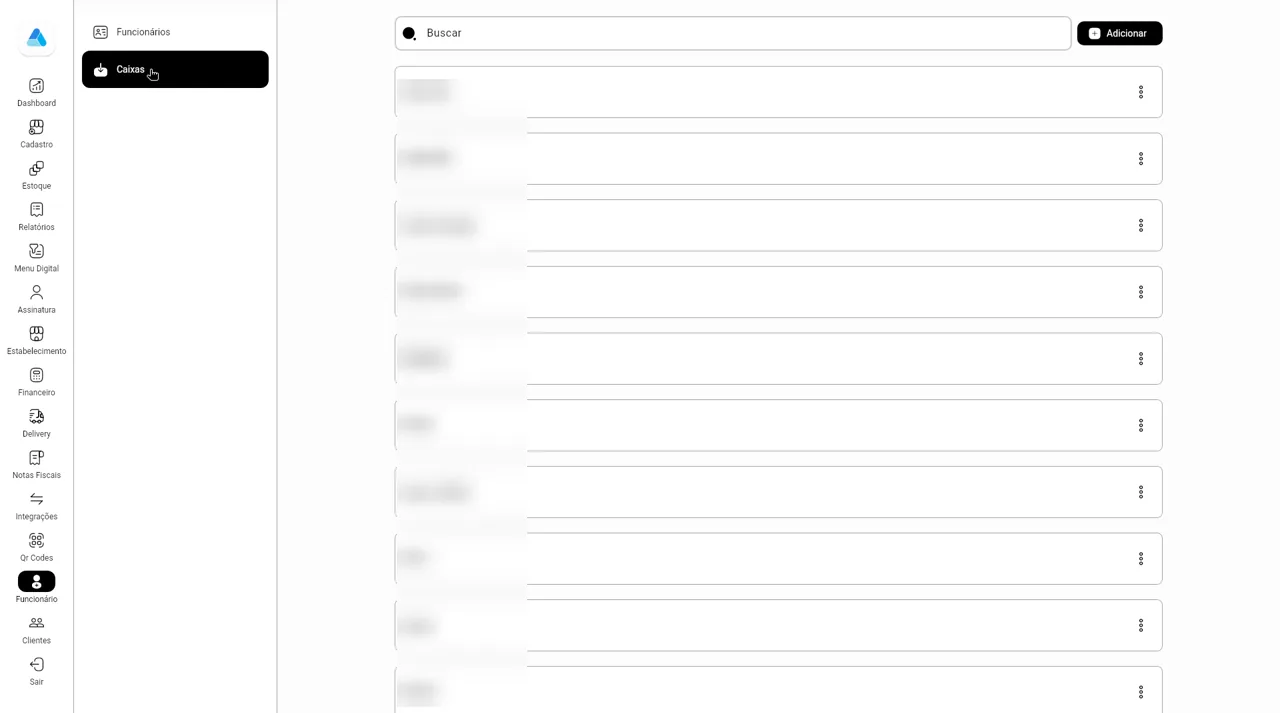
- In the Caixas tab, click Adicionar to create a cashier (Cadastrar Caixa) and save.
Screens
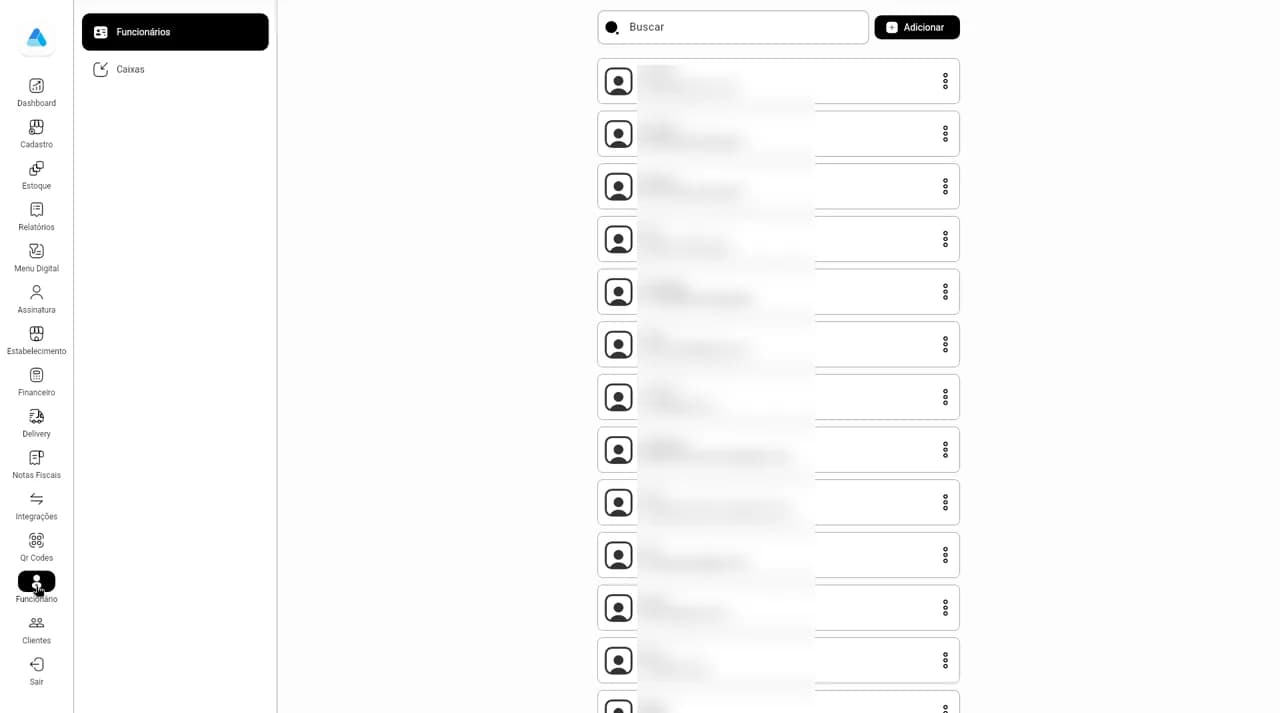
Step 1Employees: list with search and Adicionar (names and emails blurred). 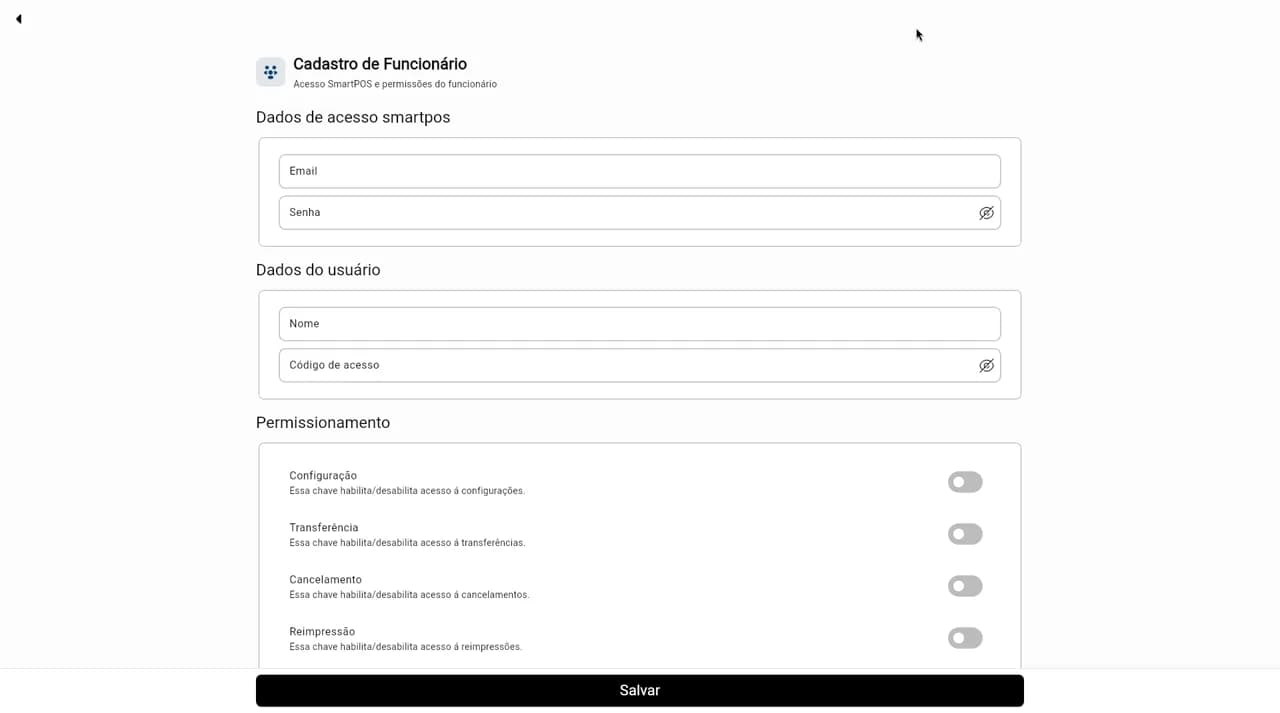
Step 2New employee: SmartPOS access, user data and permissions. 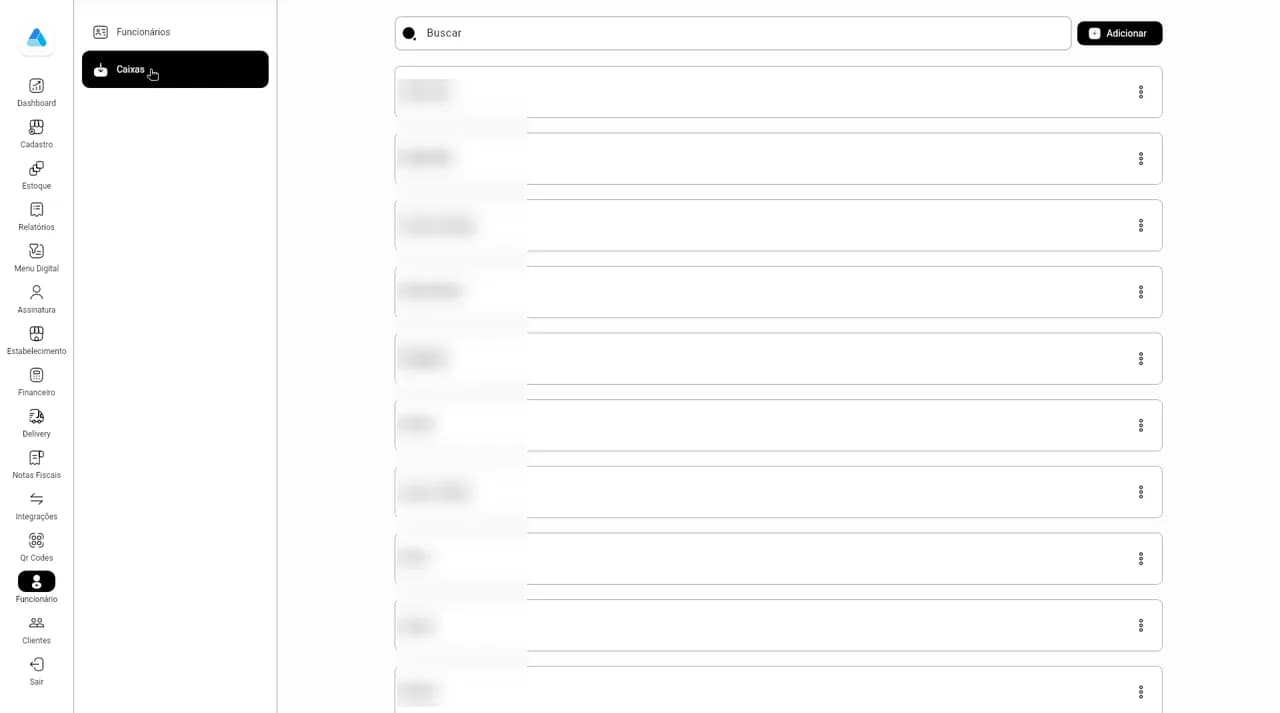
Step 3Cashiers: list and Adicionar (names blurred).
Customers and CRM
See who buys at your store, revenue per customer, and create campaigns and coupons.
How to
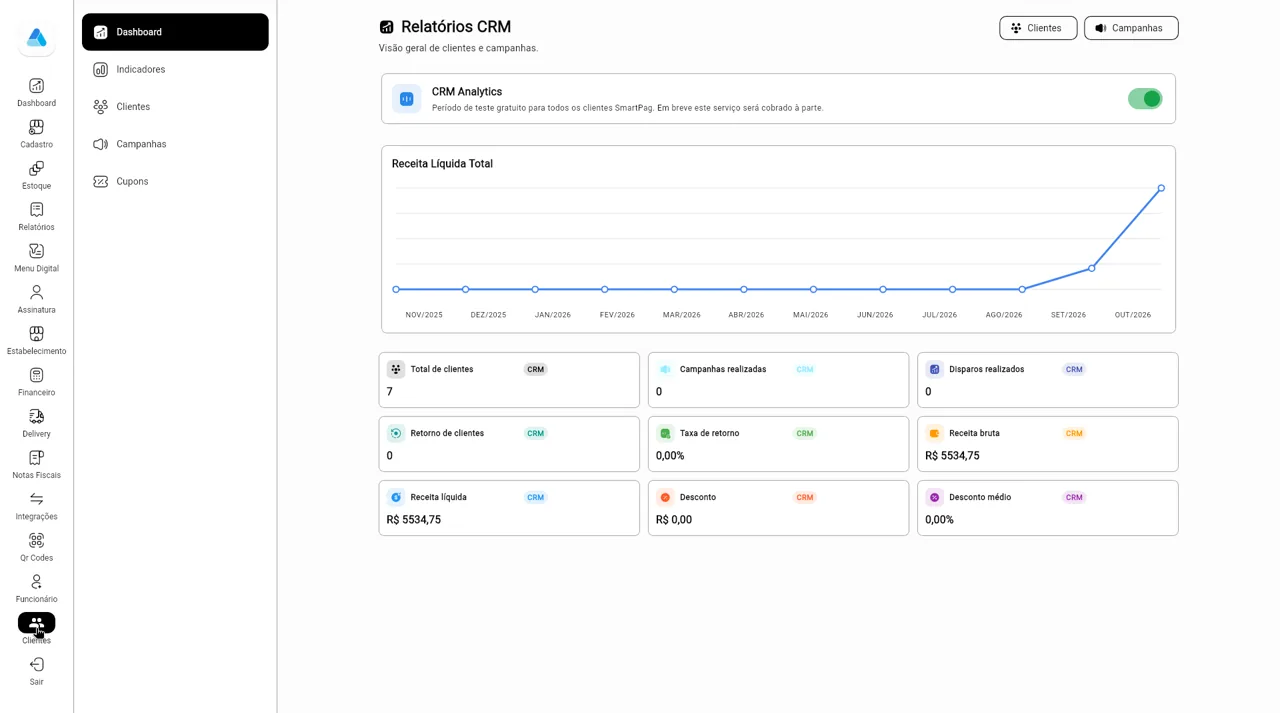
- In the desktop side menu, open Clientes. Turn on CRM Analytics to see the Dashboard.
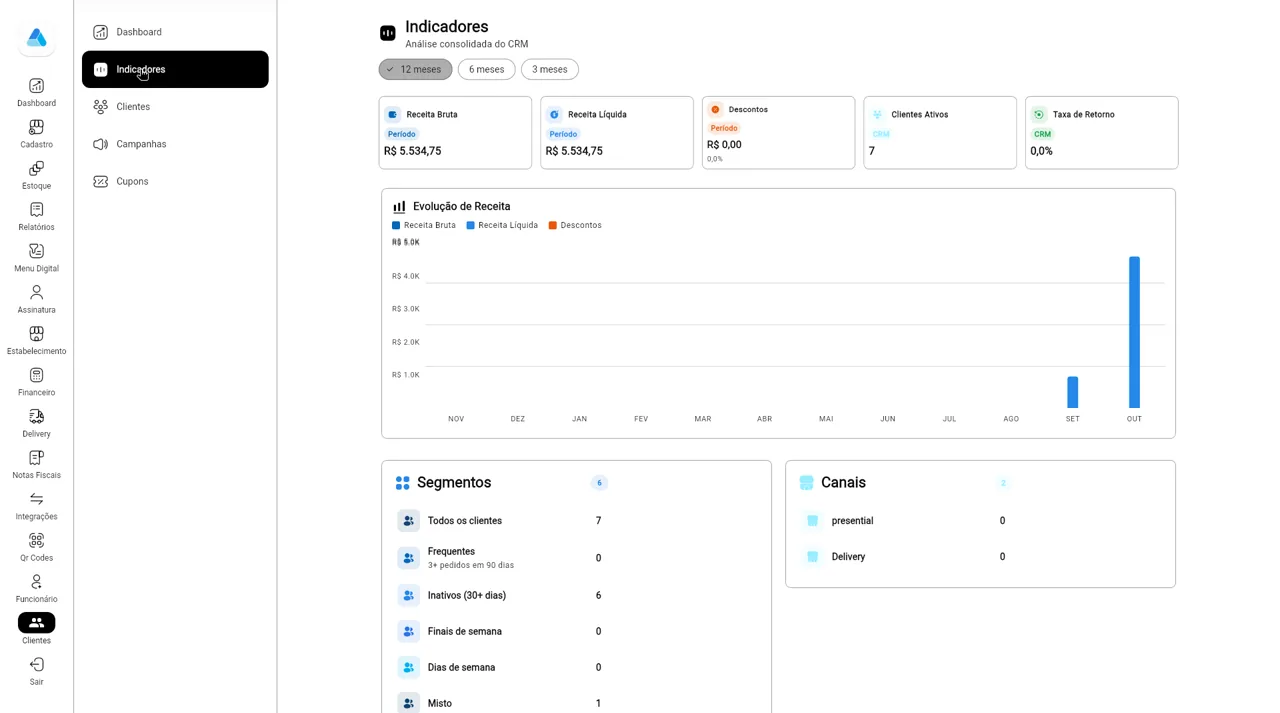
- In Indicadores, compare 12, 6 or 3 months: revenue, discounts, active customers, segments and channels.
- In Clientes, open each customer's profile with metrics and details.
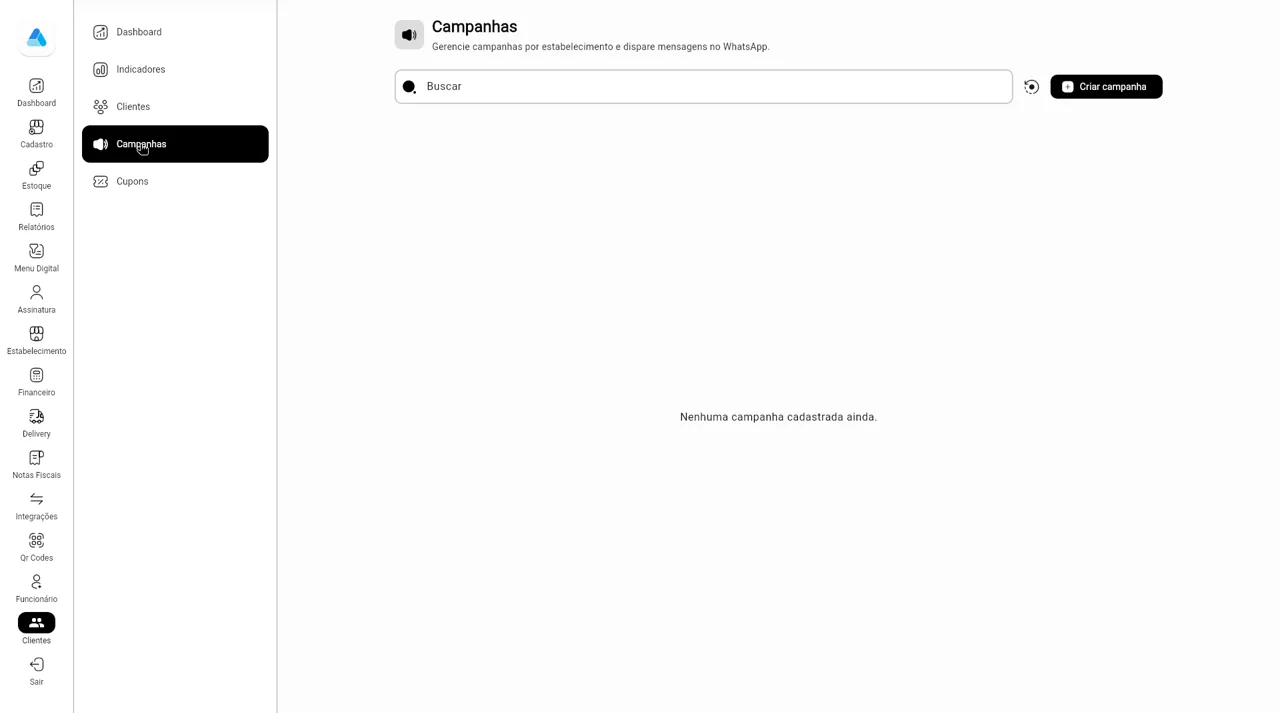
- In Campanhas, click Criar campanha, choose audience, offer and message, and send it on WhatsApp (now, scheduled or recurring).
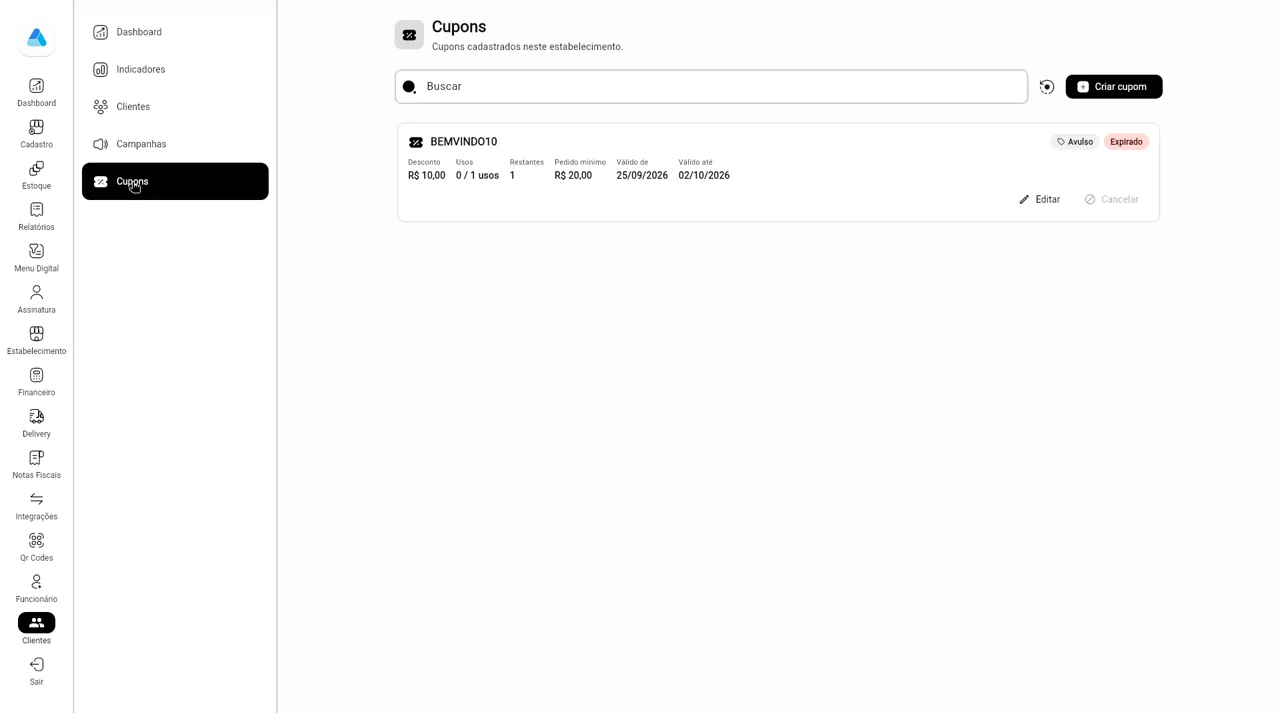
- In Cupons, click Criar cupom with discount, uses, minimum order and validity. Editar and Cancelar are on the card.
Screens
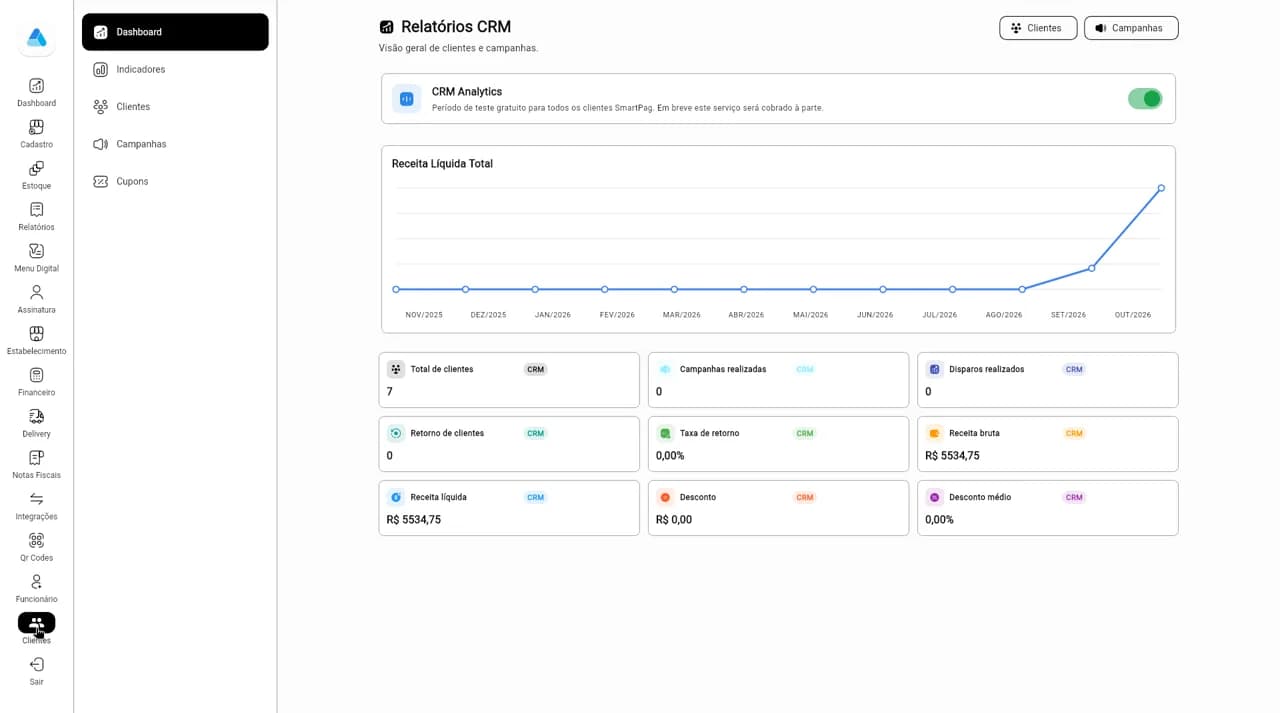
Step 1CRM reports: CRM Analytics, total net revenue and customer and campaign metrics. 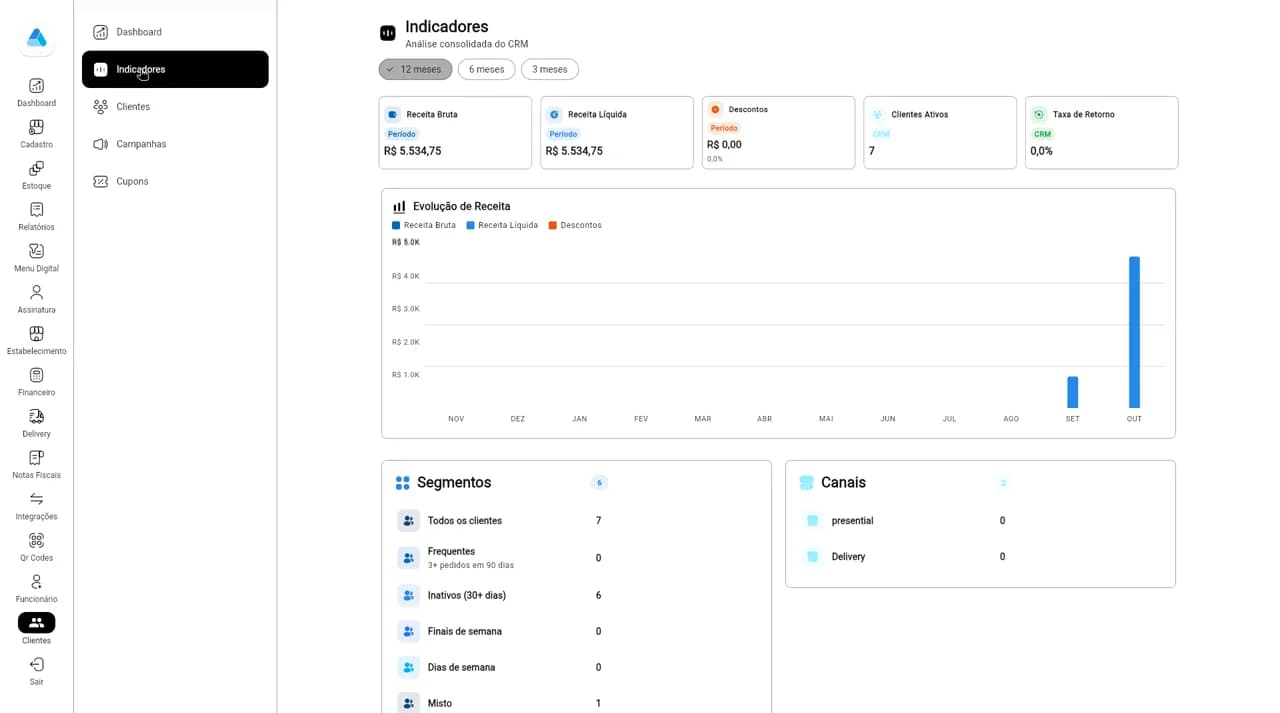
Step 2Indicators: revenue, discounts, active customers, revenue trend, segments and channels. 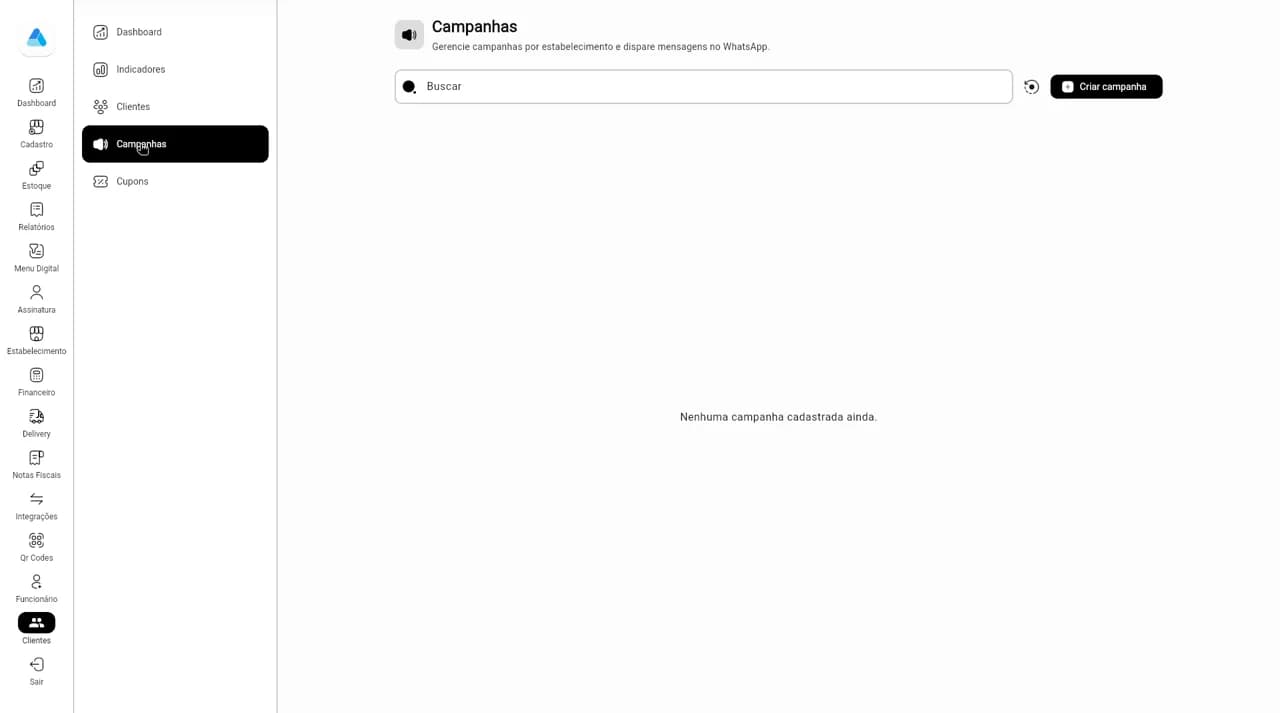
Step 3Campaigns: search and Criar campanha to send on WhatsApp. 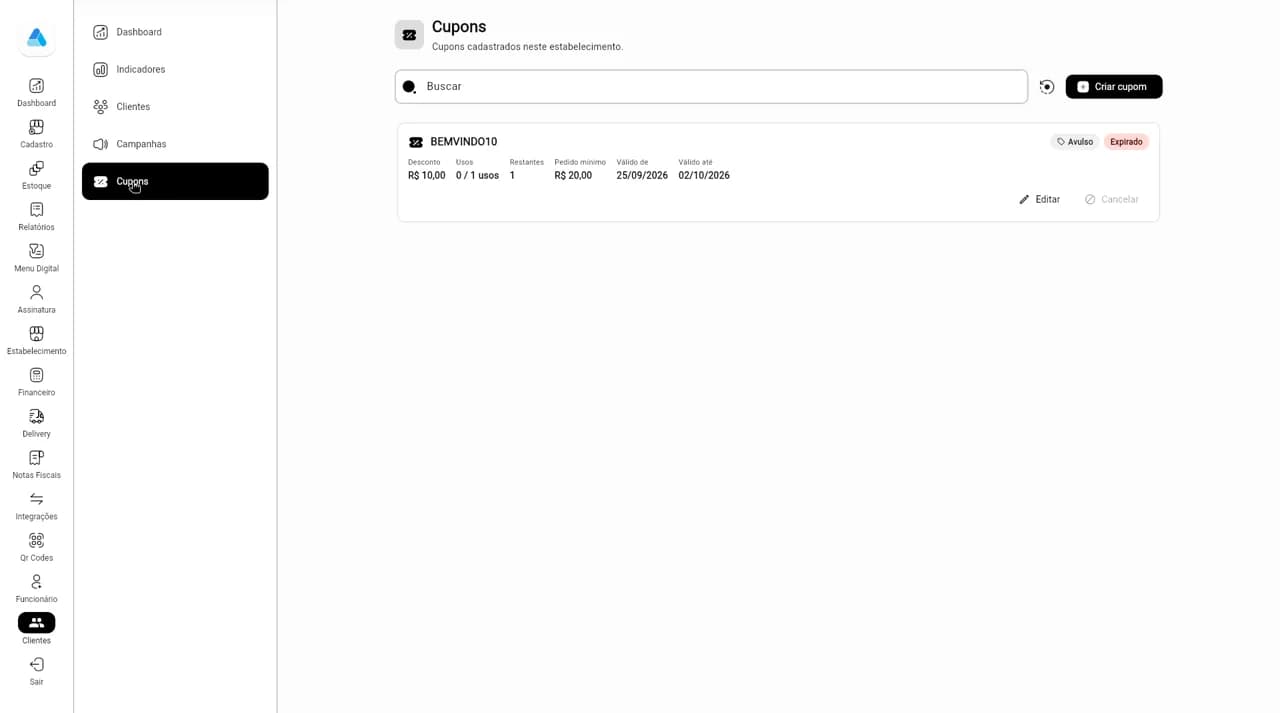
Step 4Coupons: discount, uses, minimum order, validity, Editar and Cancelar.